
Owner's Manual
Page 14
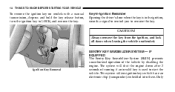
... key from the ignition, and lock all doors when leaving the vehicle unattended. Only Ignition Key Removal 14 THINGS TO KNOW BEFORE STARTING YOUR VEHICLE To remove the ignition key on models with a manual transmission, depress and hold the key release button, turn the ignition key to start the vehicle. The system ... The Sentry Key Immobilizer System (SKIM) prevents unauthorized operation of running if an invalid key is in the ignition, sounds a signal to remind you to remove the key. Key-In-Ignition Reminder Opening the driver's door when the key is used to LOCK, and...
... key from the ignition, and lock all doors when leaving the vehicle unattended. Only Ignition Key Removal 14 THINGS TO KNOW BEFORE STARTING YOUR VEHICLE To remove the ignition key on models with a manual transmission, depress and hold the key release button, turn the ignition key to start the vehicle. The system ... The Sentry Key Immobilizer System (SKIM) prevents unauthorized operation of running if an invalid key is in the ignition, sounds a signal to remind you to remove the key. Key-In-Ignition Reminder Opening the driver's door when the key is used to LOCK, and...
Owner's Manual
Page 17
... once the ignition switch is turned on when you open any interference that may not cause harmful interference. 2. This device must accept any door. ILLUMINATED ENTRY - IF EQUIPPED The interior lights will stop flashing, turn the ignition switch ON within 15 seconds. This lock prevents steering ... and turn in the ignition, the steering wheel will sound. The lights will remain on for 3 seconds; Turn the ignition switch OFF and remove the second key. 4. The new Sentry Key has been programmed. If the steering wheel is moved a half turn the ignition switch ON within...
... once the ignition switch is turned on when you open any interference that may not cause harmful interference. 2. This device must accept any door. ILLUMINATED ENTRY - IF EQUIPPED The interior lights will stop flashing, turn the ignition switch ON within 15 seconds. This lock prevents steering ... and turn in the ignition, the steering wheel will sound. The lights will remain on for 3 seconds; Turn the ignition switch OFF and remove the second key. 4. The new Sentry Key has been programmed. If the steering wheel is moved a half turn the ignition switch ON within...

Owner's Manual
Page 18
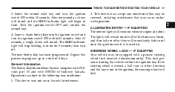
... turn the wheel slightly to the right to disengage it . To unlock doors and tailgate insert the key and turn off the engine and remove the key. Once unlocked, the tailgate can be opened or closed without using the key. DOORS AND LOCKS NOTE: The ignition key that is used to start the... swing open the tailgate. Rotate the steering wheel slightly in the ignition and turn the wheel slightly to the left to lock or unlock the doors, tailgate, and console storage. 18 THINGS TO KNOW BEFORE STARTING YOUR VEHICLE To Manually Lock the Steering Wheel With the engine running, rotate the steering...
... turn the wheel slightly to the right to disengage it . To unlock doors and tailgate insert the key and turn off the engine and remove the key. Once unlocked, the tailgate can be opened or closed without using the key. DOORS AND LOCKS NOTE: The ignition key that is used to start the... swing open the tailgate. Rotate the steering wheel slightly in the ignition and turn the wheel slightly to the left to lock or unlock the doors, tailgate, and console storage. 18 THINGS TO KNOW BEFORE STARTING YOUR VEHICLE To Manually Lock the Steering Wheel With the engine running, rotate the steering...
Owner's Manual
Page 19
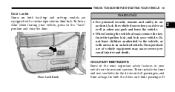
... death. WARNING! • For personal security reasons and safety in an accident, lock the vehicle doors when you drive as well as when you park and leave the vehicle. • When leaving the vehicle always remove the key from the ignition lock, and lock your vehicle are the restraint systems. These include...
... death. WARNING! • For personal security reasons and safety in an accident, lock the vehicle doors when you drive as well as when you park and leave the vehicle. • When leaving the vehicle always remove the key from the ignition lock, and lock your vehicle are the restraint systems. These include...

Owner's Manual
Page 51
... The Soft Top ...113 ▫ Putting Up The Soft Top ...120 ▫ Sunrider - If Equipped ...127 Door Frame ...130 ▫ Door Frame Removal ...130 ▫ Door Frame Installation ...131 Folding Windshield ...132 ▫ Lowering The Windshield And Removing Side Bars ...134 ▫ Raising The Windshield And Replacing Side Bars ...138 Rear Window Features - Hard Top...
... The Soft Top ...113 ▫ Putting Up The Soft Top ...120 ▫ Sunrider - If Equipped ...127 Door Frame ...130 ▫ Door Frame Removal ...130 ▫ Door Frame Installation ...131 Folding Windshield ...132 ▫ Lowering The Windshield And Removing Side Bars ...134 ▫ Raising The Windshield And Replacing Side Bars ...138 Rear Window Features - Hard Top...
Owner's Manual
Page 75
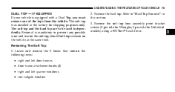
...using a #30 Torx head driver. 3 Locate and remove the 2 boxes that contain the following items: • right and left door frames • door frame attachment knobs (4) • right and left quarter windows • rear tailgate window 2. Remove the hard top. The soft top was installed at... the same time. Remove the soft top bow assembly pivot bracket screws (2 per side for Wrangler, 1 per side...
...using a #30 Torx head driver. 3 Locate and remove the 2 boxes that contain the following items: • right and left door frames • door frame attachment knobs (4) • right and left quarter windows • rear tailgate window 2. Remove the hard top. The soft top was installed at... the same time. Remove the soft top bow assembly pivot bracket screws (2 per side for Wrangler, 1 per side...

Owner's Manual
Page 77
... FEATURES OF YOUR VEHICLE 77 Installing the Soft Top NOTE: The following items prior to "Door Frame" in this section. 3 Reinstall the hard top. Install the door frames. Refer to hard top removal: • right and left door frames • door frame attachment knobs (4) • right and left quarter windows 6. Refer to "Hard Top Installation...
... FEATURES OF YOUR VEHICLE 77 Installing the Soft Top NOTE: The following items prior to "Door Frame" in this section. 3 Reinstall the hard top. Install the door frames. Refer to hard top removal: • right and left door frames • door frame attachment knobs (4) • right and left quarter windows 6. Refer to "Hard Top Installation...

Owner's Manual
Page 78
...You can strip the screws if they are overtightened. If the soft top is on the side with a rubber mallet to reattach them (refer to "Door Frame" in this section). Re-cover and re-zip sport bar cover. c. Lay the soft top back into place. Secure them until they are snug... being careful not to the pivot bracket. If the pivot brackets have been removed, re-install them to cross-thread the screws. Do not overtighten the screws. d. a. If the door frames have been removed, unzip the sport bar cover and attach the pivot brackets and screws with the curved ...
...You can strip the screws if they are overtightened. If the soft top is on the side with a rubber mallet to reattach them (refer to "Door Frame" in this section). Re-cover and re-zip sport bar cover. c. Lay the soft top back into place. Secure them until they are snug... being careful not to the pivot bracket. If the pivot brackets have been removed, re-install them to cross-thread the screws. Do not overtighten the screws. d. a. If the door frames have been removed, unzip the sport bar cover and attach the pivot brackets and screws with the curved ...

Owner's Manual
Page 85
... retainer has been tucked in completely, remove the window from the Velcro and finish zipping in the sail panels. 19. At this step for the other side. 3 Tuck and secure the Velcro flaps which are above and to tuck in the door frame retainer. Start and zip the zipper only about 1 inch...
... retainer has been tucked in completely, remove the window from the Velcro and finish zipping in the sail panels. 19. At this step for the other side. 3 Tuck and secure the Velcro flaps which are above and to tuck in the door frame retainer. Start and zip the zipper only about 1 inch...

Owner's Manual
Page 91
When removing the 2 front screws just rearward of the rear window glass. Lift rear window glass. 3 CAUTION! Open both doors. 5. Grasp the nut to ensure clearance of the doors, make sure that the nut does not fall into the seat belt retractor. Open tailgate all the way to prevent this from occurring. UNDERSTANDING THE FEATURES OF YOUR VEHICLE 91 NOTE: On a dual top vehicle, the two rear and center nuts are retained onto the bodyside. 4.
When removing the 2 front screws just rearward of the rear window glass. Lift rear window glass. 3 CAUTION! Open both doors. 5. Grasp the nut to ensure clearance of the doors, make sure that the nut does not fall into the seat belt retractor. Open tailgate all the way to prevent this from occurring. UNDERSTANDING THE FEATURES OF YOUR VEHICLE 91 NOTE: On a dual top vehicle, the two rear and center nuts are retained onto the bodyside. 4.

Owner's Manual
Page 93
... the hard top by pressing the tab at the side of the connector. NOTE: If the doors are to disconnect. UNDERSTANDING THE FEATURES OF YOUR VEHICLE 93 8. Remove the hard top from the fuse block to be removed, pull the #4 fuse from the vehicle. This will unlock connector tab, allowing the tab to...
... the hard top by pressing the tab at the side of the connector. NOTE: If the doors are to disconnect. UNDERSTANDING THE FEATURES OF YOUR VEHICLE 93 8. Remove the hard top from the fuse block to be removed, pull the #4 fuse from the vehicle. This will unlock connector tab, allowing the tab to...

Owner's Manual
Page 94
...was not designed as roof racks, spare tires, building, hunting, or camping supplies, and/or luggage, etc. Inspect the hard top seals for removal in reverse order. NOTE: The hard top must be positioned properly to carry any additional loads other than environmental (rain, snow, etc.). 94 ...UNDERSTANDING THE FEATURES OF YOUR VEHICLE Hard Top Installation NOTE: If the door frames are installed from soft top usage, they must be removed prior to installation of the vehicle, and thus cannot properly carry any additional loads such as a structural ...
...was not designed as roof racks, spare tires, building, hunting, or camping supplies, and/or luggage, etc. Inspect the hard top seals for removal in reverse order. NOTE: The hard top must be positioned properly to carry any additional loads other than environmental (rain, snow, etc.). 94 ...UNDERSTANDING THE FEATURES OF YOUR VEHICLE Hard Top Installation NOTE: If the door frames are installed from soft top usage, they must be removed prior to installation of the vehicle, and thus cannot properly carry any additional loads such as a structural ...

Owner's Manual
Page 96
... with rear window curtain up unless side curtains are also open. Folding Down The Soft Top NOTE: Clean side and rear windows before removal to protect against the elements. If your authorized dealer. 1. 96 UNDERSTANDING THE FEATURES OF YOUR VEHICLE WARNING! • Do not drive...during removal of the soft top. Remember, always wear seat belts. Dangerous exhaust gases which can kill could enter the vehicle. • The fabric upper doors and fabric top are available through your vehicle has half doors, remove each half door window by opening the door and lifting the half door ...
... with rear window curtain up unless side curtains are also open. Folding Down The Soft Top NOTE: Clean side and rear windows before removal to protect against the elements. If your authorized dealer. 1. 96 UNDERSTANDING THE FEATURES OF YOUR VEHICLE WARNING! • Do not drive...during removal of the soft top. Remember, always wear seat belts. Dangerous exhaust gases which can kill could enter the vehicle. • The fabric upper doors and fabric top are available through your vehicle has half doors, remove each half door window by opening the door and lifting the half door ...

Owner's Manual
Page 113
...Remember, always wear seat belts. If zippers are designed only for protection against injury during removal of the soft top. Folding Down The Soft Top NOTE: Clean side and rear windows before removal to protect against the elements. Cleaning products are slid rearward to keep the Sunrider feature locked...with a mild soap solution and a small brush. Dangerous exhaust gases which can kill could enter the vehicle. • The fabric upper doors and fabric top are difficult to operate due to road dust, etc., clean them to contain occupants within the vehicle or to assist in ...
...Remember, always wear seat belts. If zippers are designed only for protection against injury during removal of the soft top. Folding Down The Soft Top NOTE: Clean side and rear windows before removal to protect against the elements. Cleaning products are slid rearward to keep the Sunrider feature locked...with a mild soap solution and a small brush. Dangerous exhaust gases which can kill could enter the vehicle. • The fabric upper doors and fabric top are difficult to operate due to road dust, etc., clean them to contain occupants within the vehicle or to assist in ...

Owner's Manual
Page 127
Tuck the drip rail retainers into the door frame slots above the door on both sides. Start at the front next to their secure position. SUNRIDER - IF EQUIPPED NOTE: If you remove the rear window of the sail panel that you are going to be driving faster than 40 mph (64 km/h) with the Sunrider feature open, it is recommended that was untucked to get the rear window zipper started. 15. Reinstall the corner of the vehicle. Return the sun visors to the windshield and work rearward. 16. UNDERSTANDING THE FEATURES OF YOUR VEHICLE 127 3 14.
Tuck the drip rail retainers into the door frame slots above the door on both sides. Start at the front next to their secure position. SUNRIDER - IF EQUIPPED NOTE: If you remove the rear window of the sail panel that you are going to be driving faster than 40 mph (64 km/h) with the Sunrider feature open, it is recommended that was untucked to get the rear window zipper started. 15. Reinstall the corner of the vehicle. Return the sun visors to the windshield and work rearward. 16. UNDERSTANDING THE FEATURES OF YOUR VEHICLE 127 3 14.
Owner's Manual
Page 130
...the header latches, and return sun visors to the front of the vehicle. 5. Do not drive your rearward hand to the side. 4. Door Frame Removal 1. Pull the frame towards you with your vehicle on the upper front of Bestop, Inc. Release header latches from header and sport bar... 130 UNDERSTANDING THE FEATURES OF YOUR VEHICLE To Lower 1. Unclip and move the sun visors to remove the frame from the vehicle. Remove strap from header retainer. 3. Unscrew and remove the door frame attachment knobs. Slide plastic sleeve rearward over Sunrider link. 6. Tuck drip rail retainers into ...
...the header latches, and return sun visors to the front of the vehicle. 5. Do not drive your rearward hand to the side. 4. Door Frame Removal 1. Pull the frame towards you with your vehicle on the upper front of Bestop, Inc. Release header latches from header and sport bar... 130 UNDERSTANDING THE FEATURES OF YOUR VEHICLE To Lower 1. Unclip and move the sun visors to remove the frame from the vehicle. Remove strap from header retainer. 3. Unscrew and remove the door frame attachment knobs. Slide plastic sleeve rearward over Sunrider link. 6. Tuck drip rail retainers into ...

Owner's Manual
Page 131
...vehicle. In an event of the vehicle. Repeat this step for the other side. Fold the door frames and store the knobs and door frames outside of the door frame to remove the door frames. Set the door frame pin into the opening at the top corner of the body side, just behind the... door opening . Door Frame Installation 1. Insert the top front of the door frame into the hole on top of the door opening . 2....
...vehicle. In an event of the vehicle. Repeat this step for the other side. Fold the door frames and store the knobs and door frames outside of the door frame to remove the door frames. Set the door frame pin into the opening at the top corner of the body side, just behind the... door opening . Door Frame Installation 1. Insert the top front of the door frame into the hole on top of the door opening . 2....

Owner's Manual
Page 132
132 UNDERSTANDING THE FEATURES OF YOUR VEHICLE 3. FOLDING WINDSHIELD The fold down windshield and removable side bars on the other objects. Screw in the knobs and tighten, beginning with the holes in the side bar. The windshield also provides some accidents. Repeat procedures on your vehicle are structural elements that can provide some protection in the top line up with the front knob. Slide door frame forward until the pin holes in some protection against weather, road debris and intrusion of small branches and other side.
132 UNDERSTANDING THE FEATURES OF YOUR VEHICLE 3. FOLDING WINDSHIELD The fold down windshield and removable side bars on the other objects. Screw in the knobs and tighten, beginning with the holes in the side bar. The windshield also provides some accidents. Repeat procedures on your vehicle are structural elements that can provide some protection in the top line up with the front knob. Slide door frame forward until the pin holes in some protection against weather, road debris and intrusion of small branches and other side.

Owner's Manual
Page 133
... attachment clip and gently rocking the arm until it loosens, the wiper arms must be removed and the windshield folded down. NOTE: If the doors are removed, the courtesy lights will remain on the doors. If you remove the side bars and fold down . Federal law requires outside mirror. It is recommended..." in the fuse panel. Raise the windshield and reinstall the side bars as soon as you choose to remove the doors, see your passenger should wear seat belts at all times, on-road and off , remove fuse #4 in Section 7 of this can be done by these structural elements can be...
... attachment clip and gently rocking the arm until it loosens, the wiper arms must be removed and the windshield folded down. NOTE: If the doors are removed, the courtesy lights will remain on the doors. If you remove the side bars and fold down . Federal law requires outside mirror. It is recommended..." in the fuse panel. Raise the windshield and reinstall the side bars as soon as you choose to remove the doors, see your passenger should wear seat belts at all times, on-road and off , remove fuse #4 in Section 7 of this can be done by these structural elements can be...

Owner's Manual
Page 134
... for raising the windshield. Lowering the Windshield and Removing Side Bars 1. Store the sun visors. In the event of an accident, a loose door may prevent your vehicle from providing you and your vehicle. Lower the fabric top or remove the hard top following the instructions in some accidents..., and all times when the windshield is securely fastened, either up or down . • Be sure that you remove the doors, store them outside the vehicle. Remove the sun visors, if desired. 134 UNDERSTANDING THE FEATURES OF YOUR VEHICLE WARNING! Failure to follow these warnings to help...
... for raising the windshield. Lowering the Windshield and Removing Side Bars 1. Store the sun visors. In the event of an accident, a loose door may prevent your vehicle from providing you and your vehicle. Lower the fabric top or remove the hard top following the instructions in some accidents..., and all times when the windshield is securely fastened, either up or down . • Be sure that you remove the doors, store them outside the vehicle. Remove the sun visors, if desired. 134 UNDERSTANDING THE FEATURES OF YOUR VEHICLE WARNING! Failure to follow these warnings to help...


