
Owner's Manual
Page 148
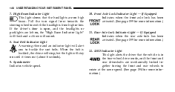
... chime will sound. 8. Pull the turn signal lever towards the steering wheel to buckle the seat belts. Rear Axle Lock Indicator Light - If Equipped Indicates when the rear axle lock has been activated. (See page 199 for more information.) 12. 4WD Indicator Light This light alerts the ...vehicle speed. 10. Seat Belt Indicator Light A warning chime and an indicator light will stay on high beam. Front Axle Lock Indicator Light - If Equipped Indicates when the front axle lock has been activated. (See page 199 for more information.) 11. 148 UNDERSTANDING YOUR INSTRUMENT PANEL 7. High Beam...
... chime will sound. 8. Pull the turn signal lever towards the steering wheel to buckle the seat belts. Rear Axle Lock Indicator Light - If Equipped Indicates when the rear axle lock has been activated. (See page 199 for more information.) 12. 4WD Indicator Light This light alerts the ...vehicle speed. 10. Seat Belt Indicator Light A warning chime and an indicator light will stay on high beam. Front Axle Lock Indicator Light - If Equipped Indicates when the front axle lock has been activated. (See page 199 for more information.) 11. 148 UNDERSTANDING YOUR INSTRUMENT PANEL 7. High Beam...
Owner's Manual
Page 179
...™ Or Rock-Trac™) - If Equipped ...194 ▫ Operating Instructions/Precautions ...195 ▫ Shift Positions ...196 ▫ Shifting Procedure ...197 Trac-Lok™ Rear Axle ...198 5
...™ Or Rock-Trac™) - If Equipped ...194 ▫ Operating Instructions/Precautions ...195 ▫ Shift Positions ...196 ▫ Shifting Procedure ...197 Trac-Lok™ Rear Axle ...198 5
Owner's Manual
Page 180
180 STARTING AND OPERATING Axle Lock (Tru-Lok™) - If Equipped ...199 Parking Brake ...200 About Your Brakes ...203 Anti-Lock Brake System - If Equipped ...205 Power Steering ...207 On-...
180 STARTING AND OPERATING Axle Lock (Tru-Lok™) - If Equipped ...199 Parking Brake ...200 About Your Brakes ...203 Anti-Lock Brake System - If Equipped ...205 Power Steering ...207 On-...
Owner's Manual
Page 198
... could have an injury accident. Make shift to occur. The preferred method is especially helpful during slippery driving conditions. TRAC-LOK™ REAR AXLE The Trac-Lok™ rear axle provides a constant driving force to the mating teeth not being properly aligned. If traction differs between the two rear wheels, the differential...
... could have an injury accident. Make shift to occur. The preferred method is especially helpful during slippery driving conditions. TRAC-LOK™ REAR AXLE The Trac-Lok™ rear axle provides a constant driving force to the mating teeth not being properly aligned. If traction differs between the two rear wheels, the differential...

Owner's Manual
Page 199
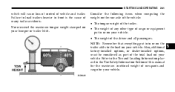
... conditions are met: • Key in ignition, vehicle in 4L (Low) range. The vehicle may be necessary to lose control of your vehicle. 5 Axle Lock Switch This feature will supply maximum traction. On vehicles equipped with a limited-slip differential, never run the engine with only one rear wheel off... the ground. When starting with one rear wheel on the ground and cause you to gain maximum traction. AXLE LOCK (TRU-LOK™) - IF EQUIPPED The Axle Lock switch is located on the lower center of the parking brake may drive through the rear wheel remaining on an...
... conditions are met: • Key in ignition, vehicle in 4L (Low) range. The vehicle may be necessary to lose control of your vehicle. 5 Axle Lock Switch This feature will supply maximum traction. On vehicles equipped with a limited-slip differential, never run the engine with only one rear wheel off... the ground. When starting with one rear wheel on the ground and cause you to gain maximum traction. AXLE LOCK (TRU-LOK™) - IF EQUIPPED The Axle Lock switch is located on the lower center of the parking brake may drive through the rear wheel remaining on an...
Owner's Manual
Page 200
... the ignition ON, the BRAKE warning light in the instrument cluster will illuminate). To activate the system, press the switch once to lock the rear axle only (the REAR LOCK indicator light will illuminate), press the switch again to flash at a different rate if the key is in the locked position... (16 km/h) or less. PARKING BRAKE To set the parking brake, pull the lever up as firmly as possible. Once the rear axle is locked, pressing the switch again will flash until the axles are still in motion, the BRAKE warning light will flash and a chime will disengage if vehicle is applied.
... the ignition ON, the BRAKE warning light in the instrument cluster will illuminate). To activate the system, press the switch once to lock the rear axle only (the REAR LOCK indicator light will illuminate), press the switch again to flash at a different rate if the key is in the locked position... (16 km/h) or less. PARKING BRAKE To set the parking brake, pull the lever up as firmly as possible. Once the rear axle is locked, pressing the switch again will flash until the axles are still in motion, the BRAKE warning light will flash and a chime will disengage if vehicle is applied.

Owner's Manual
Page 204
...braking ability, and control. To avoid loss of control. Too much cargo as much weight or improperly placed weight over or behind the rear axle can cause brake fade with loss of gravity and vehicle handling. Under such conditions, engage 4-wheel drive. Be especially careful while driving on ... build up , which could cause rear wheels to sway. • Do not pile luggage or cargo higher than the top of the rear axle. On fabric top models, do not drive with the rear window curtain up . When descending mountains or hills, repeated braking can cause the ...
...braking ability, and control. To avoid loss of control. Too much cargo as much weight or improperly placed weight over or behind the rear axle can cause brake fade with loss of gravity and vehicle handling. Under such conditions, engage 4-wheel drive. Be especially careful while driving on ... build up , which could cause rear wheels to sway. • Do not pile luggage or cargo higher than the top of the rear axle. On fabric top models, do not drive with the rear window curtain up . When descending mountains or hills, repeated braking can cause the ...
Owner's Manual
Page 210
... flowing water avoid depths in this section. Refer to "Four-Wheel Drive Operation" in excess of your vehicle fluids and lubricants (engine oil, transmission oil, axle, transfer case) to assure the fluids have not been contaminated. Determine exit point(s) that are downstream of 9 inches. Maintenance After driving through deep water, inspect...
... flowing water avoid depths in this section. Refer to "Four-Wheel Drive Operation" in excess of your vehicle fluids and lubricants (engine oil, transmission oil, axle, transfer case) to assure the fluids have not been contaminated. Determine exit point(s) that are downstream of 9 inches. Maintenance After driving through deep water, inspect...

Owner's Manual
Page 212
...Check threaded fasteners for damage. Abrasive material in mud, sand, water, or similar dirty conditions, have brake rotors, wheels, brake linings, and axle yokes inspected and cleaned as soon as necessary. • If you have full braking power when you need it to check for looseness, particularly ... driving in the Service Manual. • Check for impacted material. Retighten them, if required, and torque to fuel lines, brake hoses, axle pinion seals, and propeller shafts. • After extended operation in any problems taken care of right away and have your vehicle ready when ...
...Check threaded fasteners for damage. Abrasive material in mud, sand, water, or similar dirty conditions, have brake rotors, wheels, brake linings, and axle yokes inspected and cleaned as soon as necessary. • If you have full braking power when you need it to check for looseness, particularly ... driving in the Service Manual. • Check for impacted material. Retighten them, if required, and torque to fuel lines, brake hoses, axle pinion seals, and propeller shafts. • After extended operation in any problems taken care of right away and have your vehicle ready when ...

Owner's Manual
Page 218
NOTE: Under a maximum loaded vehicle condition, gross axle weight ratings (GAWR's) for the front and rear axles must not exceed the load carrying capacity of the tire on your vehicle. Steps for the front, rear and spare tires. 218 STARTING AND OPERATING 3) ...
NOTE: Under a maximum loaded vehicle condition, gross axle weight ratings (GAWR's) for the front and rear axles must not exceed the load carrying capacity of the tire on your vehicle. Steps for the front, rear and spare tires. 218 STARTING AND OPERATING 3) ...
Owner's Manual
Page 228
... OPERATING Tires may also cause the vehicle to guard against damage and excessive tire and chain wear: • Use chains on the front and rear axles of vehicles operate at unequal rates, and develop irregular wear patterns.
... OPERATING Tires may also cause the vehicle to guard against damage and excessive tire and chain wear: • Use chains on the front and rear axles of vehicles operate at unequal rates, and develop irregular wear patterns.
Owner's Manual
Page 237
... kg) allowance for operation condition. Tongue Weight (TW) The downward force exerted on a vehicle scale. Gross Axle Weight Rating (GAWR) The GAWR is the maximum capacity of the vehicle and have an accident. The entire weight...presence of the trailer load. Distribute the load over the front and rear axles evenly. In most cases it should not be supported by the trailer. You could lose control of... the front and rear axles. STARTING AND OPERATING 237 Gross Trailer Weight (GTW) The gross trailer weight (GTW) is ...
... kg) allowance for operation condition. Tongue Weight (TW) The downward force exerted on a vehicle scale. Gross Axle Weight Rating (GAWR) The GAWR is the maximum capacity of the vehicle and have an accident. The entire weight...presence of the trailer load. Distribute the load over the front and rear axles evenly. In most cases it should not be supported by the trailer. You could lose control of... the front and rear axles. STARTING AND OPERATING 237 Gross Trailer Weight (GTW) The gross trailer weight (GTW) is ...
Owner's Manual
Page 241
Consider the following items when computing the weight on the rear axle of the vehicle: • The tongue weight of the trailer. • The weight of any other type of cargo or equipment put into or on ...
Consider the following items when computing the weight on the rear axle of the vehicle: • The tongue weight of the trailer. • The weight of any other type of cargo or equipment put into or on ...
Owner's Manual
Page 242
... first 500 miles (805 km) of trailer towing, limit your new vehicle drivetrain components the following guidelines are recommended: NOTE: Trailer towing requires special rear axle lubricant. 242 STARTING AND OPERATING Towing Requirements To promote proper break-in of control, poor performance or damage to brakes...
... first 500 miles (805 km) of trailer towing, limit your new vehicle drivetrain components the following guidelines are recommended: NOTE: Trailer towing requires special rear axle lubricant. 242 STARTING AND OPERATING Towing Requirements To promote proper break-in of control, poor performance or damage to brakes...

Owner's Manual
Page 257
... lowered. 8. It could slip off the jack, do not tighten the nuts fully until the tire just clears the surface Place the jack under the axle tube, as shown. Lower the vehicle by turning the jack screw to the left, and remove the jack and wheel blocks. 6 Jacking Locations 5. Do not...
... lowered. 8. It could slip off the jack, do not tighten the nuts fully until the tire just clears the surface Place the jack under the axle tube, as shown. Lower the vehicle by turning the jack screw to the left, and remove the jack and wheel blocks. 6 Jacking Locations 5. Do not...
Owner's Manual
Page 264
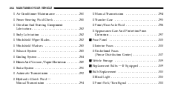
...; Brake System ...290 ▫ Automatic Transmission ...292 ▫ Hydraulic Clutch Fluid - Manual Transmission ...294 ▫ Manual Transmission ...294 ▫ Transfer Case ...295 ▫ Front/Rear Axle Fluid ...296 ▫ Appearance Care And Protection From Corrosion ...297 Fuse Panel ...305 ▫ Interior Fuses ...305 ▫ Underhood Fuses (Power Distribution Center) ...307 Vehicle...
...; Brake System ...290 ▫ Automatic Transmission ...292 ▫ Hydraulic Clutch Fluid - Manual Transmission ...294 ▫ Manual Transmission ...294 ▫ Transfer Case ...295 ▫ Front/Rear Axle Fluid ...296 ▫ Appearance Care And Protection From Corrosion ...297 Fuse Panel ...305 ▫ Interior Fuses ...305 ▫ Underhood Fuses (Power Distribution Center) ...307 Vehicle...
Owner's Manual
Page 296
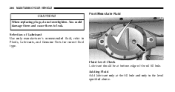
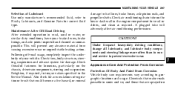
296 MAINTAINING YOUR VEHICLE CAUTION! You could damage them and cause them to the level specified above. Adding Fluid Add lubricant only at bottom edge of Lubricant Use only manufacturer's recommended fluid, refer to Fluids, Lubricants, and Genuine Parts for correct fluid type. Selection of the oil fill hole. When replacing plugs, do not overtighten. Front/Rear Axle Fluid Fluid Level Check Lubricant should be at the fill hole and only to leak.
296 MAINTAINING YOUR VEHICLE CAUTION! You could damage them and cause them to the level specified above. Adding Fluid Add lubricant only at bottom edge of Lubricant Use only manufacturer's recommended fluid, refer to Fluids, Lubricants, and Genuine Parts for correct fluid type. Selection of the oil fill hole. When replacing plugs, do not overtighten. Front/Rear Axle Fluid Fluid Level Check Lubricant should be at the fill hole and only to leak.
Owner's Manual
Page 297
...will adversely affect air conditioning performance. Following off-road usage, completely inspect the underbody of your brake drums, brake linings, and axle joints inspected and cleaned as soon as required. Check threaded fasteners for damage. Under frequent heavy-duty driving conditions, change all ...values specified in snow and ice, and those that could become a fire hazard, or conceal damage to fuel lines, brake hoses, axle pinion seals, and propeller shafts. Retighten, if required, to geographic locations and usage. A plugged tube will prevent any abrasive material ...
...will adversely affect air conditioning performance. Following off-road usage, completely inspect the underbody of your brake drums, brake linings, and axle joints inspected and cleaned as soon as required. Check threaded fasteners for damage. Under frequent heavy-duty driving conditions, change all ...values specified in snow and ice, and those that could become a fire hazard, or conceal damage to fuel lines, brake hoses, axle pinion seals, and propeller shafts. Retighten, if required, to geographic locations and usage. A plugged tube will prevent any abrasive material ...
Owner's Manual
Page 316
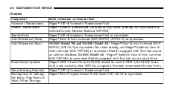
...Model 44) - Brake Master Cylinder Power Steering Reservoir Steering Gear & Linkage, Ball Joints, Prop Shafts & Yokes, Wheel Bearings Mopar Gear & Axle Lubricant (SAE 80W-90) (API GL-5) or equivalent. 194 RBI (Model 35) and 216 RBI (Model 44) - 316 MAINTAINING YOUR ...VEHICLE Chassis Component Automatic Transmission Manual Transmission Transfer Case Axle Differential (Front) Axle Differential (Rear) Fluid, Lubricant, or Genuine Part Mopar ATF+4 Automatic Transmission Fluid Mopar Manual Transmission Lubricant or equivalent (meeting...
...Model 44) - Brake Master Cylinder Power Steering Reservoir Steering Gear & Linkage, Ball Joints, Prop Shafts & Yokes, Wheel Bearings Mopar Gear & Axle Lubricant (SAE 80W-90) (API GL-5) or equivalent. 194 RBI (Model 35) and 216 RBI (Model 44) - 316 MAINTAINING YOUR ...VEHICLE Chassis Component Automatic Transmission Manual Transmission Transfer Case Axle Differential (Front) Axle Differential (Rear) Fluid, Lubricant, or Genuine Part Mopar ATF+4 Automatic Transmission Fluid Mopar Manual Transmission Lubricant or equivalent (meeting...
Owner's Manual
Page 322
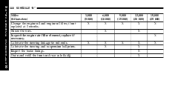
Drain and refill the front and rear axle fluid‡ 8 N C Rotate the tires. Lubricate the steering and suspension ball joints. E Inspect the engine air filter element, replace if S C H E D U L E S 3,000 (5 000) X 6,000 (10 000) X X 9,000 (15 000) X 12,000 (20 000) X X 15,000 (25 000) X X X X X X X X X X X necessary. Lubricate the steering linkage tie rod ends. Inspect the brake linings. M 322 SCHEDULE "B" A I N Miles T (Kilometers) E N Change the engine oil and engine oil filter, if not A replaced at 3 months.
Drain and refill the front and rear axle fluid‡ 8 N C Rotate the tires. Lubricate the steering and suspension ball joints. E Inspect the engine air filter element, replace if S C H E D U L E S 3,000 (5 000) X 6,000 (10 000) X X 9,000 (15 000) X 12,000 (20 000) X X 15,000 (25 000) X X X X X X X X X X X necessary. Lubricate the steering linkage tie rod ends. Inspect the brake linings. M 322 SCHEDULE "B" A I N Miles T (Kilometers) E N Change the engine oil and engine oil filter, if not A replaced at 3 months.

