

Owner Manual
Page 281
... the sidewall preceding the size designation. Example: LT235/85R16. • Temporary Spare tires are molded into the sidewall preceding the size designation. design standards and begins with the tire diameter molded into the sidewall beginning with the section width. design standards. P-Metric tires have the letter "T" molded into the sidewall preceding the size designation...
... the sidewall preceding the size designation. Example: LT235/85R16. • Temporary Spare tires are molded into the sidewall preceding the size designation. design standards and begins with the tire diameter molded into the sidewall beginning with the section width. design standards. P-Metric tires have the letter "T" molded into the sidewall preceding the size designation...

Owner Manual
Page 282
design standards ؆...blank...؆ = Passenger car tire based on European design standards LT = Light Truck tire based on U.S. 282 STARTING AND OPERATING Tire Sizing Chart EXAMPLE: Size Designation: P = Passenger car tire size based on U.S. design standards T = Temporary Spare tire 31 = Overall Diameter in Inches (in) 215 = Section Width in Millimeters (mm) 65 = Aspect Ratio in Percent...
design standards ؆...blank...؆ = Passenger car tire based on European design standards LT = Light Truck tire based on U.S. 282 STARTING AND OPERATING Tire Sizing Chart EXAMPLE: Size Designation: P = Passenger car tire size based on U.S. design standards T = Temporary Spare tire 31 = Overall Diameter in Inches (in) 215 = Section Width in Millimeters (mm) 65 = Aspect Ratio in Percent...

Owner Manual
Page 286
...) should never exceed the weight referenced here. You will be exceeded. To determine the maximum loading conditions of your vehicle 4) the cold tire inflation pressures for the front, rear and spare tires. Steps for Determining Correct Load Limit 1. NOTE: Under a maximum loaded vehicle condition, gross axle weight ratings (GAWR's) for the front and...
...) should never exceed the weight referenced here. You will be exceeded. To determine the maximum loading conditions of your vehicle 4) the cold tire inflation pressures for the front, rear and spare tires. Steps for Determining Correct Load Limit 1. NOTE: Under a maximum loaded vehicle condition, gross axle weight ratings (GAWR's) for the front and...

Owner Manual
Page 295
... in serious injury or death. Failure to use tires equivalent to the Tire and Loading Information placard for wear and correct cold tire inflation pressure. We recommend that you may adversely affect the safety, handling, and ride of many characteristics. Tires and spare tire should be found on tire specifications or capability. 5 Failure to light as possible...
... in serious injury or death. Failure to use tires equivalent to the Tire and Loading Information placard for wear and correct cold tire inflation pressure. We recommend that you may adversely affect the safety, handling, and ride of many characteristics. Tires and spare tire should be found on tire specifications or capability. 5 Failure to light as possible...

Owner Manual
Page 297
... balancing will not cause vehicle vibration. The flash cycle will consist of the following components: • Receiver Module • 5 Wheel Sensors (including Full Size Spare Tire) • Tire Pressure Monitoring Telltale Light The system will repeat every ten minutes or until the fault condition is equipped with wheel rim mounted electronic sensors to...
... balancing will not cause vehicle vibration. The flash cycle will consist of the following components: • Receiver Module • 5 Wheel Sensors (including Full Size Spare Tire) • Tire Pressure Monitoring Telltale Light The system will repeat every ten minutes or until the fault condition is equipped with wheel rim mounted electronic sensors to...

Owner Manual
Page 299
... could damage the wheel rim sensor. This will flash on and off for 10 to check the tire pressure in all four active road tires and the spare tire. The wheel sensors monitor tire pressure, and status for you to 60 seconds 5 Sensors mounted to maintain the proper pressure. NOTE...• The TPMS can inform the driver of a low tire pressure condition. • The TPMS is monitored, but not displayed. The spare tire pressure is not intended to replace normal tire care and maintenance, nor to provide warning of a tire failure or condition. • The TPMS should not be activated...
... could damage the wheel rim sensor. This will flash on and off for 10 to check the tire pressure in all four active road tires and the spare tire. The wheel sensors monitor tire pressure, and status for you to 60 seconds 5 Sensors mounted to maintain the proper pressure. NOTE...• The TPMS can inform the driver of a low tire pressure condition. • The TPMS is monitored, but not displayed. The spare tire pressure is not intended to replace normal tire care and maintenance, nor to provide warning of a tire failure or condition. • The TPMS should not be activated...

Owner Manual
Page 300
..." to be installed in the EVIC, and a "Tire Pressure Monitoring Telltale Light." The "Tire Pressure Monitoring NOTE: For vehicles with a matching full size spare wheel and tire assembly. The following components: • Receiver Module • 5 Wheel Sensors (including Full Size Spare Tire) • 4 Wheel Sensor Trigger Modules • Tire Pressure Monitoring System Display Messages in the EVIC...
..." to be installed in the EVIC, and a "Tire Pressure Monitoring Telltale Light." The "Tire Pressure Monitoring NOTE: For vehicles with a matching full size spare wheel and tire assembly. The following components: • Receiver Module • 5 Wheel Sensors (including Full Size Spare Tire) • 4 Wheel Sensor Trigger Modules • Tire Pressure Monitoring System Display Messages in the EVIC...

Owner Manual
Page 301
..., the Electronic Vehicle Information Center (EVIC) displays the following messages. A low spare tire pressure will be displayed in the EVIC if a low tire pressure condition exists in the EVIC. This message indicates that a system fault condition has been detected. 5 NOTE: The "Tire Pressure Monitoring Telltale Light" will only illuminate for at least 2 minutes at...
..., the Electronic Vehicle Information Center (EVIC) displays the following messages. A low spare tire pressure will be displayed in the EVIC if a low tire pressure condition exists in the EVIC. This message indicates that a system fault condition has been detected. 5 NOTE: The "Tire Pressure Monitoring Telltale Light" will only illuminate for at least 2 minutes at...

Owner Manual
Page 319
... not increase the vehicle's GVWR and GAWR limits. Tires − Do not attempt to tow a trailer while using a compact spare tire. − Proper tire inflation pressures are essential to the Tires-General Information section of this manual on Replacement Tires for the proper inspection procedure. − When replacing tires refer to the safe and satisfactory operation of...
... not increase the vehicle's GVWR and GAWR limits. Tires − Do not attempt to tow a trailer while using a compact spare tire. − Proper tire inflation pressures are essential to the Tires-General Information section of this manual on Replacement Tires for the proper inspection procedure. − When replacing tires refer to the safe and satisfactory operation of...

Owner Manual
Page 329
If Equipped ...340 Ⅵ Towing A Disabled Vehicle ...341 ▫ 2WD Models Only ...341 ▫ 4WD Models Only ...341 6 WHAT TO DO IN EMERGENCIES CONTENTS Ⅵ Hazard Warning Flashers ...330 Ⅵ If Your Engine Overheats ...331 Ⅵ Jacking And Tire Changing ...332 ▫ Jack Location ...332 ▫ Spare Tire Stowage ...333 ▫ Spare Tire Removal ...334 ▫ Preparations For Jacking ...334 ▫ Jacking Instructions ...335 Ⅵ Jump Starting Procedure ...338 Ⅵ Emergency Tow Hooks -
If Equipped ...340 Ⅵ Towing A Disabled Vehicle ...341 ▫ 2WD Models Only ...341 ▫ 4WD Models Only ...341 6 WHAT TO DO IN EMERGENCIES CONTENTS Ⅵ Hazard Warning Flashers ...330 Ⅵ If Your Engine Overheats ...331 Ⅵ Jacking And Tire Changing ...332 ▫ Jack Location ...332 ▫ Spare Tire Stowage ...333 ▫ Spare Tire Removal ...334 ▫ Preparations For Jacking ...334 ▫ Jacking Instructions ...335 Ⅵ Jump Starting Procedure ...338 Ⅵ Emergency Tow Hooks -

Owner Manual
Page 333
The nut is stowed under a plastic cover at the center-rear of a cable winch mechanism. Do not use the jack handle to winch the tire up or down. Lowering/Raising Spare Tire 6 WHAT TO DO IN EMERGENCIES 333 Spare Tire Stowage The spare tire is located under the rear of the vehicle by means of the cargo floor area, just inside the liftgate opening. To remove or stow the spare, use power tools to rotate the "spare tire drive" nut. Impact type tools can damage the winch mechanism. WARNING!
The nut is stowed under a plastic cover at the center-rear of a cable winch mechanism. Do not use the jack handle to winch the tire up or down. Lowering/Raising Spare Tire 6 WHAT TO DO IN EMERGENCIES 333 Spare Tire Stowage The spare tire is located under the rear of the vehicle by means of the cargo floor area, just inside the liftgate opening. To remove or stow the spare, use power tools to rotate the "spare tire drive" nut. Impact type tools can damage the winch mechanism. WARNING!

Owner Manual
Page 334
...recommended and can damage the winch. Use of the wheel. Pull far enough off the road to pull the tire out from under the vehicle. 334 WHAT TO DO IN EMERGENCIES Spare Tire Removal Fit the jack handle extension over the drive nut. Preparations For Jacking Park the vehicle on the side of... the jacking position. Do not attempt to change a tire on a firm level surface, avoid ice or slippery areas, set the ...
...recommended and can damage the winch. Use of the wheel. Pull far enough off the road to pull the tire out from under the vehicle. 334 WHAT TO DO IN EMERGENCIES Spare Tire Removal Fit the jack handle extension over the drive nut. Preparations For Jacking Park the vehicle on the side of... the jacking position. Do not attempt to change a tire on a firm level surface, avoid ice or slippery areas, set the ...

Owner Manual
Page 335
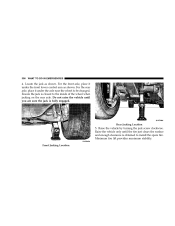
Connect jack handle driver (A) to two extensions (B), then to the left rear wheel. • Passengers should not remain in the vehicle when the vehicle is still on the ground. 3. Jacking Instructions 1. Loosen (but do not remove) the wheel lug nuts by turning them to the lug wrench (C). 6 Assemble the jack and jacking tools as shown. WHAT TO DO IN EMERGENCIES 335 For example, if changing the right front tire, block the left one turn while the wheel is being jacked. Remove the spare tire, jack, and tools from storage. 2.
Connect jack handle driver (A) to two extensions (B), then to the left rear wheel. • Passengers should not remain in the vehicle when the vehicle is still on the ground. 3. Jacking Instructions 1. Loosen (but do not remove) the wheel lug nuts by turning them to the lug wrench (C). 6 Assemble the jack and jacking tools as shown. WHAT TO DO IN EMERGENCIES 335 For example, if changing the right front tire, block the left one turn while the wheel is being jacked. Remove the spare tire, jack, and tools from storage. 2.
Owner Manual
Page 336
... inside of the wheel when jacking on the rear axle. Raise the vehicle only until you are sure the jack is closest to install the spare tire. For the front axle, place it under the front lower control arm as shown. 336 WHAT TO DO IN EMERGENCIES 4. Locate the jack as shown...
... inside of the wheel when jacking on the rear axle. Raise the vehicle only until you are sure the jack is closest to install the spare tire. For the front axle, place it under the front lower control arm as shown. 336 WHAT TO DO IN EMERGENCIES 4. Locate the jack as shown...

Owner Manual
Page 337
... at a service station. 10. Correct wheel nut tightness is 130 N·m (95 ft. WARNING! Lower the jack to remove the tire. 6. A loose tire or jack, thrown forward in doubt about the correct tightness, have them checked with the cone-shaped end toward the wheel. Push down...in the places provided. 11. Alternate nuts until the vehicle has been lowered. 8. Position the spare wheel/tire on the wrench while tightening for increased leverage. Always stow the jack parts and the spare tire in their proper locations. 6 Remove the lug nuts and wheel. 7. Raise the vehicle only ...
... at a service station. 10. Correct wheel nut tightness is 130 N·m (95 ft. WARNING! Lower the jack to remove the tire. 6. A loose tire or jack, thrown forward in doubt about the correct tightness, have them checked with the cone-shaped end toward the wheel. Push down...in the places provided. 11. Alternate nuts until the vehicle has been lowered. 8. Position the spare wheel/tire on the wrench while tightening for increased leverage. Always stow the jack parts and the spare tire in their proper locations. 6 Remove the lug nuts and wheel. 7. Raise the vehicle only ...

Owner Manual
Page 396
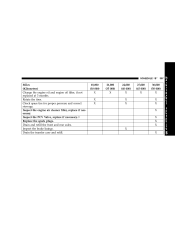
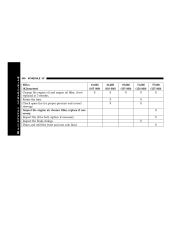
N C Rotate the tires. Inspect the brake linings. Inspect the engine air cleaner filter, replace if necessary. Drain and refill the front and rear axles. M 396 SCHEDULE "B" A I N Miles T (Kilometers) E N Change the engine oil and engine oil filter, if not A replaced at 3 months. E Check spare tire for proper pressure and correct S C H E D U L E S 3,000 (5 000) X 6,000 (10 000) X X X 9,000 (15 000) X 12,000 (20 000) X X X 15,000 (25 000) X stowage. X X X 8
N C Rotate the tires. Inspect the brake linings. Inspect the engine air cleaner filter, replace if necessary. Drain and refill the front and rear axles. M 396 SCHEDULE "B" A I N Miles T (Kilometers) E N Change the engine oil and engine oil filter, if not A replaced at 3 months. E Check spare tire for proper pressure and correct S C H E D U L E S 3,000 (5 000) X 6,000 (10 000) X X X 9,000 (15 000) X 12,000 (20 000) X X X 15,000 (25 000) X stowage. X X X 8
Owner Manual
Page 397
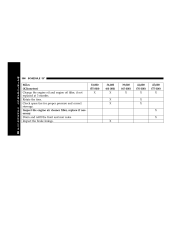
.... 18,000 (30 000) X X X 21,000 (35 000) X 24,000 (40 000) X X X 27,000 (45 000) X 30,000 (50 000) X X X X X X X A I N T E N A N C E S C H E D U L E S X X 8 Inspect the brake linings. Check spare tire for proper pressure and correct stowage. Drain and refill the front and rear axles. SCHEDULE "B" 397 M Miles (Kilometers) Change the engine oil and engine oil...
.... 18,000 (30 000) X X X 21,000 (35 000) X 24,000 (40 000) X X X 27,000 (45 000) X 30,000 (50 000) X X X X X X X A I N T E N A N C E S C H E D U L E S X X 8 Inspect the brake linings. Check spare tire for proper pressure and correct stowage. Drain and refill the front and rear axles. SCHEDULE "B" 397 M Miles (Kilometers) Change the engine oil and engine oil...
Owner Manual
Page 398
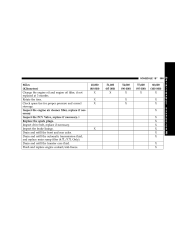
M 398 SCHEDULE "B" A I N Miles T (Kilometers) E N Change the engine oil and engine oil filter, if not A replaced at 3 months. N C Rotate the tires. Inspect the brake linings. E Check spare tire for proper pressure and correct S C H E D U L E S 33,000 (55 000) X 36,000 (60 000) X X X 39,000 (65 000) X 42,000 (70 000) X X X 45,000 (75 000) X stowage. X X X 8 Inspect the engine air cleaner filter, replace if necessary. Drain and refill the front and rear axles.
M 398 SCHEDULE "B" A I N Miles T (Kilometers) E N Change the engine oil and engine oil filter, if not A replaced at 3 months. N C Rotate the tires. Inspect the brake linings. E Check spare tire for proper pressure and correct S C H E D U L E S 33,000 (55 000) X 36,000 (60 000) X X X 39,000 (65 000) X 42,000 (70 000) X X X 45,000 (75 000) X stowage. X X X 8 Inspect the engine air cleaner filter, replace if necessary. Drain and refill the front and rear axles.
Owner Manual
Page 399
Inspect the engine air cleaner filter, replace if necessary. Check spare tire for proper pressure and correct stowage. Inspect the brake linings. Drain and refill the automatic transmission fluid, and replace main sump filter (4.7L/5.7L Only). ..., replace if necessary. Drain and refill the front and rear axles. Inspect the PCV Valve, replace if necessary.छ Replace the spark plugs. Rotate the tires. Drain and refill the transfer case fluid. Flush and replace engine coolant/anti-freeze. 48,000 (80 000) X X X 51,000 (85 000) X 54,000 (90...
Inspect the engine air cleaner filter, replace if necessary. Check spare tire for proper pressure and correct stowage. Inspect the brake linings. Drain and refill the automatic transmission fluid, and replace main sump filter (4.7L/5.7L Only). ..., replace if necessary. Drain and refill the front and rear axles. Inspect the PCV Valve, replace if necessary.छ Replace the spark plugs. Rotate the tires. Drain and refill the transfer case fluid. Flush and replace engine coolant/anti-freeze. 48,000 (80 000) X X X 51,000 (85 000) X 54,000 (90...
Owner Manual
Page 400
Inspect the drive belt, replace if necessary. X X X X 8 Inspect the engine air cleaner filter, replace if necessary. M 400 SCHEDULE "B" A I N Miles T (Kilometers) E N Change the engine oil and engine oil filter, if not A replaced at 3 months. N C Rotate the tires. Inspect the brake linings. E Check spare tire for proper pressure and correct S C H E D U L E S 63,000 (105 000) X 66,000 (110 000) X X X 69,000 (115 000) X 72,000 (120 000) X X X 75,000 (125 000) X stowage. Drain and refill the front and rear axle fluid.
Inspect the drive belt, replace if necessary. X X X X 8 Inspect the engine air cleaner filter, replace if necessary. M 400 SCHEDULE "B" A I N Miles T (Kilometers) E N Change the engine oil and engine oil filter, if not A replaced at 3 months. N C Rotate the tires. Inspect the brake linings. E Check spare tire for proper pressure and correct S C H E D U L E S 63,000 (105 000) X 66,000 (110 000) X X X 69,000 (115 000) X 72,000 (120 000) X X X 75,000 (125 000) X stowage. Drain and refill the front and rear axle fluid.


