
Owner's Manual
Page 15
... and turn on the ignition after all the doors. To open the flipper glass, push up on the window switch located on the handle and lift. This device must accept any door. NOTE: If a power malfunction to lock or unlock the driver's door. They will fade to off . To open any...
... and turn on the ignition after all the doors. To open the flipper glass, push up on the window switch located on the handle and lift. This device must accept any door. NOTE: If a power malfunction to lock or unlock the driver's door. They will fade to off . To open any...

Owner's Manual
Page 62
Lift the cover to move. Lighted Vanity Mirrors - If Equipped To access a lighted vanity mirror, flip down will turn on automatically. 62 UNDERSTANDING THE FEATURES OF ...
Lift the cover to move. Lighted Vanity Mirrors - If Equipped To access a lighted vanity mirror, flip down will turn on automatically. 62 UNDERSTANDING THE FEATURES OF ...
Owner's Manual
Page 63
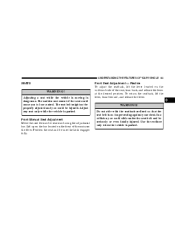
... on the bar located on the outboard side of the seat near the floor. To return the seatback, lift the lever, lean forward, and release the lever. 3 WARNING! In a collision you could be injured. Position the seat and be seriously or even fatally injured. ... parked. The seat belt might not be properly adjusted and you could cause you to lose control. Front Seat Adjustment - Recline To adjust the seatback, lift the lever located on the front of the seat, lean back, and release the lever at the desired position. UNDERSTANDING THE FEATURES OF YOUR VEHICLE...
... on the bar located on the outboard side of the seat near the floor. To return the seatback, lift the lever, lean forward, and release the lever. 3 WARNING! In a collision you could be injured. Position the seat and be seriously or even fatally injured. ... parked. The seat belt might not be properly adjusted and you could cause you to lose control. Front Seat Adjustment - Recline To adjust the seatback, lift the lever located on the front of the seat, lean back, and release the lever at the desired position. UNDERSTANDING THE FEATURES OF YOUR VEHICLE...
Owner's Manual
Page 72
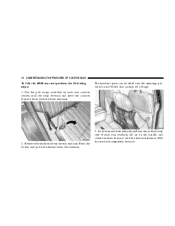
... the pull straps available on each rear seatback; Locate the seatback release handle on the handle, and rotate the lever forward until the seatback releases. lift up on the outboard top side of each seat cushion section;
... the pull straps available on each rear seatback; Locate the seatback release handle on the handle, and rotate the lever forward until the seatback releases. lift up on the outboard top side of each seat cushion section;
Owner's Manual
Page 73
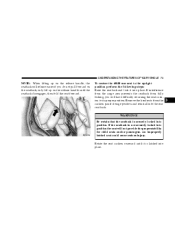
... from the cushion panel storage position and reinstall into position the seat will not provide the proper stability for child seats and/or passengers. only lift up on the release handle, the seatback will have difficulty returning the seat cushion to the upright position perform the following steps: Raise the seatback... seat could cause serious injury. To restore the 60/40 rear seat to its proper position. UNDERSTANDING THE FEATURES OF YOUR VEHICLE 73 NOTE: When lifting up on the release handle until it into place.
... from the cushion panel storage position and reinstall into position the seat will not provide the proper stability for child seats and/or passengers. only lift up on the release handle, the seatback will have difficulty returning the seat cushion to the upright position perform the following steps: Raise the seatback... seat could cause serious injury. To restore the 60/40 rear seat to its proper position. UNDERSTANDING THE FEATURES OF YOUR VEHICLE 73 NOTE: When lifting up on the release handle until it into place.
Owner's Manual
Page 74
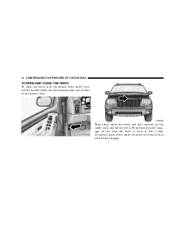
Then reach under the hood and pull upward on the safety latch and lift the hood. 74 UNDERSTANDING THE FEATURES OF YOUR VEHICLE TO OPEN AND CLOSE THE HOOD To open the hood, pull the release lever inside your vehicle located below the instrument panel and in front of the hood to close it. To prevent possible damage, do not slam the hood to ensure that both latches engage. Use a firm downward push at the center of the driver's door.
Then reach under the hood and pull upward on the safety latch and lift the hood. 74 UNDERSTANDING THE FEATURES OF YOUR VEHICLE TO OPEN AND CLOSE THE HOOD To open the hood, pull the release lever inside your vehicle located below the instrument panel and in front of the hood to close it. To prevent possible damage, do not slam the hood to ensure that both latches engage. Use a firm downward push at the center of the driver's door.

Owner's Manual
Page 231
... weight. When pulling a heavy load or driving a fully loaded vehicle use a premium unleaded fuel to the transfer case will occur if a front or rear wheel lift is used when recreational towing. STARTING AND OPERATING 231 NOTE: If you tow a trailer frequently, especially in the P (Park) position for recreational towing. (Recreational towing...
... weight. When pulling a heavy load or driving a fully loaded vehicle use a premium unleaded fuel to the transfer case will occur if a front or rear wheel lift is used when recreational towing. STARTING AND OPERATING 231 NOTE: If you tow a trailer frequently, especially in the P (Park) position for recreational towing. (Recreational towing...

Owner's Manual
Page 239
..., flat or damaged tire securely in the vehicle where they could become dangerous projectiles during a quick stop or collision. • The jack is designed to lift the vehicle for service purposes, unless suitable supports are placed under the vehicle as a safety measure, The vehicle should not be used to use as... To Remove the Spare Tire 6 1. Open the liftgate. 2. The cover may be jacked on both sides at the edge adjacent to the carpet depressions and lift the cover to lean against the rear
..., flat or damaged tire securely in the vehicle where they could become dangerous projectiles during a quick stop or collision. • The jack is designed to lift the vehicle for service purposes, unless suitable supports are placed under the vehicle as a safety measure, The vehicle should not be used to use as... To Remove the Spare Tire 6 1. Open the liftgate. 2. The cover may be jacked on both sides at the edge adjacent to the carpet depressions and lift the cover to lean against the rear

Owner Manual
Page 23
The Security Alarm System will not unlock the liftgate. Liftgate Release 2 LIFTGATE To open the liftgate, pull up (squeeze) on the remote keyless entry transmitter to disarm the system. Manually unlocking the vehicle doors with a manual unlock, either through the lock plunger located on the inside of the door, or through a key in the lock cylinder will not disarm with the plunger or a key in the driver's door key cylinder. THINGS TO KNOW BEFORE STARTING YOUR VEHICLE 23 press the "Unlock" button on the handle and lift.
The Security Alarm System will not unlock the liftgate. Liftgate Release 2 LIFTGATE To open the liftgate, pull up (squeeze) on the remote keyless entry transmitter to disarm the system. Manually unlocking the vehicle doors with a manual unlock, either through the lock plunger located on the inside of the door, or through a key in the lock cylinder will not disarm with the plunger or a key in the driver's door key cylinder. THINGS TO KNOW BEFORE STARTING YOUR VEHICLE 23 press the "Unlock" button on the handle and lift.
Owner Manual
Page 76
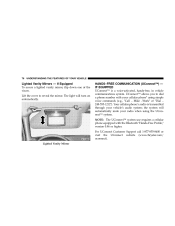
Lighted Vanity Mirror If Equipped To access a lighted vanity mirror, flip down one of the visors. Lift the cover to dial a phone number with the Bluetooth ЉHands-Free Profile,Љ version 0.96 or higher. IF EQUIPPED UConnect™ is transmitted through ...
Lighted Vanity Mirror If Equipped To access a lighted vanity mirror, flip down one of the visors. Lift the cover to dial a phone number with the Bluetooth ЉHands-Free Profile,Љ version 0.96 or higher. IF EQUIPPED UConnect™ is transmitted through ...

Owner Manual
Page 99
... phone set up on the bar located on the front of the seat near the floor. Adjusting a seat while the vehicle is moving is parked. Lift up SEATS WARNING!
... phone set up on the bar located on the front of the seat near the floor. Adjusting a seat while the vehicle is moving is parked. Lift up SEATS WARNING!

Owner Manual
Page 100
... seat belts. • Be sure everyone in a seat and using a seat belt properly. Recline To adjust the seatback, lift the lever located on the outboard side of your chest. To return the seatback, lift the lever, lean forward, and release the lever. Use the recliner only when the vehicle is no longer...
... seat belts. • Be sure everyone in a seat and using a seat belt properly. Recline To adjust the seatback, lift the lever located on the outboard side of your chest. To return the seatback, lift the lever, lean forward, and release the lever. Use the recliner only when the vehicle is no longer...
Owner Manual
Page 106
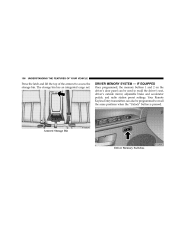
... same positions when the "Unlock" button is pressed. Armrest Storage Bin Driver Memory Switches 106 UNDERSTANDING THE FEATURES OF YOUR VEHICLE Press the latch and lift the top of the armrest to recall the driver's seat, driver's outside mirror, adjustable brake and accelerator pedals, and radio station preset settings. DRIVER MEMORY...
... same positions when the "Unlock" button is pressed. Armrest Storage Bin Driver Memory Switches 106 UNDERSTANDING THE FEATURES OF YOUR VEHICLE Press the latch and lift the top of the armrest to recall the driver's seat, driver's outside mirror, adjustable brake and accelerator pedals, and radio station preset settings. DRIVER MEMORY...

Owner Manual
Page 110
Hood Release Lever Underhood Safety Latch 110 UNDERSTANDING THE FEATURES OF YOUR VEHICLE TO OPEN AND CLOSE THE HOOD To open the hood, pull the release lever inside your vehicle located below the instrument panel and in front of the hood to close it. To prevent possible damage, do not slam the hood to ensure that both latches engage. Use a firm downward push at the center of the driver's door. Then reach under the hood and pull upward on the safety latch and lift the hood.
Hood Release Lever Underhood Safety Latch 110 UNDERSTANDING THE FEATURES OF YOUR VEHICLE TO OPEN AND CLOSE THE HOOD To open the hood, pull the release lever inside your vehicle located below the instrument panel and in front of the hood to close it. To prevent possible damage, do not slam the hood to ensure that both latches engage. Use a firm downward push at the center of the driver's door. Then reach under the hood and pull upward on the safety latch and lift the hood.

Owner Manual
Page 155
..., use the following procedure: NOTE: The cargo load floor latches should not be used as cargo tie-downs. UNDERSTANDING THE FEATURES OF YOUR VEHICLE 155 1. Lift tray over loop(s), and reposition tray. 4.
..., use the following procedure: NOTE: The cargo load floor latches should not be used as cargo tie-downs. UNDERSTANDING THE FEATURES OF YOUR VEHICLE 155 1. Lift tray over loop(s), and reposition tray. 4.

Owner Manual
Page 290
... damage which is used when recreational towing. Shifting Into Neutral (N) Use the following procedure to the transfer case will occur if a front or rear wheel lift is not covered under the Limited Warranty. Quadra-Trac II /Quadra-Drive II 4WD Models CAUTION! Towing - Towing with the rear wheels on the ground...
... damage which is used when recreational towing. Shifting Into Neutral (N) Use the following procedure to the transfer case will occur if a front or rear wheel lift is not covered under the Limited Warranty. Quadra-Trac II /Quadra-Drive II 4WD Models CAUTION! Towing - Towing with the rear wheels on the ground...
Owner Manual
Page 298
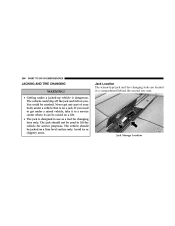
You could slip off the jack and fall on a lift. • The jack is designed to get any part of your body under a vehicle that is dangerous. Jack Storage Location Jack Location The scissor-type ... is on a firm level surface only. The vehicle should not be jacked on a jack. The jack should be used to a service center where it to lift the vehicle for changing tires only.
You could slip off the jack and fall on a lift. • The jack is designed to get any part of your body under a vehicle that is dangerous. Jack Storage Location Jack Location The scissor-type ... is on a firm level surface only. The vehicle should not be jacked on a jack. The jack should be used to a service center where it to lift the vehicle for changing tires only.

Owner Manual
Page 302
... tighten the nuts. Raise the vehicle only until the vehicle has been lowered. 8. Raise the vehicle only enough to install the spare tire. Minimum tire lift provides maximum stability. Remove the lug nuts and wheel. 7. Push down on the vehicle and install the lug nuts with the cone-shaped end toward...
... tighten the nuts. Raise the vehicle only until the vehicle has been lowered. 8. Raise the vehicle only enough to install the spare tire. Minimum tire lift provides maximum stability. Remove the lug nuts and wheel. 7. Push down on the vehicle and install the lug nuts with the cone-shaped end toward...


