
Owner's Manual
Page 7
... front corner of the instrument panel pad, visible from outside of your vehicle identification number and optional equipment. 1 NOTE: It is found on a stamped plate located on your vehicle. VEHICLE IDENTIFICATION NUMBER The vehicle identification number (VIN) is illegal to your vehicle. Observe all Warnings and Cautions. INTRODUCTION 7 WARNINGS AND CAUTIONS...
... front corner of the instrument panel pad, visible from outside of your vehicle identification number and optional equipment. 1 NOTE: It is found on a stamped plate located on your vehicle. VEHICLE IDENTIFICATION NUMBER The vehicle identification number (VIN) is illegal to your vehicle. Observe all Warnings and Cautions. INTRODUCTION 7 WARNINGS AND CAUTIONS...

Owner's Manual
Page 15
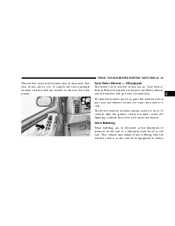
... AND LIFTGATE LOCKS NOTE: The master key that may be injured by these fumes. To open the flipper glass, push up on the window switch located on the ignition after all the doors. The lights also will remain on for about 30 seconds after you open can allow poisonous exhaust gases...
... AND LIFTGATE LOCKS NOTE: The master key that may be injured by these fumes. To open the flipper glass, push up on the window switch located on the ignition after all the doors. The lights also will remain on for about 30 seconds after you open can allow poisonous exhaust gases...

Owner's Manual
Page 16
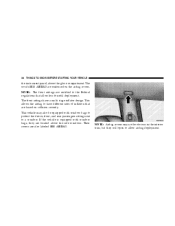
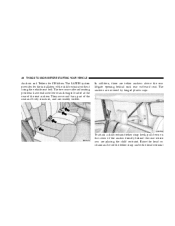
Driving with the flipper glass open the liftgate. You and your vehicle. WARNING! Keep the flipper glass closed when you are operating the vehicle. The emergency liftgate latch release can allow poisonous exhaust gases into your passengers could be accessed through a snap-in cover located on the liftgate trim panel. 16 THINGS TO KNOW BEFORE STARTING YOUR VEHICLE can be used to open can be injured by these fumes.
Driving with the flipper glass open the liftgate. You and your vehicle. WARNING! Keep the flipper glass closed when you are operating the vehicle. The emergency liftgate latch release can allow poisonous exhaust gases into your passengers could be accessed through a snap-in cover located on the liftgate trim panel. 16 THINGS TO KNOW BEFORE STARTING YOUR VEHICLE can be used to open can be injured by these fumes.

Owner's Manual
Page 24
POWER WINDOWS The power window controls are located on the front passenger door which operates the passenger door window. You may also accidentally disarm the system by unlocking the driver's door with the key and then locking it. The door will be locked but the Security Alarm will not arm. There is a single switch on the driver's door trim panel. 24 THINGS TO KNOW BEFORE STARTING YOUR VEHICLE transmitter to disarm the system.
POWER WINDOWS The power window controls are located on the front passenger door which operates the passenger door window. You may also accidentally disarm the system by unlocking the driver's door with the key and then locking it. The door will be locked but the Security Alarm will not arm. There is a single switch on the driver's door trim panel. 24 THINGS TO KNOW BEFORE STARTING YOUR VEHICLE transmitter to disarm the system.
Owner's Manual
Page 25
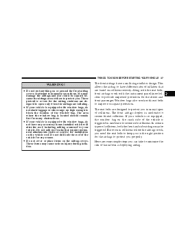
... open the window part way, press the window switch part way and release it when you to disable the rear passenger window switches that are located on the ears or a helicopter type sound in certain 2 Your vehicle may exhibit wind buffeting with the windows down automatically. Wind Buffeting Wind buffeting...switch past the detent, release, and the window will cancel this feature. THINGS TO KNOW BEFORE STARTING YOUR VEHICLE 25 The window lock switch located next to the power door lock switch allows you want the window to 45 seconds after the ignition switch has been turned off.
... open the window part way, press the window switch part way and release it when you to disable the rear passenger window switches that are located on the ears or a helicopter type sound in certain 2 Your vehicle may exhibit wind buffeting with the windows down automatically. Wind Buffeting Wind buffeting...switch past the detent, release, and the window will cancel this feature. THINGS TO KNOW BEFORE STARTING YOUR VEHICLE 25 The window lock switch located next to the power door lock switch allows you want the window to 45 seconds after the ignition switch has been turned off.
Owner's Manual
Page 36
... of inflation that allow airbag deployment. This vehicle may not be equipped with window bags, they will open to a window. The words SRS/AIRBAG are located above the glove compartment. but they are embossed on collision severity. NOTE: The front airbags are certified to have a multi stage inflator design. This allows...
... of inflation that allow airbag deployment. This vehicle may not be equipped with window bags, they will open to a window. The words SRS/AIRBAG are located above the glove compartment. but they are embossed on collision severity. NOTE: The front airbags are certified to have a multi stage inflator design. This allows...
Owner's Manual
Page 37
...8226; If your vehicle. Window bags also work with window bags, do not stack luggage or other cargo up high enough to block the location of collisions, both the front and side airbags may be injured because the airbags are designed to protect you in the right position for the... to keep you in moderate to severe frontal collisions. These protective covers for the airbag cushions are designed to open them. If your vehicle is located should remain free from a deploying airbag. 2 These items may damage the airbags and you could be triggered. This allows the airbag to have a...
...8226; If your vehicle. Window bags also work with window bags, do not stack luggage or other cargo up high enough to block the location of collisions, both the front and side airbags may be injured because the airbags are designed to protect you in the right position for the... to keep you in moderate to severe frontal collisions. These protective covers for the airbag cushions are designed to open them. If your vehicle is located should remain free from a deploying airbag. 2 These items may damage the airbags and you could be triggered. This allows the airbag to have a...
Owner's Manual
Page 40
... with the remote side impact sensors detects side impact. • The ACM will not inflate. If the key is in the ignition, the airbags are located in the instrument panel for 6 to 8 seconds when the ignition is severe enough to require the airbags to protect you drive, have the airbag system...
... with the remote side impact sensors detects side impact. • The ACM will not inflate. If the key is in the ignition, the airbags are located in the instrument panel for 6 to 8 seconds when the ignition is severe enough to require the airbags to protect you drive, have the airbag system...

Owner's Manual
Page 43
... proper knee impact protection in another collision. Maintaining Your Airbag System WARNING! • Modifications to any part of the instrument panel. Do not mount or locate any part of badges or stickers to tell anyone who works on or behind the knee bolsters. • It is not there to repair any...
... proper knee impact protection in another collision. Maintaining Your Airbag System WARNING! • Modifications to any part of the instrument panel. Do not mount or locate any part of badges or stickers to tell anyone who works on or behind the knee bolsters. • It is not there to repair any...
Owner's Manual
Page 48
... the rear liftgate opening behind the seat where you are covered by hinged plastic caps. The two rear outboard seating positions have exclusive lower anchorages located at the rear of the child restraint without using the vehicle seat belt.
... the rear liftgate opening behind the seat where you are covered by hinged plastic caps. The two rear outboard seating positions have exclusive lower anchorages located at the rear of the child restraint without using the vehicle seat belt.

Owner's Manual
Page 53
... speed. Fluid Leaks Check area under vehicle after overnight parking for proper pressure. Inspect for excessive tread wear or uneven wear patterns. You should be located and corrected immediately. 2 Check wheel nuts for tightness and tires (including spare) for fuel, coolant, oil or other objects lodged in the tread. THINGS TO...
... speed. Fluid Leaks Check area under vehicle after overnight parking for proper pressure. Inspect for excessive tread wear or uneven wear patterns. You should be located and corrected immediately. 2 Check wheel nuts for tightness and tires (including spare) for fuel, coolant, oil or other objects lodged in the tread. THINGS TO...
Owner's Manual
Page 61
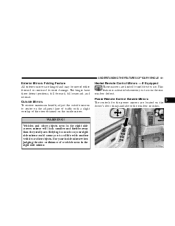
... when judging the size or distance of a vehicle seen in the right side convex mirror will look smaller and farther away than they really are located on the rear window defrost. Heated Remote Control Mirrors - If Equipped These mirrors are hinged and may be moved either forward or rearward to resist...
... when judging the size or distance of a vehicle seen in the right side convex mirror will look smaller and farther away than they really are located on the rear window defrost. Heated Remote Control Mirrors - If Equipped These mirrors are hinged and may be moved either forward or rearward to resist...
Owner's Manual
Page 63
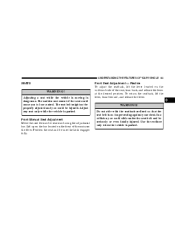
... any seat only while the vehicle is dangerous. Position the seat and be injured. Front Seat Adjustment - Recline To adjust the seatback, lift the lever located on the front of the seat near the floor. The sudden movement of the seat, lean back, and release the lever at the desired position.... Lift up on the bar located on the outboard side of the seat could cause you could be sure the latch engages fully. Adjusting a seat while the vehicle is moving is...
... any seat only while the vehicle is dangerous. Position the seat and be injured. Front Seat Adjustment - Recline To adjust the seatback, lift the lever located on the front of the seat near the floor. The sudden movement of the seat, lean back, and release the lever at the desired position.... Lift up on the bar located on the outboard side of the seat could cause you could be sure the latch engages fully. Adjusting a seat while the vehicle is moving is...
Owner's Manual
Page 65
In a collision you could slide under the seat belt and be seriously injured or even fatally injured. The power seat adjuster switches are located on the outboard side of the seat near the floor. Use this switch to move the seat up or down, forward or rearward, or to ...
In a collision you could slide under the seat belt and be seriously injured or even fatally injured. The power seat adjuster switches are located on the outboard side of the seat near the floor. Use this switch to move the seat up or down, forward or rearward, or to ...
Owner's Manual
Page 66
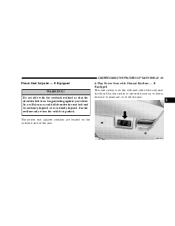
66 UNDERSTANDING THE FEATURES OF YOUR VEHICLE This seat also has a manual recline lever located just to the rear of the seat near the floor. Pull up or down, forward or rearward, to tilt the seat, to recline the seat, or to recline the seat. 10-Way Power Seat with Power Recliner and Power Lumbar - If Equipped These seat switches are located on the lever to increase/decrease the amount of lumbar support. Use these switches to move the seat up on the outboard side of the power seat switch.
66 UNDERSTANDING THE FEATURES OF YOUR VEHICLE This seat also has a manual recline lever located just to the rear of the seat near the floor. Pull up or down, forward or rearward, to tilt the seat, to recline the seat, or to recline the seat. 10-Way Power Seat with Power Recliner and Power Lumbar - If Equipped These seat switches are located on the lever to increase/decrease the amount of lumbar support. Use these switches to move the seat up on the outboard side of the power seat switch.
Owner's Manual
Page 67
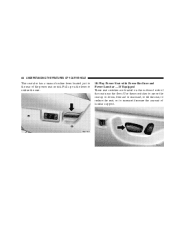
Use this switch to the seat controls. Power Lumbar The power lumbar control is located on the outboard side of lumbar support. 3 It may cause damage to increase or decrease the desired amount of the seat. Do not put anything under a power seat. UNDERSTANDING THE FEATURES OF YOUR VEHICLE 67 CAUTION!
Use this switch to the seat controls. Power Lumbar The power lumbar control is located on the outboard side of lumbar support. 3 It may cause damage to increase or decrease the desired amount of the seat. Do not put anything under a power seat. UNDERSTANDING THE FEATURES OF YOUR VEHICLE 67 CAUTION!

Owner's Manual
Page 69
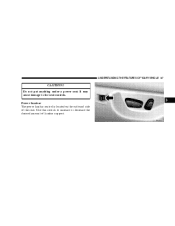
... corresponding remote keyless entry transmitter is pressed. Once the memory button has been set . UNDERSTANDING THE FEATURES OF YOUR VEHICLE 69 The Memory Position Buttons located on the driver's door.
... corresponding remote keyless entry transmitter is pressed. Once the memory button has been set . UNDERSTANDING THE FEATURES OF YOUR VEHICLE 69 The Memory Position Buttons located on the driver's door.

Owner's Manual
Page 71
..., or LO heat settings. This will allow for the heated seats are fully upright and positioned forward. NOTE: Be sure that the front seats are located on the instrument panel below the heater/air conditioning controls. UNDERSTANDING THE FEATURES OF YOUR VEHICLE 71 Heated Seats - If Equipped This feature heats the...
..., or LO heat settings. This will allow for the heated seats are fully upright and positioned forward. NOTE: Be sure that the front seats are located on the instrument panel below the heater/air conditioning controls. UNDERSTANDING THE FEATURES OF YOUR VEHICLE 71 Heated Seats - If Equipped This feature heats the...
Owner's Manual
Page 72
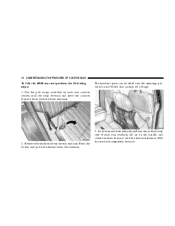
... rear seat perform the following steps: 1. Fold the seatback completely forward. pull the strap forward and pivot the cushion forward flush with the front seatback. Locate the seatback release handle on the handle, and rotate the lever forward until the seatback releases. Press the button and pull the headrest from the...
... rear seat perform the following steps: 1. Fold the seatback completely forward. pull the strap forward and pivot the cushion forward flush with the front seatback. Locate the seatback release handle on the handle, and rotate the lever forward until the seatback releases. Press the button and pull the headrest from the...
Owner's Manual
Page 74
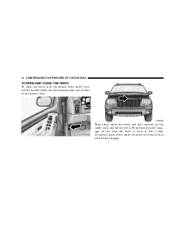
Then reach under the hood and pull upward on the safety latch and lift the hood. Use a firm downward push at the center of the driver's door. To prevent possible damage, do not slam the hood to ensure that both latches engage. 74 UNDERSTANDING THE FEATURES OF YOUR VEHICLE TO OPEN AND CLOSE THE HOOD To open the hood, pull the release lever inside your vehicle located below the instrument panel and in front of the hood to close it.
Then reach under the hood and pull upward on the safety latch and lift the hood. Use a firm downward push at the center of the driver's door. To prevent possible damage, do not slam the hood to ensure that both latches engage. 74 UNDERSTANDING THE FEATURES OF YOUR VEHICLE TO OPEN AND CLOSE THE HOOD To open the hood, pull the release lever inside your vehicle located below the instrument panel and in front of the hood to close it.


