Owner's Manual
Page 15
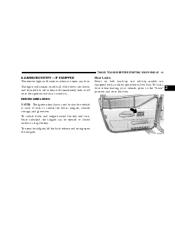
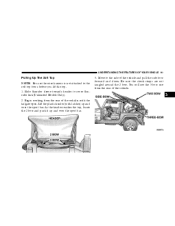
... closed without using the key. To lock a door when leaving your vehicle, press to the "Lock" position and close the door. 2 To open the tailgate, lift the latch release and swing open any door. Once unlocked, the tailgate can be opened or closed , and then fade to off once the ignition...
... closed without using the key. To lock a door when leaving your vehicle, press to the "Lock" position and close the door. 2 To open the tailgate, lift the latch release and swing open any door. Once unlocked, the tailgate can be opened or closed , and then fade to off once the ignition...
Owner's Manual
Page 36
... portion tight around the child restraint so that you push the child restraint rearward and downward into the seat, removing slack in the strap. Then lift the tether anchorage cover directly behind the seat where you are equipped with each side, with cinching latch plates, which are designed to the tether...
... portion tight around the child restraint so that you push the child restraint rearward and downward into the seat, removing slack in the strap. Then lift the tether anchorage cover directly behind the seat where you are equipped with each side, with cinching latch plates, which are designed to the tether...
Owner's Manual
Page 50
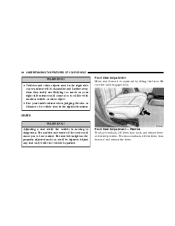
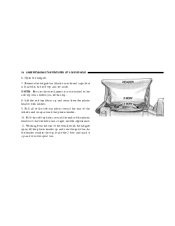
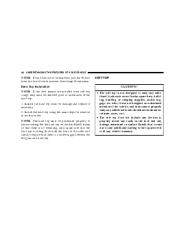
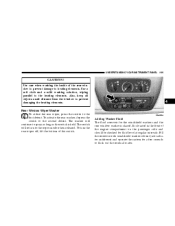
SEATS Front Seat Adjustment Move seat forward or rearward by lifting the lever. Be sure the latch engages fully. The seat belt might not be injured. Relying too much on your right side mirror could cause ... collide with another vehicle or other objects seen in the right side mirror. Adjusting a seat while the vehicle is moving is parked. To return seatback, lift the lever, lean forward and release the lever. 50 UNDERSTANDING THE FEATURES OF YOUR VEHICLE WARNING! • Vehicles and other object. • Use your inside...
SEATS Front Seat Adjustment Move seat forward or rearward by lifting the lever. Be sure the latch engages fully. The seat belt might not be injured. Relying too much on your right side mirror could cause ... collide with another vehicle or other objects seen in the right side mirror. Adjusting a seat while the vehicle is moving is parked. To return seatback, lift the lever, lean forward and release the lever. 50 UNDERSTANDING THE FEATURES OF YOUR VEHICLE WARNING! • Vehicles and other object. • Use your inside...
Owner's Manual
Page 52
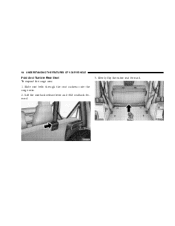
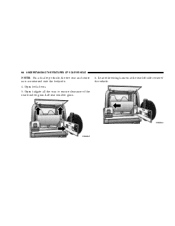
52 UNDERSTANDING THE FEATURES OF YOUR VEHICLE Fold And Tumble Rear Seat To expand the cargo area: 1. Slowly flip the entire seat forward. Slide seat belts through the seat cushions into the cargo area. 2. Lift the seatback release lever and fold seatback forward. 3.
52 UNDERSTANDING THE FEATURES OF YOUR VEHICLE Fold And Tumble Rear Seat To expand the cargo area: 1. Slowly flip the entire seat forward. Slide seat belts through the seat cushions into the cargo area. 2. Lift the seatback release lever and fold seatback forward. 3.
Owner's Manual
Page 55
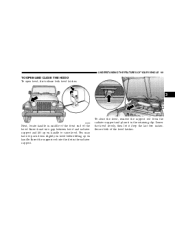
... it in the radiator support. Insert the support rod into gap between hood and radiator support and lift up on handle to raise hood. You may have to push down slightly on hood before lifting up on handle. UNDERSTANDING THE FEATURES OF YOUR VEHICLE 55 TO OPEN AND CLOSE THE HOOD To...
... it in the radiator support. Insert the support rod into gap between hood and radiator support and lift up on handle to raise hood. You may have to push down slightly on hood before lifting up on handle. UNDERSTANDING THE FEATURES OF YOUR VEHICLE 55 TO OPEN AND CLOSE THE HOOD To...
Owner's Manual
Page 66
... not leave the Add-A-Trunk™ loose in this section. 3. The soft top and the hard top are to the body. Removing The Soft Top 1. Lift the Add-A-Trunk™ out and place the knobs in the molded-in a safe place. Remove the soft top bow assembly pivot bracket screws (2 per...
... not leave the Add-A-Trunk™ loose in this section. 3. The soft top and the hard top are to the body. Removing The Soft Top 1. Lift the Add-A-Trunk™ out and place the knobs in the molded-in a safe place. Remove the soft top bow assembly pivot bracket screws (2 per...
Owner's Manual
Page 70
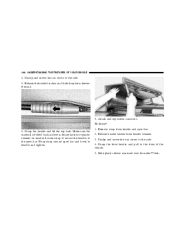
.... As the header reaches the top, locate the 2 bow and push it up and over the sport bar. 70 UNDERSTANDING THE FEATURES OF YOUR VEHICLE 6. Lift the soft top fabric up and over the sport bar. Pull all of the soft top fabric toward the rear of the vehicle with end... caps) that the fabric has a tight, smooth appearance. 11. Remove the tailgate bar (black bar with the tailgate open, lift the plastic header up and away from the rear of the vehicle and wrap around the ends of the plastic header so that is not...
.... As the header reaches the top, locate the 2 bow and push it up and over the sport bar. 70 UNDERSTANDING THE FEATURES OF YOUR VEHICLE 6. Lift the soft top fabric up and over the sport bar. Pull all of the soft top fabric toward the rear of the vehicle with end... caps) that the fabric has a tight, smooth appearance. 11. Remove the tailgate bar (black bar with the tailgate open, lift the plastic header up and away from the rear of the vehicle and wrap around the ends of the plastic header so that is not...
Owner's Manual
Page 80
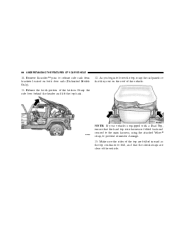
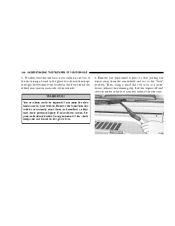
Open tailgate all the way to ensure clearance of the vehicle. Locate the wiring harness at the rear left side corner of the rear window glass. Open both doors. 5. Lift rear window glass. 6. 80 UNDERSTANDING THE FEATURES OF YOUR VEHICLE NOTE: On a dual top vehicle, the two rear and center nuts are retained onto the bodyside. 4.
Open tailgate all the way to ensure clearance of the vehicle. Locate the wiring harness at the rear left side corner of the rear window glass. Open both doors. 5. Lift rear window glass. 6. 80 UNDERSTANDING THE FEATURES OF YOUR VEHICLE NOTE: On a dual top vehicle, the two rear and center nuts are retained onto the bodyside. 4.
Owner's Manual
Page 82
... sure that the hard top is sitting flush with the body at the sides and check to ensure that there is a uniform gap between the lift glass and hard top. NOTE: The hard top must be removed, pull the #4 fuse from soft top usage, they must be removed prior to installation...
... sure that the hard top is sitting flush with the body at the sides and check to ensure that there is a uniform gap between the lift glass and hard top. NOTE: The hard top must be removed, pull the #4 fuse from soft top usage, they must be removed prior to installation...
Owner's Manual
Page 84
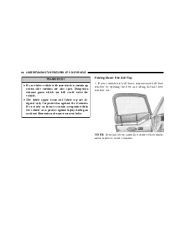
... the vehicle, never inside to protect against the elements. If your vehicle has half doors, remove each half door window by opening the door and lifting the half door window out.
... the vehicle, never inside to protect against the elements. If your vehicle has half doors, remove each half door window by opening the door and lifting the half door window out.
Owner's Manual
Page 88
... Sunrider™ pins to fold, and that they rest on both door rails (Unlimited Models Only). 11. Grasp the side bow behind the header and lift the top back. 12. Make sure the sides of the top are clear of the vehicle.
... Sunrider™ pins to fold, and that they rest on both door rails (Unlimited Models Only). 11. Grasp the side bow behind the header and lift the top back. 12. Make sure the sides of the top are clear of the vehicle.
Owner's Manual
Page 91
... top. 1. Be sure the check straps are not tangled around the 2 bow. Begin working from the rear of the vehicle. 3 Lift the plastic header (with the tailgate open. You will see the 3 bow rise from the rear of the vehicle, with latches) up and over the ...
... top. 1. Be sure the check straps are not tangled around the 2 bow. Begin working from the rear of the vehicle. 3 Lift the plastic header (with the tailgate open. You will see the 3 bow rise from the rear of the vehicle, with latches) up and over the ...
Owner's Manual
Page 100
... from header and sport bar. 2. To Lower 4. Make sure the material is folded back as shown. Remove strap from header retainer. 3. Grasp the header and lift the top back. Release the header latches, and slide the plastic sleeves forward. 5. Wrap strap around sport bar and hook to the sport bar. Unclip...
... from header and sport bar. 2. To Lower 4. Make sure the material is folded back as shown. Remove strap from header retainer. 3. Grasp the header and lift the top back. Release the header latches, and slide the plastic sleeves forward. 5. Wrap strap around sport bar and hook to the sport bar. Unclip...
Owner's Manual
Page 106
... side bars loose in center console or securely behind the folded rear seat on each side of the cinch straps, found in the glove box. Lift the wipers off and store in your authorized dealer for replacement if the cinch straps are not found in the glove box. 106 UNDERSTANDING THE...
... side bars loose in center console or securely behind the folded rear seat on each side of the cinch straps, found in the glove box. Lift the wipers off and store in your authorized dealer for replacement if the cinch straps are not found in the glove box. 106 UNDERSTANDING THE...
Owner's Manual
Page 155
... the reservoir with windshield washer solvent (not radiator antifreeze) and operate the system for fluid level at regular intervals. To turn the rear wiper off, lift the bottom of the engine compartment on the passenger side and should be checked for a few seconds to the heating elements. Also, keep all objects...
... the reservoir with windshield washer solvent (not radiator antifreeze) and operate the system for fluid level at regular intervals. To turn the rear wiper off, lift the bottom of the engine compartment on the passenger side and should be checked for a few seconds to the heating elements. Also, keep all objects...
Owner's Manual
Page 178
.... To avoid loss of control resulting in unpredictable braking action, longer stopping distances, or brake damage. On fabric top models, do not drive with the lift glass up unless the side curtains are wet or slushy. Do not drive too fast for passengers, who should sit in seats and use your...
.... To avoid loss of control resulting in unpredictable braking action, longer stopping distances, or brake damage. On fabric top models, do not drive with the lift glass up unless the side curtains are wet or slushy. Do not drive too fast for passengers, who should sit in seats and use your...
Owner's Manual
Page 205
... "Recommended Fluids, Lubricants, and Genuine Parts" in N (Neutral) before recreational towing to prevent damage to the transfer case will occur if a front or rear wheel lift is used when recreational towing. Shift automatic transmission into D (Drive) or manual transmission into N (Neutral) or depress clutch pedal on manual transmission. 3. STARTING AND OPERATING...
... "Recommended Fluids, Lubricants, and Genuine Parts" in N (Neutral) before recreational towing to prevent damage to the transfer case will occur if a front or rear wheel lift is used when recreational towing. Shift automatic transmission into D (Drive) or manual transmission into N (Neutral) or depress clutch pedal on manual transmission. 3. STARTING AND OPERATING...
Owner's Manual
Page 212
The jack should be used to lift the vehicle for "Tire Changing Procedures." WARNING! Always store the jack, lug wrench, jack handle driver, jack extension, and spare, flat or damaged tire securely ...
The jack should be used to lift the vehicle for "Tire Changing Procedures." WARNING! Always store the jack, lug wrench, jack handle driver, jack extension, and spare, flat or damaged tire securely ...
