Owner's Manual
Page 235
WHAT TO DO IN EMERGENCIES CONTENTS Hazard Warning Flashers ...236 If Your Engine Overheats ...237 Changing A Flat Tire ...238 ▫ Jack And Lug Wrench Locations ...238 ▫ Spare Tire Location ...239 ▫ Tire Changing Procedure ...242 Jump Starting Procedure ...246 Emergency Tow Hooks - If Equipped ...248 Towing A Disabled Vehicle ...248 6
WHAT TO DO IN EMERGENCIES CONTENTS Hazard Warning Flashers ...236 If Your Engine Overheats ...237 Changing A Flat Tire ...238 ▫ Jack And Lug Wrench Locations ...238 ▫ Spare Tire Location ...239 ▫ Tire Changing Procedure ...242 Jump Starting Procedure ...246 Emergency Tow Hooks - If Equipped ...248 Towing A Disabled Vehicle ...248 6
Owner's Manual
Page 238
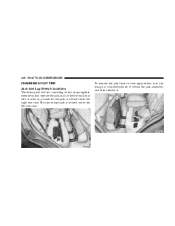
The scissor-type jack is stored under the left rear seat. To remove the jack from its stowage position, turn the wing nut counterclockwise to loosen the jack assembly, and then remove it. 238 WHAT TO DO IN EMERGENCIES CHANGING A FLAT TIRE Jack And Lug Wrench Locations The three piece tool set, consisting of two snap-together extensions that operate the jack and a wheel wrench that also is used as a crank for the jack, is located under the right rear seat.
The scissor-type jack is stored under the left rear seat. To remove the jack from its stowage position, turn the wing nut counterclockwise to loosen the jack assembly, and then remove it. 238 WHAT TO DO IN EMERGENCIES CHANGING A FLAT TIRE Jack And Lug Wrench Locations The three piece tool set, consisting of two snap-together extensions that operate the jack and a wheel wrench that also is used as a crank for the jack, is located under the right rear seat.
Owner's Manual
Page 239
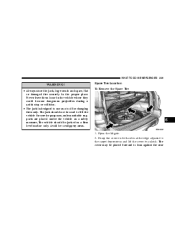
... ice or slippery areas. The cover may be placed forward to lift the vehicle for changing tires only. Open the liftgate. 2. Spare Tire Location To Remove the Spare Tire 6 1. Never leave them loose in the proper place. WHAT TO DO IN EMERGENCIES 239 WARNING! • Always store... the jack, lug wrench and spare, flat or damaged tire securely in the vehicle where they could become dangerous projectiles during a quick stop or collision. • The jack is designed to unlatch. Grasp the cover on a firm level surface only...
... ice or slippery areas. The cover may be placed forward to lift the vehicle for changing tires only. Open the liftgate. 2. Spare Tire Location To Remove the Spare Tire 6 1. Never leave them loose in the proper place. WHAT TO DO IN EMERGENCIES 239 WARNING! • Always store... the jack, lug wrench and spare, flat or damaged tire securely in the vehicle where they could become dangerous projectiles during a quick stop or collision. • The jack is designed to unlatch. Grasp the cover on a firm level surface only...
Owner's Manual
Page 243
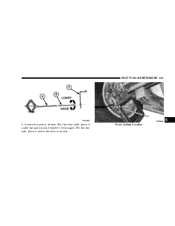
Front Jacking Location For the front axle, place it under the axle near the wheel to be changed. WHAT TO DO IN EMERGENCIES 243 6 4. Locate the jack as shown. For the rear axle, place it under the axle as shown.
Front Jacking Location For the front axle, place it under the axle near the wheel to be changed. WHAT TO DO IN EMERGENCIES 243 6 4. Locate the jack as shown. For the rear axle, place it under the axle as shown.
Owner's Manual
Page 244
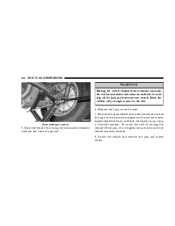
Rear Jacking Location 5. Remove the lug nuts and wheel. 7. To avoid the risk of forcing the vehicle off the jack and hurt someone near it. Lower the vehicle and remove the jack and wheel blocks. Raise the vehicle by turning the jack handle clockwise until they are equally snug, using a crisscross pattern. Raising the vehicle higher... lug nuts with the cone-shaped end toward the wheel. Lightly tighten the nuts until the tire clears the ground. It could slip off the jack, do not tighten the nuts fully until the vehicle has been lowered. 8.
Rear Jacking Location 5. Remove the lug nuts and wheel. 7. To avoid the risk of forcing the vehicle off the jack and hurt someone near it. Lower the vehicle and remove the jack and wheel blocks. Raise the vehicle by turning the jack handle clockwise until they are equally snug, using a crisscross pattern. Raising the vehicle higher... lug nuts with the cone-shaped end toward the wheel. Lightly tighten the nuts until the tire clears the ground. It could slip off the jack, do not tighten the nuts fully until the vehicle has been lowered. 8.
Owner's Manual
Page 245
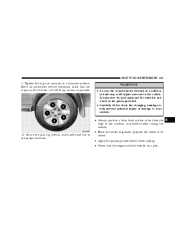
... • Carefully follow these tire changing warnings to help prevent personal injury or damage to be raised. • Apply the parking brake firmly before jacking. • Never start the engine with the vehicle on a firm, level surface as far from the edge of the roadway as possible. Always ...stow the jack parts and the extra tire and wheel in the proper locations. • Block the wheel diagonally opposite the wheel to your vehicle: • Always park on a jack. Have an authorized service technician check that the torque is 85...
... • Carefully follow these tire changing warnings to help prevent personal injury or damage to be raised. • Apply the parking brake firmly before jacking. • Never start the engine with the vehicle on a firm, level surface as far from the edge of the roadway as possible. Always ...stow the jack parts and the extra tire and wheel in the proper locations. • Block the wheel diagonally opposite the wheel to your vehicle: • Always park on a jack. Have an authorized service technician check that the torque is 85...
Owner's Manual
Page 335
... ...127 Instrument Panel and Controls ...126 Interior Appearance Care ...284 Interior Fuses ...286 Interior Lighting ...75 Interior Lights ...75,78 Intermittent Wipers ...81 Introduction ...4 Jack Location ...Jack Operation ...Jacking Instructions Jump Starting ...238 242 242 246 ...14 13 12 12 20 Keys ...11 Lane Change and Turn Signals ...129 Lap Belts ...33 Lap/Shoulder...
... ...127 Instrument Panel and Controls ...126 Interior Appearance Care ...284 Interior Fuses ...286 Interior Lighting ...75 Interior Lights ...75,78 Intermittent Wipers ...81 Introduction ...4 Jack Location ...Jack Operation ...Jacking Instructions Jump Starting ...238 242 242 246 ...14 13 12 12 20 Keys ...11 Lane Change and Turn Signals ...129 Lap Belts ...33 Lap/Shoulder...


