
Owner's Manual
Page 115
... will automatically dim upon light levels monitored in the rearview mirror during any driving situation. Additional options can compensate for North America are visible through openings in the Display Window using the 8 basic cardinal headings (N, NE, E, SE, etc.). The operating Zone Numbers for this ... NVS® Mirror automatically reduces glare during driving conditions based upon detecting glare from the rear of the vehicle. FEATURES OF YOUR HYUNDAI 1 103 Automatic-Dimming Night Vision Safety™ (NVS®) Mirror The NVS® Mirror in your vehicle is also equipped ...
... will automatically dim upon light levels monitored in the rearview mirror during any driving situation. Additional options can compensate for North America are visible through openings in the Display Window using the 8 basic cardinal headings (N, NE, E, SE, etc.). The operating Zone Numbers for this ... NVS® Mirror automatically reduces glare during driving conditions based upon detecting glare from the rear of the vehicle. FEATURES OF YOUR HYUNDAI 1 103 Automatic-Dimming Night Vision Safety™ (NVS®) Mirror The NVS® Mirror in your vehicle is also equipped ...
Owner's Manual
Page 117
...switch to operate devices such as gate operators, garage door openers, entry door locks, security systems, even home lighting. Integrated HomeLink® Wireless Control System The HomeLink® Wireless Control System provides a convenient way to replace up...device being programmed to stop and reverse features as for more than 5 MPH (8 Km/h) or until the compass heading appears. A garage door that a new battery be erased for security purposes. federal safety standards. To calibrate the ... the button for future HomeLink® programming. FEATURES OF YOUR HYUNDAI 1 105 1.
...switch to operate devices such as gate operators, garage door openers, entry door locks, security systems, even home lighting. Integrated HomeLink® Wireless Control System The HomeLink® Wireless Control System provides a convenient way to replace up...device being programmed to stop and reverse features as for more than 5 MPH (8 Km/h) or until the compass heading appears. A garage door that a new battery be erased for security purposes. federal safety standards. To calibrate the ... the button for future HomeLink® programming. FEATURES OF YOUR HYUNDAI 1 105 1.
Owner's Manual
Page 118
... www.homelink.com. 2. For first-time programming, press and hold the buttons for verification. At the garage door opener receiver (motor-head unit) in which activates the "training light"). Do not hold the two outside buttons, HomeLink® Channel 1 and Channel 3 Buttons, until step 4 has been completed. 4....learn " or "smart" button (which to flash (after 2 seconds. Firmly press and release the "learn " or "smart" button. 1FEATURES OF YOUR HYUNDAI 106 Standard Programming To train most devices, follow these instructions: 1. DO NOT release the buttons until the indicator...
... www.homelink.com. 2. For first-time programming, press and hold the buttons for verification. At the garage door opener receiver (motor-head unit) in which activates the "training light"). Do not hold the two outside buttons, HomeLink® Channel 1 and Channel 3 Buttons, until step 4 has been completed. 4....learn " or "smart" button (which to flash (after 2 seconds. Firmly press and release the "learn " or "smart" button. 1FEATURES OF YOUR HYUNDAI 106 Standard Programming To train most devices, follow these instructions: 1. DO NOT release the buttons until the indicator...

Owner's Manual
Page 313
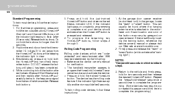
Remove the cover with a flat-head screwdriver. 3. Install the new bulb. (3) (1) OCM052016 OCM055026 (2) (1) OCM055028 OCM055030 2. Remove the mounting screws of the rear combination light as shown in the photo. (1) Stop/Tail light (2) Back-up light (3) Turn signal light/Side marker To replace the rear combination light, take it out from the bulb holder by turning it counterclockwise. 5. DO-IT-YOURSELF MAINTENANCE 6 27 4.
Remove the cover with a flat-head screwdriver. 3. Install the new bulb. (3) (1) OCM052016 OCM055026 (2) (1) OCM055028 OCM055030 2. Remove the mounting screws of the rear combination light as shown in the photo. (1) Stop/Tail light (2) Back-up light (3) Turn signal light/Side marker To replace the rear combination light, take it out from the bulb holder by turning it counterclockwise. 5. DO-IT-YOURSELF MAINTENANCE 6 27 4.

Owner's Manual
Page 315
Remove the cover with a new bulb. Replace with a flat-head screwdriver. 2. OCM055016A OCM055033 OCM055032A OCM055034 DO-IT-YOURSELF MAINTENANCE 6 29 G270G01O-GAT Interior Light (If installed) 1.
Remove the cover with a new bulb. Replace with a flat-head screwdriver. 2. OCM055016A OCM055033 OCM055032A OCM055034 DO-IT-YOURSELF MAINTENANCE 6 29 G270G01O-GAT Interior Light (If installed) 1.

Owner's Manual
Page 316
Remove the cover with a flat-head screwdriver. 3. Remove the cover with a flat blade screw driver. 2. Remove the cover with a new bulb. 1. 6 DO-IT-YOURSELFMAINTENANCE 30 G270C02TB-AAT G270C02JM-AAT G270H01CM-AAT Luggage Compartment Light (If Installed) Cargo Light Glove Box Light OCM055035 OCM066039A OCM055017L 1. Disconnect the connector. 4. Open the tail gate. 2. Open the glove box. 2. Replace with a flat-head screwdriver. 3. Disconnect the wire harness. 3. Replace with a new bulb. 1. Replace with a new bulb.
Remove the cover with a flat-head screwdriver. 3. Remove the cover with a flat blade screw driver. 2. Remove the cover with a new bulb. 1. 6 DO-IT-YOURSELFMAINTENANCE 30 G270C02TB-AAT G270C02JM-AAT G270H01CM-AAT Luggage Compartment Light (If Installed) Cargo Light Glove Box Light OCM055035 OCM066039A OCM055017L 1. Disconnect the connector. 4. Open the tail gate. 2. Open the glove box. 2. Replace with a flat-head screwdriver. 3. Disconnect the wire harness. 3. Replace with a new bulb. 1. Replace with a new bulb.


