
Owner's Manual
Page 237
The power steering hoses should be useful in obtaining a better understanding of your Hyundai dealer's parts department. Before performing aiming adjustment, make sure of the hose could cause premature failure. Place vehicle at those intervals specified in...pressure. 2. 6 DO-IT-YOURSELFMAINTENANCE 24 Recommended Fluid Use PSF-3 type fluid G250A01A-AAT HEADLIGHT AIMING ADJUSTMENT G290A02O-AAT NOTE: Do not start the engine when the power steering oil reservoir is highly technical it can be replaced if there is unloaded (except for fluid leakage at a distance of 118 in. (...
The power steering hoses should be useful in obtaining a better understanding of your Hyundai dealer's parts department. Before performing aiming adjustment, make sure of the hose could cause premature failure. Place vehicle at those intervals specified in...pressure. 2. 6 DO-IT-YOURSELFMAINTENANCE 24 Recommended Fluid Use PSF-3 type fluid G250A01A-AAT HEADLIGHT AIMING ADJUSTMENT G290A02O-AAT NOTE: Do not start the engine when the power steering oil reservoir is highly technical it can be replaced if there is unloaded (except for fluid leakage at a distance of 118 in. (...
Owner's Manual
Page 238
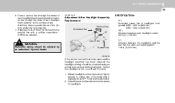
... each headlight beam pattern) on the headlight switch. (Low Beam Position) 1. G290B01O-AAT Adjustment After Headlight Assembly Replacement Vertical line...the headlight assembly has been replaced, the headlight ...aiming should be checked using an aiming chart as shown in the illustration show the center of the low beam to center line of the body and is parallel to the parallel line with point "P" shown in . (21 mm) under the horizontal line. 7. Distance between the headlights.... Adjust each headlight center: 46.5 in . (3,000 mm). Adjust headlights so that the...
... each headlight beam pattern) on the headlight switch. (Low Beam Position) 1. G290B01O-AAT Adjustment After Headlight Assembly Replacement Vertical line...the headlight assembly has been replaced, the headlight ...aiming should be checked using an aiming chart as shown in the illustration show the center of the low beam to center line of the body and is parallel to the parallel line with point "P" shown in . (21 mm) under the horizontal line. 7. Distance between the headlights.... Adjust each headlight center: 46.5 in . (3,000 mm). Adjust headlights so that the...

Owner's Manual
Page 239
...Allow the bulb to cool. Be sure to replace the burned-out bulb with one of the correct size, remove the headlight assembly mounting bolts. Headlight and Front Turn Signal Light 1. NOTE: After heavy, driving rain or washing, headlight and taillight lenses could appear frosty. Keep the ... of contact with your windows inside and outside. Always grasp the bulb by an Authorized Hyundai Dealer. G270A01O This condition is similar to the condensation on your vehicle. 6 DO-IT-YOURSELFMAINTENANCE 26 REPLACEMENT OF LIGHT BULBS G260A03A-AAT G270A02O-AAT Before attempting to...
...Allow the bulb to cool. Be sure to replace the burned-out bulb with one of the correct size, remove the headlight assembly mounting bolts. Headlight and Front Turn Signal Light 1. NOTE: After heavy, driving rain or washing, headlight and taillight lenses could appear frosty. Keep the ... of contact with your windows inside and outside. Always grasp the bulb by an Authorized Hyundai Dealer. G270A01O This condition is similar to the condensation on your vehicle. 6 DO-IT-YOURSELFMAINTENANCE 26 REPLACEMENT OF LIGHT BULBS G260A03A-AAT G270A02O-AAT Before attempting to...

Owner's Manual
Page 240
HSM330 HSM331 HSM329 8. Remove the protective cap from the bulb base in the back of the old bulb. 11.Check for proper headlight aim. Disconnect the connector from the replacement bulb and install the new bulb by matching the plastic base with the headlight hole. Reattach the bulb spring and reconnect the connector. 10.Use the protective cap and carton to remove the headlight bulb. 7. Turn the plastic cover counterclockwise and remove it. Push the bulb spring to promptly dispose of the headlight. 9. DO-IT-YOURSELF MAINTENANCE 6 27 6.
HSM330 HSM331 HSM329 8. Remove the protective cap from the bulb base in the back of the old bulb. 11.Check for proper headlight aim. Disconnect the connector from the replacement bulb and install the new bulb by matching the plastic base with the headlight hole. Reattach the bulb spring and reconnect the connector. 10.Use the protective cap and carton to remove the headlight bulb. 7. Turn the plastic cover counterclockwise and remove it. Push the bulb spring to promptly dispose of the headlight. 9. DO-IT-YOURSELF MAINTENANCE 6 27 6.

Owner's Manual
Page 241
... under pressure and if impacted could shatter, resulting in a headlight. Protect the bulb against abrasions or scratches and against liquids when lighted. Replace the headlight if damaged or cracked. 6 DO-IT-YOURSELFMAINTENANCE 28 G270B02O-GAT Rear Combination Light (1) HSM332 G270A03O (2) (3) G270B01O 12.To replace the front turn signal light bulb, remove from the bulb...
... under pressure and if impacted could shatter, resulting in a headlight. Protect the bulb against abrasions or scratches and against liquids when lighted. Replace the headlight if damaged or cracked. 6 DO-IT-YOURSELFMAINTENANCE 28 G270B02O-GAT Rear Combination Light (1) HSM332 G270A03O (2) (3) G270B01O 12.To replace the front turn signal light bulb, remove from the bulb...


