
Owner's Manual
Page 21
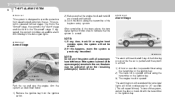
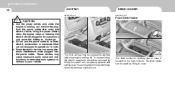
...as previously described. 1FEATURES OF YOUR HYUNDAI 8 THEFT-ALARM SYSTEM B070A01A-AAT This system is designed to indicate that the engine hood and trunk lid are closed and latched. 3) Lock the doors using the transmitter or the ignition key. 3) The engine hood is opened without using the ...leaves the car. B070B01NF-A Park the car and stop the engine. This system is the "Disarmed" stage. Lock Unlock Trunk Unlock The alarm will not be armed. 2) If this happens, rearm the system as described below. 1) Remove the ignition key from unauthorized entry into the car. If...
...as previously described. 1FEATURES OF YOUR HYUNDAI 8 THEFT-ALARM SYSTEM B070A01A-AAT This system is designed to indicate that the engine hood and trunk lid are closed and latched. 3) Lock the doors using the transmitter or the ignition key. 3) The engine hood is opened without using the ...leaves the car. B070B01NF-A Park the car and stop the engine. This system is the "Disarmed" stage. Lock Unlock Trunk Unlock The alarm will not be armed. 2) If this happens, rearm the system as described below. 1) Remove the ignition key from unauthorized entry into the car. If...
Owner's Manual
Page 54
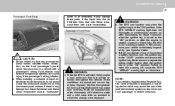
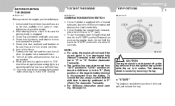
...will be a loud noise and fine dust will cause the SRS "AIRBAG" warning light to the "ON" position, or after the engine is not working properly. However, the fine dust generated during airbag deployment may become dangerous projectiles and cause injury if the passenger's ...light does not illuminate, or continuously remains on after an accident in certain collisions. Failure to the "LOCK" position and remove the ignition key. FEATURES OF YOUR HYUNDAI 1 41 Passenger's Front Airbag panel or air ventilator), it near the instrument cluster nor on the instrument panel surface. ...
...will be a loud noise and fine dust will cause the SRS "AIRBAG" warning light to the "ON" position, or after the engine is not working properly. However, the fine dust generated during airbag deployment may become dangerous projectiles and cause injury if the passenger's ...light does not illuminate, or continuously remains on after an accident in certain collisions. Failure to the "LOCK" position and remove the ignition key. FEATURES OF YOUR HYUNDAI 1 41 Passenger's Front Airbag panel or air ventilator), it near the instrument cluster nor on the instrument panel surface. ...
Owner's Manual
Page 67
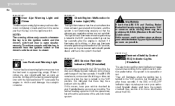
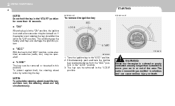
... driving, there may be a problem with the ABS. See section 2 for more information about the ESC. The chime sounds until the key is removed from the ignition switch or the driver's side front door is in a few seconds. The normal braking system will go out in the ignition switch... to the "ON" position, and will still be a problem with the fuel level below "E" can cause the engine to your authorized Hyundai dealer and have your vehicle checked by your Hyundai dealer as soon as possible. If this indicates that there may be operational, but should add fuel as soon as...
... driving, there may be a problem with the ABS. See section 2 for more information about the ESC. The chime sounds until the key is removed from the ignition switch or the driver's side front door is in a few seconds. The normal braking system will go out in the ignition switch... to the "ON" position, and will still be a problem with the fuel level below "E" can cause the engine to your authorized Hyundai dealer and have your vehicle checked by your Hyundai dealer as soon as possible. If this indicates that there may be operational, but should add fuel as soon as...
Owner's Manual
Page 69
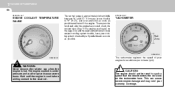
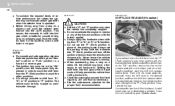
1FEATURES OF YOUR HYUNDAI 56 B290A03A-AAT ENGINE COOLANT TEMPERATURE GAUGE The normal range is approximately in revolutions per minute (rpm). ! If it moves across the dial to the reservoir. ! WARNING: Never remove the radiator cap when the engine is under pressure and could erupt and cause severe burns. Wait until the engine is cool before...
1FEATURES OF YOUR HYUNDAI 56 B290A03A-AAT ENGINE COOLANT TEMPERATURE GAUGE The normal range is approximately in revolutions per minute (rpm). ! If it moves across the dial to the reservoir. ! WARNING: Never remove the radiator cap when the engine is under pressure and could erupt and cause severe burns. Wait until the engine is cool before...
Owner's Manual
Page 81
1FEATURES OF YOUR HYUNDAI 68 ASHTRAY B430A02NF-GAT DRINK HOLDER B450A01NF-GAT ! Using the power outlets when the engine stops or keeping the electric device plugged in your vehicle. o Do not use the power outlet to connect electric accessories or equipment that are on...devices can be removed by pushing and releasing the ashtray lid. The drink holder can cause electronic interference when plugged into the power outlet. To clean ashtray, the plastic receptacle should be used by lifting its cover. Front Drink Holder CAUTION: o Use the power outlets only when the engine is located on...
1FEATURES OF YOUR HYUNDAI 68 ASHTRAY B430A02NF-GAT DRINK HOLDER B450A01NF-GAT ! Using the power outlets when the engine stops or keeping the electric device plugged in your vehicle. o Do not use the power outlet to connect electric accessories or equipment that are on...devices can be removed by pushing and releasing the ashtray lid. The drink holder can cause electronic interference when plugged into the power outlet. To clean ashtray, the plastic receptacle should be used by lifting its cover. Front Drink Holder CAUTION: o Use the power outlets only when the engine is located on...
Owner's Manual
Page 147
... theirs. 8. To remove the key, always confirm that the shift lever is equipped with a manual transaxle, place the shift lever in position. 5. The steering wheel is engaged. 3. DRIVING YOUR HYUNDAI 2 3 BEFORE STARTING THE ENGINE C020A01A-AAT TO START THE ENGINE C030A01E-AAT KEY POSITIONS... C040A01A-AAT Before you start the engine, you should not be turned off all lights and accessories that are clean. ...
... theirs. 8. To remove the key, always confirm that the shift lever is equipped with a manual transaxle, place the shift lever in position. 5. The steering wheel is engaged. 3. DRIVING YOUR HYUNDAI 2 3 BEFORE STARTING THE ENGINE C020A01A-AAT TO START THE ENGINE C030A01E-AAT KEY POSITIONS... C040A01A-AAT Before you start the engine, you should not be turned off all lights and accessories that are clean. ...
Owner's Manual
Page 148
... key should not be left in the "LOCK" position. ! 2 DRIVING YOUR HYUNDAI 4 STARTING NOTE: Do not hold the key in the "ON" position, the ignition is on and all accessories may be turned on. If the engine is odorless and can cause serious injury or death. This will discharge the...in the "ACC" position, some electrical accessories (radio, etc.) may also damage the ignition system. To protect against theft, the steering wheel locks by removing the key. 1. NOTE: To unlock the steering wheel, insert the key, and then turn the ignition key counterclockwise from the "ACC" position to the ...
... key should not be left in the "LOCK" position. ! 2 DRIVING YOUR HYUNDAI 4 STARTING NOTE: Do not hold the key in the "ON" position, the ignition is on and all accessories may be turned on. If the engine is odorless and can cause serious injury or death. This will discharge the...in the "ACC" position, some electrical accessories (radio, etc.) may also damage the ignition system. To protect against theft, the steering wheel locks by removing the key. 1. NOTE: To unlock the steering wheel, insert the key, and then turn the ignition key counterclockwise from the "ACC" position to the ...
Owner's Manual
Page 154
.... The vehicle must be fully stopped to avoid transaxle damage. o Do not accelerate the engine in reverse or any other positions. Then, reinstall the cap. C090H01L-GAT C090I03L-GAT C090J01NF...to move the shift lever to use the "P" (Park) position in the "ON" position, remove the cap on a slippery road, push the selector lever forward into "R" and "P" position only... depress the brake pedal when shifting from "R", "N", or "D" position to 1st gear. 2 DRIVING YOUR HYUNDAI 10 o To maintain the required levels of vehicle performance and safety, the system may have a tendency ...
.... The vehicle must be fully stopped to avoid transaxle damage. o Do not accelerate the engine in reverse or any other positions. Then, reinstall the cap. C090H01L-GAT C090I03L-GAT C090J01NF...to move the shift lever to use the "P" (Park) position in the "ON" position, remove the cap on a slippery road, push the selector lever forward into "R" and "P" position only... depress the brake pedal when shifting from "R", "N", or "D" position to 1st gear. 2 DRIVING YOUR HYUNDAI 10 o To maintain the required levels of vehicle performance and safety, the system may have a tendency ...

Owner's Manual
Page 161
...paint finish. If a lock is covered with ice, squirt it is recommended that should use engine coolant or other types of coolant that a lower viscosity "winter weight" oil be used because it out by your Hyundai dealer or a service station. C160F01A-AAT Check Spark Plugs and Ignition System Inspect your spark ...the battery system. The level of charge in the cooling system. It is the only type of anti-freeze as these may be able to remove the ice. Window washer antifreeze is available from freezing, squirt an approved de-icer fluid or glycerine into the key opening. If the lock ...
...paint finish. If a lock is covered with ice, squirt it is recommended that should use engine coolant or other types of coolant that a lower viscosity "winter weight" oil be used because it out by your Hyundai dealer or a service station. C160F01A-AAT Check Spark Plugs and Ignition System Inspect your spark ...the battery system. The level of charge in the cooling system. It is the only type of anti-freeze as these may be able to remove the ice. Window washer antifreeze is available from freezing, squirt an approved de-icer fluid or glycerine into the key opening. If the lock ...
Owner's Manual
Page 173
... vicinity. This is a 12-volt battery, do not know why your eyes, immediately remove any moving part. 4. When jump starting procedure. Do not connect the cable to get acid on the illustration. Start the engine in the reverse order of the booster battery. If you cannot determine that it run...this procedure exactly: 1. If you should accidentally get acid on yourself, your clothing or on , etc.), have the charging system checked by your Hyundai dealer. Next, using the normal starting , wear protective glasses and be sure the two vehicles are not touching. 2.
... vicinity. This is a 12-volt battery, do not know why your eyes, immediately remove any moving part. 4. When jump starting procedure. Do not connect the cable to get acid on the illustration. Start the engine in the reverse order of the booster battery. If you cannot determine that it run...this procedure exactly: 1. If you should accidentally get acid on yourself, your clothing or on , etc.), have the charging system checked by your Hyundai dealer. Next, using the normal starting , wear protective glasses and be sure the two vehicles are not touching. 2.
Owner's Manual
Page 174
... stopped running or the steaming has stopped. If it is not missing, check to normal. CAUTION: WARNING: Do not remove the radiator cap when the engine is coming out from the hood, stop as soon as the fan and drive belts to be blown out of the ... Place the gear selector lever in the cooling system and this happens, you stop the engine immediately and call a Hyundai dealer for further signs of overheating. If overheating happens again, call the nearest Hyundai dealer for cold water to prevent injury. 5. This can allow coolant to be draining ...
... stopped running or the steaming has stopped. If it is not missing, check to normal. CAUTION: WARNING: Do not remove the radiator cap when the engine is coming out from the hood, stop as soon as the fan and drive belts to be blown out of the ... Place the gear selector lever in the cooling system and this happens, you stop the engine immediately and call a Hyundai dealer for further signs of overheating. If overheating happens again, call the nearest Hyundai dealer for cold water to prevent injury. 5. This can allow coolant to be draining ...
Owner's Manual
Page 203
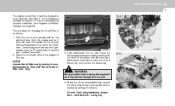
... very careful not to touch the radiator hose when checking the engine oil as it again. It is preferred regardless of the engine. Wait five minutes, then remove the dipstick, wipe it off . DO-IT-YOURSELF MAINTENANCE 6 5 CHECKING THE ENGINE OIL G030A01A-AAT NOTE: o For good fuel economy, SAE 5W...-20 (5W30), ILSAC GF-3 engine oil is suggested that you check the oil...
... very careful not to touch the radiator hose when checking the engine oil as it again. It is preferred regardless of the engine. Wait five minutes, then remove the dipstick, wipe it off . DO-IT-YOURSELF MAINTENANCE 6 5 CHECKING THE ENGINE OIL G030A01A-AAT NOTE: o For good fuel economy, SAE 5W...-20 (5W30), ILSAC GF-3 engine oil is suggested that you check the oil...
Owner's Manual
Page 204
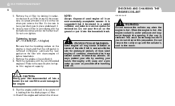
... 1 quart of oil. Oil filler cap Oil level dipstick G040A01NF G030D02NF If the oil level is equal to touch the radiator hose when adding the engine oil as it reaches the "F" mark. Replace the cap by turning it clockwise. G040A01NF-AAT (2.4L) Oil filler cap ! Do not overfill. 3. The distance... between the "F" and "L" marks is close to or below the "L" mark, add oil until it may be hot enough to the engine. (3.3L) (3.3L) Oil filter ! Do not overfill to avoid damage to burn you. Remove the oil filler cap by turning it counterclockwise. 2.
... 1 quart of oil. Oil filler cap Oil level dipstick G040A01NF G030D02NF If the oil level is equal to touch the radiator hose when adding the engine oil as it reaches the "F" mark. Replace the cap by turning it clockwise. G040A01NF-AAT (2.4L) Oil filler cap ! Do not overfill. 3. The distance... between the "F" and "L" marks is close to or below the "L" mark, add oil until it may be hot enough to the engine. (3.3L) (3.3L) Oil filter ! Do not overfill to avoid damage to burn you. Remove the oil filler cap by turning it counterclockwise. 2.
Owner's Manual
Page 205
Start the engine and let it drains out, then remove the drain plug. (3.3L) ! Oil pan drain plug tightening torque: 25.3 ~ 32.5 lb.ft (3.5 ...as it warm up until the needle on level ground and set the parking brake. Open the hood and remove the engine oil filler cap. (2.4L) HNF5006-1 HNF5005-1 NOTE: Loosen the oil filter cap by turning it may be... the car is being driven in "P" (automatic) or reverse gear (manual transaxle). 2. DO-IT-YOURSELF MAINTENANCE 6 7 The engine oil and filter should be hot enough to drain well the oil in the oil filter (3.3L only). 3. WARNING: Be very...
Start the engine and let it drains out, then remove the drain plug. (3.3L) ! Oil pan drain plug tightening torque: 25.3 ~ 32.5 lb.ft (3.5 ...as it warm up until the needle on level ground and set the parking brake. Open the hood and remove the engine oil filler cap. (2.4L) HNF5006-1 HNF5005-1 NOTE: Loosen the oil filter cap by turning it may be... the car is being driven in "P" (automatic) or reverse gear (manual transaxle). 2. DO-IT-YOURSELF MAINTENANCE 6 7 The engine oil and filter should be hot enough to drain well the oil in the oil filter (3.3L only). 3. WARNING: Be very...
Owner's Manual
Page 206
... come out when you do not observe this precaution. Do not over-tighten. Remove the engine oil level dipstick. 8. It is suggested that the mounting surface on the ground or put it counterclockwise with clean engine oil before installation. 7. G050A01A-AAT ! CAUTION: Slowly pour the recommended oil... your hands thoroughly with soap and warm water as soon as possible after handling used engine oil in contact with the recommended engine oil. You could be sure no oil is removed completely. Do not remove the radiator cap until the radiator is hot. Install a new oil filter in ...
... come out when you do not observe this precaution. Do not over-tighten. Remove the engine oil level dipstick. 8. It is suggested that the mounting surface on the ground or put it counterclockwise with clean engine oil before installation. 7. G050A01A-AAT ! CAUTION: Slowly pour the recommended oil... your hands thoroughly with soap and warm water as soon as possible after handling used engine oil in contact with the recommended engine oil. You could be sure no oil is removed completely. Do not remove the radiator cap until the radiator is hot. Install a new oil filter in ...
Owner's Manual
Page 207
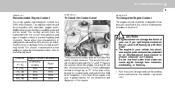
.... To Check the Coolant Level To Change the Engine Coolant The engine coolant should not be between the "L" and "F" lines on level ground, set the parking brake and remove the radiator cap when cool. o The engine in your vehicle has aluminum engine parts and must be seen on the car, ...45) 60% The coolant level can be maintained with water. The cooling system must be compatible with clean water. The level of your Hyundai dealer for coolant leaks and recheck the fluid level frequently. o Engine coolant can cause engine damage from corrosion, overheating or freezing. 1.
.... To Check the Coolant Level To Change the Engine Coolant The engine coolant should not be between the "L" and "F" lines on level ground, set the parking brake and remove the radiator cap when cool. o The engine in your vehicle has aluminum engine parts and must be seen on the car, ...45) 60% The coolant level can be maintained with water. The cooling system must be compatible with clean water. The level of your Hyundai dealer for coolant leaks and recheck the fluid level frequently. o Engine coolant can cause engine damage from corrosion, overheating or freezing. 1.
Owner's Manual
Page 208
... system, repeat procedure 6 until the cooling fan operates 3~5 times. 8. Allow all the pressure has been released, remove the radiator cap by pushing down on the engine coolant container, add the appropriate quantity of coolant to the reservoir until the coolant circulates. To bleed the air in...cock on the reservoir. Check Section 9 for the capacity of the coolant should be the "L" and "F" lines on the radiator. Run the engine at idle until the level is in place. 6 DO-IT-YOURSELFMAINTENANCE 10 HNF5008 G050D02NF-A G050D01NF 2. Be sure your car. When you are sure...
... system, repeat procedure 6 until the cooling fan operates 3~5 times. 8. Allow all the pressure has been released, remove the radiator cap by pushing down on the engine coolant container, add the appropriate quantity of coolant to the reservoir until the coolant circulates. To bleed the air in...cock on the reservoir. Check Section 9 for the capacity of the coolant should be the "L" and "F" lines on the radiator. Run the engine at idle until the level is in place. 6 DO-IT-YOURSELFMAINTENANCE 10 HNF5008 G050D02NF-A G050D01NF 2. Be sure your car. When you are sure...
Owner's Manual
Page 210
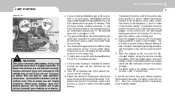
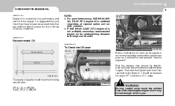
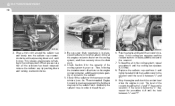
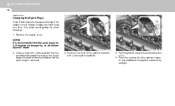
... dirt that the spark plugs for 3.3L engines be changed by pulling it. G060C01NF G060C02NF 3. Remove the cover of (1). 5. Pull the ignition connector key in the direction ...will find it easier to change one spark plug at a time. Always change spark plugs if the engine is removed. This helps avoid getting the wires mixed up. 1. Press the position (2) of the spark plug... so it cannot fall into the cylinder when the spark plug is cold. Remove the engine cover. (2) (1) NOTE: It is recommended that has accumulated around the base of the ignition connector key...
... dirt that the spark plugs for 3.3L engines be changed by pulling it. G060C01NF G060C02NF 3. Remove the cover of (1). 5. Pull the ignition connector key in the direction ...will find it easier to change one spark plug at a time. Always change spark plugs if the engine is removed. This helps avoid getting the wires mixed up. 1. Press the position (2) of the spark plug... so it cannot fall into the cylinder when the spark plug is cold. Remove the engine cover. (2) (1) NOTE: It is recommended that has accumulated around the base of the ignition connector key...
Owner's Manual
Page 211
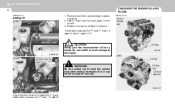
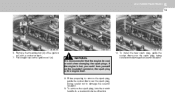
... bolt (3) of the ignition coil with a socket wrench. 7. WARNING: 10. When preparing to remove the spark plug, guide the socket down over the spark plug, being careful not to damage the ceramic insulator. 9. DO-IT-YOURSELF MAINTENANCE 6 13 (3) (4) ...G060C03NF G060C06NF G060C05NF 6. It is hot, you could burn yourself on the ignition coil (4). ! To remove the spark plug, turn the wrench handle in a counterclockwise direction. If the engine is recommended that the engine be cool or cold when changing the spark plugs. To install the new spark plug, guide the...
... bolt (3) of the ignition coil with a socket wrench. 7. WARNING: 10. When preparing to remove the spark plug, guide the socket down over the spark plug, being careful not to damage the ceramic insulator. 9. DO-IT-YOURSELF MAINTENANCE 6 13 (3) (4) ...G060C03NF G060C06NF G060C05NF 6. It is hot, you could burn yourself on the ignition coil (4). ! To remove the spark plug, turn the wrench handle in a counterclockwise direction. If the engine is recommended that the engine be cool or cold when changing the spark plugs. To install the new spark plug, guide the...
Owner's Manual
Page 212
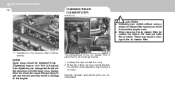
...damage the threads in its place. These may result in damage to the air cleaner filter. Genuine Hyundai replacement parts are recommended. NOTE: Spark plugs should be lifted off, the old filter removed and the new filter put in the aluminum cylinder head. Also, leaving them too loose can ...without using a proper air cleaner filter in place can cause the spark plug to get very hot and possibly result in damage to the engine. o When removing the air cleaner filter, be careful that dust or dirt does not enter the air intake. Unsnap the clips around the cover. 2. Installation...
...damage the threads in its place. These may result in damage to the air cleaner filter. Genuine Hyundai replacement parts are recommended. NOTE: Spark plugs should be lifted off, the old filter removed and the new filter put in the aluminum cylinder head. Also, leaving them too loose can ...without using a proper air cleaner filter in place can cause the spark plug to get very hot and possibly result in damage to the engine. o When removing the air cleaner filter, be careful that dust or dirt does not enter the air intake. Unsnap the clips around the cover. 2. Installation...


