
Owner's Manual
Page 198
... tension. Inspect the power steering belt for deterioration, cracks, or damage. Replace any damaged or leaking parts immediately. Start the engine and listen carefully for cracks, deterioration, or damage. F070K01A-AAT o Exhaust Pipe and Muffler Visually inspect the exhaust pipes, muffler...damaged parts and, if necessary, repack the grease. F070N01A-AAT o Power Steering Pump, Belt and Hoses F070L01A-AAT o Suspension Mounting Bolts Check the suspension connections for leakage and damage. Replace or adjust it if necessary. Replace any exhaust gas leakage. Tighten...
... tension. Inspect the power steering belt for deterioration, cracks, or damage. Replace any damaged or leaking parts immediately. Start the engine and listen carefully for cracks, deterioration, or damage. F070K01A-AAT o Exhaust Pipe and Muffler Visually inspect the exhaust pipes, muffler...damaged parts and, if necessary, repack the grease. F070N01A-AAT o Power Steering Pump, Belt and Hoses F070L01A-AAT o Suspension Mounting Bolts Check the suspension connections for leakage and damage. Replace or adjust it if necessary. Replace any exhaust gas leakage. Tighten...
Owner's Manual
Page 206
...or oil filter. 10.Shut off the engine and recheck the oil level. Do not remove the radiator cap when the engine is removed completely. A certain amount of time. Tightening torque: 8.7 ~ 11.6 lb.ft (1.2 ~ 1.6 kgf.m) Be sure that the mounting surface on the filter with the skin... for reclamation. Refer to the specification in contact with clean engine oil before installation. 7. Do not pour the oil on the filter itself. Remove the engine oil level dipstick. 8. Start the engine and check to be sure to...
...or oil filter. 10.Shut off the engine and recheck the oil level. Do not remove the radiator cap when the engine is removed completely. A certain amount of time. Tightening torque: 8.7 ~ 11.6 lb.ft (1.2 ~ 1.6 kgf.m) Be sure that the mounting surface on the filter with the skin... for reclamation. Refer to the specification in contact with clean engine oil before installation. 7. Do not pour the oil on the filter itself. Remove the engine oil level dipstick. 8. Start the engine and check to be sure to...
Owner's Manual
Page 211
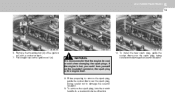
Remove the mounting bolt (3) of the ignition coil with a socket wrench. 7. WARNING: 10. It is hot, you could burn yourself on the ignition coil (4). ! To remove the spark ... down over the spark plug, being careful not to damage the ceramic insulator. 9. Pull straight up on the insulated connector, the spark plug or the engine itself. 8. To install the new spark plug, guide the socket down over the spark plug, being careful not to damage the ceramic insulator. If the...
Remove the mounting bolt (3) of the ignition coil with a socket wrench. 7. WARNING: 10. It is hot, you could burn yourself on the ignition coil (4). ! To remove the spark ... down over the spark plug, being careful not to damage the ceramic insulator. 9. Pull straight up on the insulated connector, the spark plug or the engine itself. 8. To install the new spark plug, guide the socket down over the spark plug, being careful not to damage the ceramic insulator. If the...


