Owner's Manual
Page 199
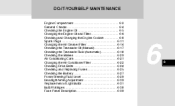
... the Transaxle Fluid (Automatic) ...6-18 Checking the Brakes ...6-20 Air Conditioning Care ...6-21 Changing the Air Conditioner Filter ...6-22 Checking Drive Belts ...6-24 Checking and Replacing Fuses ...6-25 Checking the Battery ...6-27 Power Steering Fluid Level ...6-29 Headlight Aiming Adjustment ...6-30 Replacement of Light Bulbs ...6-31 Bulb Wattages ...6-38 Fuse Panel Description ...6-39 6 6
... the Transaxle Fluid (Automatic) ...6-18 Checking the Brakes ...6-20 Air Conditioning Care ...6-21 Changing the Air Conditioner Filter ...6-22 Checking Drive Belts ...6-24 Checking and Replacing Fuses ...6-25 Checking the Battery ...6-27 Power Steering Fluid Level ...6-29 Headlight Aiming Adjustment ...6-30 Replacement of Light Bulbs ...6-31 Bulb Wattages ...6-38 Fuse Panel Description ...6-39 6 6
Owner's Manual
Page 229
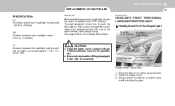
... and the wall that the lights are tested against : 118.11 in. (3,000 mm) G260A01L-GAT G270A01NF-AAT Before attempting to replace a light bulb, be changed. Wear eye protection. 2. HEADLIGHT, FRONT TURN SIGNAL LIGHT AND FRONT FOG LIGHT Headlight and Front Turn Signal Light Headlight... touching the glass. Front Fog Light Turn signal light (Front position light) G260A01NF-A Replacement instructions: 1. Allow the bulb to the "OFF" position. DO-IT-YOURSELF MAINTENANCE 6 31 REPLACEMENT OF LIGHT BULBS SPECIFICATION: "H" Horizontal center line of the same number and wattage rating. The next ...
... and the wall that the lights are tested against : 118.11 in. (3,000 mm) G260A01L-GAT G270A01NF-AAT Before attempting to replace a light bulb, be changed. Wear eye protection. 2. HEADLIGHT, FRONT TURN SIGNAL LIGHT AND FRONT FOG LIGHT Headlight and Front Turn Signal Light Headlight... touching the glass. Front Fog Light Turn signal light (Front position light) G260A01NF-A Replacement instructions: 1. Allow the bulb to the "OFF" position. DO-IT-YOURSELF MAINTENANCE 6 31 REPLACEMENT OF LIGHT BULBS SPECIFICATION: "H" Horizontal center line of the same number and wattage rating. The next ...
Owner's Manual
Page 230
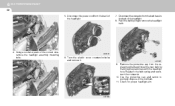
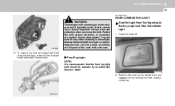
...reconnect the connector. 10. Check for proper headlight aim. Push the bulb spring to promptly dispose of the headlight. 7. HNF5024 HNF5026 Using a socket wrench of the headlight. 8. Disconnect the connector from the bulb base in the back of the correct size, remove the headlight assembly... and carton to remove the headlight bulb. Turn the plastic cover counterclockwise and remove it. 9. HNF5027 Remove the protective cap from the back of the old bulb. 11. HNF5023 4. Disconnect the power cord from the replacement bulb and install the new bulb by matching the plastic base with ...
...reconnect the connector. 10. Check for proper headlight aim. Push the bulb spring to promptly dispose of the headlight. 7. HNF5024 HNF5026 Using a socket wrench of the headlight. 8. Disconnect the connector from the bulb base in the back of the correct size, remove the headlight assembly... and carton to remove the headlight bulb. Turn the plastic cover counterclockwise and remove it. 9. HNF5027 Remove the protective cap from the back of the old bulb. 11. HNF5023 4. Disconnect the power cord from the replacement bulb and install the new bulb by matching the plastic base with ...
Owner's Manual
Page 231
... and dispose of the rear luggage trim by an authorized Hyundai dealer. Protect the bulb against abrasions or scratches and against liquids when lighted. To replace the front turn signal light bulb (front position light), remove it from the bulb holder and install the new bulb. DO-IT-YOURSELF MAINTENANCE 6 33 G270D01NF-AAT ! Open the trunk...
... and dispose of the rear luggage trim by an authorized Hyundai dealer. Protect the bulb against abrasions or scratches and against liquids when lighted. To replace the front turn signal light bulb (front position light), remove it from the bulb holder and install the new bulb. DO-IT-YOURSELF MAINTENANCE 6 33 G270D01NF-AAT ! Open the trunk...
Owner's Manual
Page 232
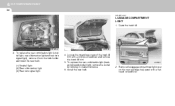
Install the new bulb. HNF5030-A HNF5042 3. To replace the rear combination light (stop /tail light), remove the socket by turning it from the bulb holder and install the new bulb. (1) Stop/tail light (2) Rear side marker light (3) Rear turn signal light 4. HNF5031 2. 6 DO-IT-YOURSELFMAINTENANCE 34 G270C01L-AAT LUGGAGE COMPARTMENT LIGHT 1. Loosen the mounting screws...
Install the new bulb. HNF5030-A HNF5042 3. To replace the rear combination light (stop /tail light), remove the socket by turning it from the bulb holder and install the new bulb. (1) Stop/tail light (2) Rear side marker light (3) Rear turn signal light 4. HNF5031 2. 6 DO-IT-YOURSELFMAINTENANCE 34 G270C01L-AAT LUGGAGE COMPARTMENT LIGHT 1. Loosen the mounting screws...
Owner's Manual
Page 233
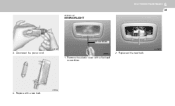
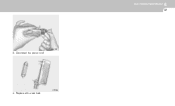
Replace with a new bulb. HTB284 4. Disconnect the power cord. 2. Replace with a new bulb. 1. Remove the plastic cover with a flat-head screwdriver. DO-IT-YOURSELF MAINTENANCE 6 35 G270G01L-AAT INTERIOR LIGHT Screwdriver HNF5032 HNF5035 HNF5034 3.
Replace with a new bulb. HTB284 4. Disconnect the power cord. 2. Replace with a new bulb. 1. Remove the plastic cover with a flat-head screwdriver. DO-IT-YOURSELF MAINTENANCE 6 35 G270G01L-AAT INTERIOR LIGHT Screwdriver HNF5032 HNF5035 HNF5034 3.
Owner's Manual
Page 234
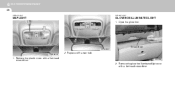
Replace with a flat-head screwdriver. Remove the glove box illuminated light cover with a new bulb. Open the glove box. Remove the plastic cover with a flat-head screwdriver. 2. HNF5036 1. 6 DO-IT-YOURSELFMAINTENANCE 36 G270L01L-AAT G270K01L-AAT MAP LIGHT GLOVE BOX ILLUMINATED LIGHT 1. Screwdriver G270G02NF G270G01NF 2.
Replace with a flat-head screwdriver. Remove the glove box illuminated light cover with a new bulb. Open the glove box. Remove the plastic cover with a flat-head screwdriver. 2. HNF5036 1. 6 DO-IT-YOURSELFMAINTENANCE 36 G270L01L-AAT G270K01L-AAT MAP LIGHT GLOVE BOX ILLUMINATED LIGHT 1. Screwdriver G270G02NF G270G01NF 2.
Owner's Manual
Page 235
HTB284 4. DO-IT-YOURSELF MAINTENANCE 6 37 HJM5039 3. Disconnect the power cord. Replace with a new bulb.
HTB284 4. DO-IT-YOURSELF MAINTENANCE 6 37 HJM5039 3. Disconnect the power cord. Replace with a new bulb.
Owner's Manual
Page 267
...Remote release ...1-87 Fuse Panel Description ...6-39 Fuses ...6-25 G General Checks ...6-4 Glove Box ...1-74 H Hazard Warning System ...1-65 Headlight Aiming adjustment ...6-30 Replacement ...6-31 Switch ...1-62 Heating and Cooling Control ...1-96 Heating and Ventilation Air flow control ...1-98, 1-110 Air intake control switch ...1-101, 1-108 Bi-... Control (Rheostat) ...1-67 Interior Light ...1-73 Intermittent Wiper ...1-65 J Jump Starting ...3-3 K Key ...1-3 If you lose your keys ...3-13 Positions ...2-3 L Light Bulb Watages ...6-38 Light Bulbs Replacement ...6-31 Lubrication Chart ...9-4
...Remote release ...1-87 Fuse Panel Description ...6-39 Fuses ...6-25 G General Checks ...6-4 Glove Box ...1-74 H Hazard Warning System ...1-65 Headlight Aiming adjustment ...6-30 Replacement ...6-31 Switch ...1-62 Heating and Cooling Control ...1-96 Heating and Ventilation Air flow control ...1-98, 1-110 Air intake control switch ...1-101, 1-108 Bi-... Control (Rheostat) ...1-67 Interior Light ...1-73 Intermittent Wiper ...1-65 J Jump Starting ...3-3 K Key ...1-3 If you lose your keys ...3-13 Positions ...2-3 L Light Bulb Watages ...6-38 Light Bulbs Replacement ...6-31 Lubrication Chart ...9-4


