Owner's Manual
Page 66
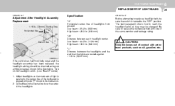
..., or does not go on at the same time. The second position turns on the parking lights, sidelights, tail lights and instrument panel lights. FEATURES OF YOUR HYUNDAI 1 55 MULTI-FUNCTION LIGHT SWITCH B340A01A-AAT B340B01A-AAT B340C03E-AAT COMBINATION TURN SIGNAL, HEADLIGHT AND HIGH-BEAM SWITCH Turn Signal... car to turn signals on the headlights. NOTE: The ignition must be in the system. Check for a burnedout fuse or bulb or see your Hyundai dealer. As the turn signals at all, there is completed, the lever will automatically return to blink. Lane Change Signal Headlight...
..., or does not go on at the same time. The second position turns on the parking lights, sidelights, tail lights and instrument panel lights. FEATURES OF YOUR HYUNDAI 1 55 MULTI-FUNCTION LIGHT SWITCH B340A01A-AAT B340B01A-AAT B340C03E-AAT COMBINATION TURN SIGNAL, HEADLIGHT AND HIGH-BEAM SWITCH Turn Signal... car to turn signals on the headlights. NOTE: The ignition must be in the system. Check for a burnedout fuse or bulb or see your Hyundai dealer. As the turn signals at all, there is completed, the lever will automatically return to blink. Lane Change Signal Headlight...
Owner's Manual
Page 144
...transaxle, place the shift lever in neutral and depress the clutch pedal fully. Fasten your Hyundai is not in their proper positions. 6. COMBINATION IGNITION SWITCH o If your seat belt and be sure that all lights and accessories that are not needed. 9. o To start the engine, insert the ..., water or other occupants have sufficient fuel. 10.Check the operation of warning lights and all appropriate warning lights are operating and that you release the key. Check that all the doors. 7. Check that all bulbs when key is securely positioned in "P" (park). o If your seat, seatback...
...transaxle, place the shift lever in neutral and depress the clutch pedal fully. Fasten your Hyundai is not in their proper positions. 6. COMBINATION IGNITION SWITCH o If your seat belt and be sure that all lights and accessories that are not needed. 9. o To start the engine, insert the ..., water or other occupants have sufficient fuel. 10.Check the operation of warning lights and all appropriate warning lights are operating and that you release the key. Check that all the doors. 7. Check that all bulbs when key is securely positioned in "P" (park). o If your seat, seatback...
Owner's Manual
Page 194
... The Air Conditioner Filter ...6-18 Checking Drive Belts ...6-20 Checking and Replacing Fuses ...6-20 Checking the Battery ...6-22 Power Steering Fluid Level ...6-23 Replacement of Light Bulbs ...6-25 Bulb Wattage ...6-33 Fuse Panel Description ...6-34 6 6
... The Air Conditioner Filter ...6-18 Checking Drive Belts ...6-20 Checking and Replacing Fuses ...6-20 Checking the Battery ...6-22 Power Steering Fluid Level ...6-23 Replacement of Light Bulbs ...6-25 Bulb Wattage ...6-33 Fuse Panel Description ...6-34 6 6
Owner's Manual
Page 218
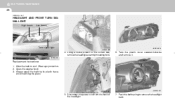
... mm) High beam : 33.0 in. (840 mm) "L" Distance between the headlights and the wall that main axis of light is parallel to replace a headlight bulb, be changed. If the vehicle has had front body repair and the headlight assembly has been replaced, the headlight aiming should be... the headlight switch. (Low Beam Position) 1. DO-IT-YOURSELF MAINTENANCE 6 25 REPLACEMENT OF LIGHT BULBS G290B03E-AAT Adjustment After Headlight Assembly Replacement 1.18 in the illustration. 2. Be sure to reach the headlight bulbs so they may be sure the switch is aligned with point "P" shown in . (30mm...
... mm) High beam : 33.0 in. (840 mm) "L" Distance between the headlights and the wall that main axis of light is parallel to replace a headlight bulb, be changed. If the vehicle has had front body repair and the headlight assembly has been replaced, the headlight aiming should be... the headlight switch. (Low Beam Position) 1. DO-IT-YOURSELF MAINTENANCE 6 25 REPLACEMENT OF LIGHT BULBS G290B03E-AAT Adjustment After Headlight Assembly Replacement 1.18 in the illustration. 2. Be sure to reach the headlight bulbs so they may be sure the switch is aligned with point "P" shown in . (30mm...
Owner's Manual
Page 219
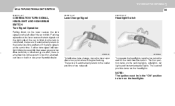
... its plastic base, avoid touching the glass. Push the bulb spring to cool. G270A01E 6. Disconnect the power cord from the back of the correct size, remove the headlight assembly mounting bolts. Using a socket wrench of ...the headlight. 7. Replacement instructions: 1. HXDFL1009 HXDFL1011 5. Turn the plastic cover counterclockwise and remove it. Open the engine hood. 3. Allow the bulb to remove the headlight bulb. 6 DO-IT-YOURSELFMAINTENANCE 26 G270A01A-AAT HEADLIGHT AND FRONT TURN SIGNAL LIGHT High beam Low beam Turn signal...
... its plastic base, avoid touching the glass. Push the bulb spring to cool. G270A01E 6. Disconnect the power cord from the back of the correct size, remove the headlight assembly mounting bolts. Using a socket wrench of ...the headlight. 7. Replacement instructions: 1. HXDFL1009 HXDFL1011 5. Turn the plastic cover counterclockwise and remove it. Open the engine hood. 3. Allow the bulb to remove the headlight bulb. 6 DO-IT-YOURSELFMAINTENANCE 26 G270A01A-AAT HEADLIGHT AND FRONT TURN SIGNAL LIGHT High beam Low beam Turn signal...
Owner's Manual
Page 220
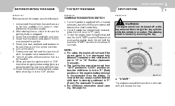
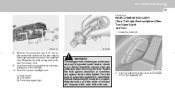
... 2. Unscrew and remove the cover on only when installing in flying fragments. Retighten the bulb spring and reconnect the power cord. 9. DO-IT-YOURSELF MAINTENANCE 6 27 G270D01E-AAT REAR COMBINATION LIGHT (Stop / Tail Light, Back up light and Rear Turn Signal Light) 4 Door (3) 1. Check for proper headlight aim. (1) High beam (2) Low beam (3) Front turn signal...
... 2. Unscrew and remove the cover on only when installing in flying fragments. Retighten the bulb spring and reconnect the power cord. 9. DO-IT-YOURSELF MAINTENANCE 6 27 G270D01E-AAT REAR COMBINATION LIGHT (Stop / Tail Light, Back up light and Rear Turn Signal Light) 4 Door (3) 1. Check for proper headlight aim. (1) High beam (2) Low beam (3) Front turn signal...

Owner's Manual
Page 221
... rear combination light with a socket wrench. (1) (2) (2) (3) (4) HXDFL1016-A HXDFL334 (1) HXDFL1017 2. Remove the mounting screws of the rear combination light with a flat blade screwdriver. 3. 6 DO-IT-YOURSELFMAINTENANCE 28 4. HXDFL1015 HXDFL335 3. To replace the rear combination light, remove it from the bulb holder and install the new bulb. (1) (2) (3) (4) Stop/Tail light Side marker light Rear turn signal light Back up light 5 Door...
... rear combination light with a socket wrench. (1) (2) (2) (3) (4) HXDFL1016-A HXDFL334 (1) HXDFL1017 2. Remove the mounting screws of the rear combination light with a flat blade screwdriver. 3. 6 DO-IT-YOURSELFMAINTENANCE 28 4. HXDFL1015 HXDFL335 3. To replace the rear combination light, remove it from the bulb holder and install the new bulb. (1) (2) (3) (4) Stop/Tail light Side marker light Rear turn signal light Back up light 5 Door...

Owner's Manual
Page 222
Open the tail gate. Remove the plastic cover with a flat blade screwdriver. HXDFL332 Back up light HXDFL341A HXDFL342 2. Tail light HXDFL333 3. Open the trunk lid. 5 Door (Tail gate) 1. Remove the cover with a flat blade screwdriver. 2. To replace the rear combination light, remove it from the bulb holder and install the new bulb. DO-IT-YOURSELF MAINTENANCE 6 29 (1) Stop/Tail light (2) Rear turn signal light G270C01L-GAT LUGGAGE COMPARTMENT LIGHT 4 Door 1.
Open the tail gate. Remove the plastic cover with a flat blade screwdriver. HXDFL332 Back up light HXDFL341A HXDFL342 2. Tail light HXDFL333 3. Open the trunk lid. 5 Door (Tail gate) 1. Remove the cover with a flat blade screwdriver. 2. To replace the rear combination light, remove it from the bulb holder and install the new bulb. DO-IT-YOURSELF MAINTENANCE 6 29 (1) Stop/Tail light (2) Rear turn signal light G270C01L-GAT LUGGAGE COMPARTMENT LIGHT 4 Door 1.

Owner's Manual
Page 223
Replace with a new bulb. Open the tail gate. HXDFL341 3. HTB284 HTB284 4. Replace with a new bulb. 4. Remove the luggage compartment light cover on the right side package tray panel with pushing it. Disconnect the power cord. 2. Disconnect the power cord. HXDFL343 HXDFL341B 3. 6 DO-IT-YOURSELFMAINTENANCE 30 5Door 1.
Replace with a new bulb. Open the tail gate. HXDFL341 3. HTB284 HTB284 4. Replace with a new bulb. 4. Remove the luggage compartment light cover on the right side package tray panel with pushing it. Disconnect the power cord. 2. Disconnect the power cord. HXDFL343 HXDFL341B 3. 6 DO-IT-YOURSELFMAINTENANCE 30 5Door 1.
Owner's Manual
Page 224
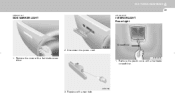
Disconnect the power cord. Remove the plastic cover with a new bulb. HXDFL1020 1. Replace with a flat blade screwdriver. Remove the cover with a flat blade screwdriver. HXDFL338 1. HXDFL340 3. DO-IT-YOURSELF MAINTENANCE 6 31 G270E01E-AAT G270G01E-GAT SIDE MARKER LIGHT INTERIOR LIGHT Room Light Screwdriver HXDFL339 2.
Disconnect the power cord. Remove the plastic cover with a new bulb. HXDFL1020 1. Replace with a flat blade screwdriver. Remove the cover with a flat blade screwdriver. HXDFL338 1. HXDFL340 3. DO-IT-YOURSELF MAINTENANCE 6 31 G270E01E-AAT G270G01E-GAT SIDE MARKER LIGHT INTERIOR LIGHT Room Light Screwdriver HXDFL339 2.

Owner's Manual
Page 225
6 DO-IT-YOURSELFMAINTENANCE 32 G270H01E-GAT Map Light (If installed) HXDFL1021 G270H01E-A 2. Remove the plastic cover with a new bulb. Replace with a flat blade screwdriver. B460D02E-A 2. Replace with a new bulb. 1.
6 DO-IT-YOURSELFMAINTENANCE 32 G270H01E-GAT Map Light (If installed) HXDFL1021 G270H01E-A 2. Remove the plastic cover with a new bulb. Replace with a flat blade screwdriver. B460D02E-A 2. Replace with a new bulb. 1.
Owner's Manual
Page 226
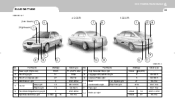
DO-IT-YOURSELF MAINTENANCE 6 33 BULB WATTAGE G280A04E-AAT 4 DOOR (Low beam) (High beam) 5 DOOR 1 5 7 8 7 12 8 1 4 2 No. 1 2 3 4 5 6 7 Part Name Head Light (High/Low) Front Fog Light Front Turn Signal Light Side Marker Light Map Light Interior Room Light 9 6 Wattage 55/55 51 27 5 10 10 5 4 Door 16 Soket type P14,5s/PX 26d P22d ... W2.1x9.5D S8.5/8.5 W2.1x9.5d BA 15s No. 7 8 9 10 11 12 3 10 9 Part Name 10 Wattage 5 Door 5 5 Turn Signal Light Stop/Tail Light 4 Door 27 27/8 8 16 27 2.6(LED) 11 G280A03E-A Soket type S8.5/8.5 S8.5/8.5 BA 15s BAY 15d BAY 15d W2.1 x 9.5D BA 15s High ...
DO-IT-YOURSELF MAINTENANCE 6 33 BULB WATTAGE G280A04E-AAT 4 DOOR (Low beam) (High beam) 5 DOOR 1 5 7 8 7 12 8 1 4 2 No. 1 2 3 4 5 6 7 Part Name Head Light (High/Low) Front Fog Light Front Turn Signal Light Side Marker Light Map Light Interior Room Light 9 6 Wattage 55/55 51 27 5 10 10 5 4 Door 16 Soket type P14,5s/PX 26d P22d ... W2.1x9.5D S8.5/8.5 W2.1x9.5d BA 15s No. 7 8 9 10 11 12 3 10 9 Part Name 10 Wattage 5 Door 5 5 Turn Signal Light Stop/Tail Light 4 Door 27 27/8 8 16 27 2.6(LED) 11 G280A03E-A Soket type S8.5/8.5 S8.5/8.5 BA 15s BAY 15d BAY 15d W2.1 x 9.5D BA 15s High ...


