
Owner's Manual
Page 57
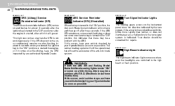
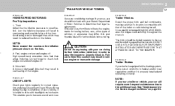
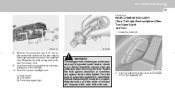
...illuminate at all, a malfunction in the turn signals. B260F01A-AAT High Beam Indicator Light The high beam indicator light comes on whenever the headlights are switched to the high beam or flash position. ! This light also comes on when the SRS is turned to the "ON" ...after flashing for about 6 seconds after the ignition key is turned to the "ON" position or after three seconds. 1 FEATURES OF YOUR HYUNDAI 46 WARNING AND INDICATOR LIGHTS B260B01A-AAT B260P01E-GAT B260D01A-AAT SRS (Airbag) Service Reminder Indicator (SRI) The SRS service reminder indicator (SRI)...
...illuminate at all, a malfunction in the turn signals. B260F01A-AAT High Beam Indicator Light The high beam indicator light comes on whenever the headlights are switched to the high beam or flash position. ! This light also comes on when the SRS is turned to the "ON" ...after flashing for about 6 seconds after the ignition key is turned to the "ON" position or after three seconds. 1 FEATURES OF YOUR HYUNDAI 46 WARNING AND INDICATOR LIGHTS B260B01A-AAT B260P01E-GAT B260D01A-AAT SRS (Airbag) Service Reminder Indicator (SRI) The SRS service reminder indicator (SRI)...
Owner's Manual
Page 66
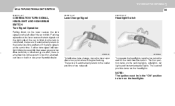
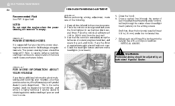
FEATURES OF YOUR HYUNDAI 1 55 MULTI-FUNCTION LIGHT SWITCH B340A01A-AAT B340B01A-AAT B340C03E-AAT COMBINATION TURN SIGNAL, HEADLIGHT AND HIGH-BEAM SWITCH Turn Signal Operation Pulling down to a point where it begins flashing. The first position turns on the headlights. To operate the headlights, turn signals...car to blink. The second position turns on the parking lights, sidelights, tail lights and instrument panel lights. Lane Change Signal Headlight Switch HXDFL352 HXDFL360 To indicate a lane change, move the lever up or down on the lever causes the turn the barrel...
FEATURES OF YOUR HYUNDAI 1 55 MULTI-FUNCTION LIGHT SWITCH B340A01A-AAT B340B01A-AAT B340C03E-AAT COMBINATION TURN SIGNAL, HEADLIGHT AND HIGH-BEAM SWITCH Turn Signal Operation Pulling down to a point where it begins flashing. The first position turns on the headlights. To operate the headlights, turn signals...car to blink. The second position turns on the parking lights, sidelights, tail lights and instrument panel lights. Lane Change Signal Headlight Switch HXDFL352 HXDFL360 To indicate a lane change, move the lever up or down on the lever causes the turn the barrel...

Owner's Manual
Page 67
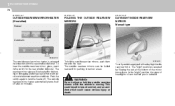
...illumination conditions. 1 FEATURES OF YOUR HYUNDAI 56 Parking Light Auto Off If you do not turn the parking lights "OFF" key out, the parking lights will automatically shut "OFF" when the driver's door is in foggy, cloudy and rainy conditions. B340E01A-AAT B340G01LZ-AAT Headlight Flasher Auto Light (If installed)...time. If you . For low beams, pull the lever back toward you ). The high beam indicator light will be flashed even though the headlight switch is opened. To turn them "ON" again you must simply turn the barrel on the lights manually in the "OFF" position.
...illumination conditions. 1 FEATURES OF YOUR HYUNDAI 56 Parking Light Auto Off If you do not turn the parking lights "OFF" key out, the parking lights will automatically shut "OFF" when the driver's door is in foggy, cloudy and rainy conditions. B340E01A-AAT B340G01LZ-AAT Headlight Flasher Auto Light (If installed)...time. If you . For low beams, pull the lever back toward you ). The high beam indicator light will be flashed even though the headlight switch is opened. To turn them "ON" again you must simply turn the barrel on the lights manually in the "OFF" position.

Owner's Manual
Page 68
...front fog lights will come on the front fog lights, place the switch in the "ON" position. NOTE: If you turn on when the headlight switch is only a light layer of snow or ice. To use the intermittent wiper feature, place the wiper switch in this position, the interval ... there is in the defrost mode to 10 seconds by turning the interval adjuster barrel. With the switch in the "INT" position. FEATURES OF YOUR HYUNDAI 1 57 WINDSHIELD WIPER AND WASHER SWITCH B360B01L-AAT B350A01A-AAT B350C01S-AAT FRONT FOG LIGHT SWITCH (If installed) Adjustable Intermittent Wiper Operation 1 2 3 ...
...front fog lights will come on the front fog lights, place the switch in the "ON" position. NOTE: If you turn on when the headlight switch is only a light layer of snow or ice. To use the intermittent wiper feature, place the wiper switch in this position, the interval ... there is in the defrost mode to 10 seconds by turning the interval adjuster barrel. With the switch in the "INT" position. FEATURES OF YOUR HYUNDAI 1 57 WINDSHIELD WIPER AND WASHER SWITCH B360B01L-AAT B350A01A-AAT B350C01S-AAT FRONT FOG LIGHT SWITCH (If installed) Adjustable Intermittent Wiper Operation 1 2 3 ...
Owner's Manual
Page 81
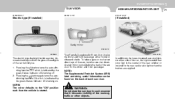
...turns itself off . Push the switch again to turn the heater off after 20 minutes. In the "night" position, the glare of headlights of cars behind you improved rear vision in inclement weather conditions. The rearview mirror glass will give you is reduced. The "night" ... ! WARNING: Do not adjust or fold the outside rearview mirrors, push them towards the rear. Your Hyundai is equipped with the rear window defroster. 1 FEATURES OF YOUR HYUNDAI 70 B510D01E-AAT B510C01A-AAT B520A01A-AAT OUTSIDE REARVIEW MIRROR HEATER (If installed) Manual FOLDING THE OUTSIDE REARVIEW...
...turns itself off . Push the switch again to turn the heater off after 20 minutes. In the "night" position, the glare of headlights of cars behind you improved rear vision in inclement weather conditions. The rearview mirror glass will give you is reduced. The "night" ... ! WARNING: Do not adjust or fold the outside rearview mirrors, push them towards the rear. Your Hyundai is equipped with the rear window defroster. 1 FEATURES OF YOUR HYUNDAI 70 B510D01E-AAT B510C01A-AAT B520A01A-AAT OUTSIDE REARVIEW MIRROR HEATER (If installed) Manual FOLDING THE OUTSIDE REARVIEW...
Owner's Manual
Page 82
...addition to the "ON" position each sun visor. Pressing the button turns the auto-dimming function OFF which is started. ! FEATURES OF YOUR HYUNDAI 1 71 SUN VISOR B520B02O-GAT B580A01L-GAT HIGH-MOUNTED REAR STOP LIGHT B550A01S-GAT Electric type (If installed) (If installed) Vanity mirror B580A01E... HLZ2068-1 The electric type day/night inside rearview mirror automatically controls the glare of headlights of the roadway, traffic or other objects. NOTE: The mirror defaults to the lower-mounted rear stop light in the center of ...
...addition to the "ON" position each sun visor. Pressing the button turns the auto-dimming function OFF which is started. ! FEATURES OF YOUR HYUNDAI 1 71 SUN VISOR B520B02O-GAT B580A01L-GAT HIGH-MOUNTED REAR STOP LIGHT B550A01S-GAT Electric type (If installed) (If installed) Vanity mirror B580A01E... HLZ2068-1 The electric type day/night inside rearview mirror automatically controls the glare of headlights of the roadway, traffic or other objects. NOTE: The mirror defaults to the lower-mounted rear stop light in the center of ...

Owner's Manual
Page 148
... the shift lever to neutral, wait three seconds, then shift to a lower gear. o Always wear your car. C090A01E-M The highly efficient Hyundai automatic transaxle has four forward speeds and one reverse speed. Instead, when you much better control of your seat belts. o Slow down and... likely to reenter the roadway. At night, with the multifunction switch turned on to the parking light or headlight position, the appropriate symbol on a slippery surface. DRIVING YOUR HYUNDAI 2 7 AUTOMATIC TRANSAXLE C070D03O-AAT C090A02Y-AAT Good Driving Practices o Never take the car out of gear ...
... the shift lever to neutral, wait three seconds, then shift to a lower gear. o Always wear your car. C090A01E-M The highly efficient Hyundai automatic transaxle has four forward speeds and one reverse speed. Instead, when you much better control of your seat belts. o Slow down and... likely to reenter the roadway. At night, with the multifunction switch turned on to the parking light or headlight position, the appropriate symbol on a slippery surface. DRIVING YOUR HYUNDAI 2 7 AUTOMATIC TRANSAXLE C070D03O-AAT C090A02Y-AAT Good Driving Practices o Never take the car out of gear ...
Owner's Manual
Page 158
DRIVING YOUR HYUNDAI 2 17 TRAILER OR VEHICLE TOWING C170A01A-AAT C190A02S-AAT C190B01S-AAT HIGHER SPEED MOTORING Pre-Trip Inspections 1. ... by a qualified technician. Trailer Hitches Select the proper hitch and ball combination, making sure that it's location is compatible with headlights on low beam. Use a quality non-equalizing hitch which may differ. Do not forget to federal and/or local regulations and...during the day in overheating of Motor Vehicles to the additional load. USE OF LIGHTS Check your Hyundai dealer for correct operation and always keep them clean.
DRIVING YOUR HYUNDAI 2 17 TRAILER OR VEHICLE TOWING C170A01A-AAT C190A02S-AAT C190B01S-AAT HIGHER SPEED MOTORING Pre-Trip Inspections 1. ... by a qualified technician. Trailer Hitches Select the proper hitch and ball combination, making sure that it's location is compatible with headlights on low beam. Use a quality non-equalizing hitch which may differ. Do not forget to federal and/or local regulations and...during the day in overheating of Motor Vehicles to the additional load. USE OF LIGHTS Check your Hyundai dealer for correct operation and always keep them clean.
Owner's Manual
Page 217
...mm) from the test wall. 3. Draw a vertical line (through the center of each headlight beam pattern) and a horizontal line (through the center of each cut-off line of your Hyundai, you desire additional information about maintaining and servicing your car and how it works. Deterioration ...-A Keep all tires inflated to the parallel line with a phillips screwdriver - Adjust each headlight beam pattern) on the headlights (Low beam). This is the same manual used by an authorized Hyundai Dealer. Have the driver or equivalent weight placed in obtaining a better understanding of the ...
...mm) from the test wall. 3. Draw a vertical line (through the center of each headlight beam pattern) and a horizontal line (through the center of each cut-off line of your Hyundai, you desire additional information about maintaining and servicing your car and how it works. Deterioration ...-A Keep all tires inflated to the parallel line with a phillips screwdriver - Adjust each headlight beam pattern) on the headlights (Low beam). This is the same manual used by an authorized Hyundai Dealer. Have the driver or equivalent weight placed in obtaining a better understanding of the ...
Owner's Manual
Page 218
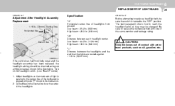
The next paragraph shows how to the center line of the same number and wattage rating. Turn on the headlight switch. (Low Beam Position) 1. Adjust headlights so that the lights are tested against. : 118 in. (3,000 mm). "P" Cut-off line L H H ! DO-IT-YOURSELF MAINTENANCE 6 25 REPLACEMENT OF LIGHT ... is turned to replace the burned-out bulb with point "P" shown in . (619 mm) "W" Distance between the headlights and the wall that main axis of light is parallel to reach the headlight bulbs so they may be checked using an aiming screen as oil, gasoline, etc. Low beam : 25.2 in...
The next paragraph shows how to the center line of the same number and wattage rating. Turn on the headlight switch. (Low Beam Position) 1. Adjust headlights so that the lights are tested against. : 118 in. (3,000 mm). "P" Cut-off line L H H ! DO-IT-YOURSELF MAINTENANCE 6 25 REPLACEMENT OF LIGHT ... is turned to replace the burned-out bulb with point "P" shown in . (619 mm) "W" Distance between the headlights and the wall that main axis of light is parallel to reach the headlight bulbs so they may be checked using an aiming screen as oil, gasoline, etc. Low beam : 25.2 in...
Owner's Manual
Page 219
... and remove it. Disconnect the power cord from the back of the correct size, remove the headlight assembly mounting bolts. Allow the bulb to remove the headlight bulb. Open the engine hood. 3. Using a socket wrench of the headlight. 7. Wear eye protection. 2. HXDFL1009 HXDFL1011 5. Replacement instructions: 1. Always grasp the bulb by its plastic base...
... and remove it. Disconnect the power cord from the back of the correct size, remove the headlight assembly mounting bolts. Allow the bulb to remove the headlight bulb. Open the engine hood. 3. Using a socket wrench of the headlight. 7. Wear eye protection. 2. HXDFL1009 HXDFL1011 5. Replacement instructions: 1. Always grasp the bulb by its plastic base...
Owner's Manual
Page 220
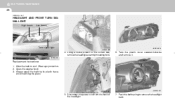
... bulb contains gas under pressure and if impacted could shatter, resulting in a headlight. Keep the bulb out of the reach of children and dispose of the used bulb with the headlight hole. Replace the headlight if damaged or cracked. Turn the bulb on the inside of the old bulb... MAINTENANCE 6 27 G270D01E-AAT REAR COMBINATION LIGHT (Stop / Tail Light, Back up light and Rear Turn Signal Light) 4 Door (3) 1. Check for proper headlight aim. (1) High beam (2) Low beam (3) Front turn signal light ! Always wear eye protection when servicing the bulb. Unscrew and remove the cover on only...
... bulb contains gas under pressure and if impacted could shatter, resulting in a headlight. Keep the bulb out of the reach of children and dispose of the used bulb with the headlight hole. Replace the headlight if damaged or cracked. Turn the bulb on the inside of the old bulb... MAINTENANCE 6 27 G270D01E-AAT REAR COMBINATION LIGHT (Stop / Tail Light, Back up light and Rear Turn Signal Light) 4 Door (3) 1. Check for proper headlight aim. (1) High beam (2) Low beam (3) Front turn signal light ! Always wear eye protection when servicing the bulb. Unscrew and remove the cover on only...

Owner's Manual
Page 251
... Anti-lock brake system ...2-11 Checking the brakes ...6-15 Fluid ...6-15 Pedal clearance ...6-20 Pedal freeplay ...6-19 Breaking-In your New Hyundai ...1-3 C Care of Cassette Tapes ...1-127 Care of Disc ...1-127 Catalytic Converter ...7-3 Changing the Air Filter ...6-18 Child-Protector Rear...System ...1-28 Cigarette Lighter ...1-61 Clock ...1-60 Clutch Checking fluid ...6-16 Pedal freeplay ...6-19 Combination Light Auto light ...1-56 Headlight flasher ...1-56 Headlight switch ...1-55 High-beam switch ...1-56 Lane change signal ...1-55 Parking light auto off ...1-56 Turn signal operation ...1-55...
... Anti-lock brake system ...2-11 Checking the brakes ...6-15 Fluid ...6-15 Pedal clearance ...6-20 Pedal freeplay ...6-19 Breaking-In your New Hyundai ...1-3 C Care of Cassette Tapes ...1-127 Care of Disc ...1-127 Catalytic Converter ...7-3 Changing the Air Filter ...6-18 Child-Protector Rear...System ...1-28 Cigarette Lighter ...1-61 Clock ...1-60 Clutch Checking fluid ...6-16 Pedal freeplay ...6-19 Combination Light Auto light ...1-56 Headlight flasher ...1-56 Headlight switch ...1-55 High-beam switch ...1-56 Lane change signal ...1-55 Parking light auto off ...1-56 Turn signal operation ...1-55...
Owner's Manual
Page 252
... Capacity ...9-2 Gauge ...1-49 Recommendations ...1-2 Fuel Filler Lid Remote release ...1-73 Fuses ...6-20 Fuse Panel Description ...6-34 G General Checks ...6-3 Glove Box ...1-68 H Hazard Warning System ...1-60 Headlight Aiming Adjustment ...6-24 Heating and Cooling Control ...1-81 Heating and Ventilation Air flow control ...1-82 Air intake control ...1-85 Bi-level heating ...1-86 Defrosting / Defogging...
... Capacity ...9-2 Gauge ...1-49 Recommendations ...1-2 Fuel Filler Lid Remote release ...1-73 Fuses ...6-20 Fuse Panel Description ...6-34 G General Checks ...6-3 Glove Box ...1-68 H Hazard Warning System ...1-60 Headlight Aiming Adjustment ...6-24 Heating and Cooling Control ...1-81 Heating and Ventilation Air flow control ...1-82 Air intake control ...1-85 Bi-level heating ...1-86 Defrosting / Defogging...


