
Owner's Manual
Page 58
... a malfunction in the "ON" position to turn the ignition key to blink. Check for a burnedout fuse or bulb or see your Hyundai dealer. Lane Change Signal Headlight Switch HLC2072 HLC2069 To indicate a lane change, move the lever up or down on the lever causes the turn signals.... The second position turns on the parking lights, sidelights, tail lights and instrument panel lights. 1 FEATURES OF YOUR HYUNDAI 46 COMBINATION TURN SIGNAL, HEADLIGHT AND LOW-BEAM SWITCH B340A01A-AAT B340B01A-AAT B340C03A-AAT Turn Signal Operation Pulling down to the center position when released....
... a malfunction in the "ON" position to turn the ignition key to blink. Check for a burnedout fuse or bulb or see your Hyundai dealer. Lane Change Signal Headlight Switch HLC2072 HLC2069 To indicate a lane change, move the lever up or down on the lever causes the turn signals.... The second position turns on the parking lights, sidelights, tail lights and instrument panel lights. 1 FEATURES OF YOUR HYUNDAI 46 COMBINATION TURN SIGNAL, HEADLIGHT AND LOW-BEAM SWITCH B340A01A-AAT B340B01A-AAT B340C03A-AAT Turn Signal Operation Pulling down to the center position when released....
Owner's Manual
Page 173
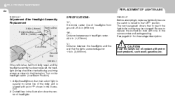
...Low Beam Position) 1. Be sure to the "OFF" position. 6 DO-IT-YOURSELF MAINTENANCE 24 G290B02A-AAT REPLACEMENT OF LIGHT BULBS SPECIFICATIONS: "H"; Horizontal center line of headlights. Distance between each headlight center : 42.4 in . (656 mm) "W"; The next paragraph shows how to center line of the body and is... turned to replace the burned-out bulb with one of contact with point "P" shown in the illustration. H L If the vehicle has had front body repair and the headlight assembly has been replaced, the headlight aiming should be sure the switch is aligned with ...
...Low Beam Position) 1. Be sure to the "OFF" position. 6 DO-IT-YOURSELF MAINTENANCE 24 G290B02A-AAT REPLACEMENT OF LIGHT BULBS SPECIFICATIONS: "H"; Horizontal center line of headlights. Distance between each headlight center : 42.4 in . (656 mm) "W"; The next paragraph shows how to center line of the body and is... turned to replace the burned-out bulb with one of contact with point "P" shown in the illustration. H L If the vehicle has had front body repair and the headlight assembly has been replaced, the headlight aiming should be sure the switch is aligned with ...

Owner's Manual
Page 174
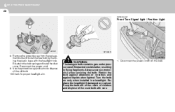
HLC5034-1 HLC5010 5. HLC5033 4. Allow the bulb to remove the headlight bulb. HLC5009 6. Push the bulb spring to cool. DO-IT-YOURSELF MAINTENANCE 6 25 G270A03A-AAT Headlight Bulb 1. Always grasp the bulb by its plastic base, avoid touching the glass. Disconnect the power cord from the bulb base in the back of the correct size, remove the headlight assembly mounting bolts. Using a socket wrench of the headlight. 7. Remove the dust cover. Wear eye protection. 2. Open the engine hood. 3.
HLC5034-1 HLC5010 5. HLC5033 4. Allow the bulb to remove the headlight bulb. HLC5009 6. Push the bulb spring to cool. DO-IT-YOURSELF MAINTENANCE 6 25 G270A03A-AAT Headlight Bulb 1. Always grasp the bulb by its plastic base, avoid touching the glass. Disconnect the power cord from the bulb base in the back of the correct size, remove the headlight assembly mounting bolts. Using a socket wrench of the headlight. 7. Remove the dust cover. Wear eye protection. 2. Open the engine hood. 3.
Owner's Manual
Page 175
... children and dispose of the old bulb. 10.Check for proper headlight aim. ! Remove the protective cap from the bulb. The halogen bulb contains gas under pressure and if impacted could shatter, resulting in a headlight. Protect the bulb against abrasions or scratches and against liquids when lighted. Re-attach the bulb spring and install the dust cover...
... children and dispose of the old bulb. 10.Check for proper headlight aim. ! Remove the protective cap from the bulb. The halogen bulb contains gas under pressure and if impacted could shatter, resulting in a headlight. Protect the bulb against abrasions or scratches and against liquids when lighted. Re-attach the bulb spring and install the dust cover...
Owner's Manual
Page 180
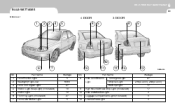
DO-IT-YOURSELF MAINTENANCE 6 31 BULB WATTAGES G280A03A-AAT 4 DOOR 3 DOOR 1 2 3 4 5 8 9 8 9 12 6 No. 1 2 3 4 5 6 7 7 Wattage 5 60/55 27 10 10 27 5 No. 8 10 11 11 10 12 G280A02A Part Name Front Position Light Headlight (High/Low) Front Turn Signal Light Interior Light (Map Light) (If Installed) Interior Light Front Fog Light (If Installed) Front...
DO-IT-YOURSELF MAINTENANCE 6 31 BULB WATTAGES G280A03A-AAT 4 DOOR 3 DOOR 1 2 3 4 5 8 9 8 9 12 6 No. 1 2 3 4 5 6 7 7 Wattage 5 60/55 27 10 10 27 5 No. 8 10 11 11 10 12 G280A02A Part Name Front Position Light Headlight (High/Low) Front Turn Signal Light Interior Light (Map Light) (If Installed) Interior Light Front Fog Light (If Installed) Front...
Owner's Manual
Page 202
... Seat pocket ...1-54 Fuel Capacity ...9-2 Gauge ...1-41 Recommendations ...1-2 Fuel Filler Lid Remote release ...1-59 Fuses ...6-19 G General Checks ...6-3 Glove box ...1-54 H Hazard Warning System ...1-49 Headlight Bulb ...6-25
... Seat pocket ...1-54 Fuel Capacity ...9-2 Gauge ...1-41 Recommendations ...1-2 Fuel Filler Lid Remote release ...1-59 Fuses ...6-19 G General Checks ...6-3 Glove box ...1-54 H Hazard Warning System ...1-49 Headlight Bulb ...6-25


