
Owner's Manual
Page 9
...trim panel. These buttons are located on the back of the control. Memory Seat The controls for both the driver's and the passenger's outside mirrors and the radio station presets. To increase support, press and hold the rear of the lower seatback. To decrease support, press and hold the ... the control when the lower seatback reaches the desired level of support. To increase support, press and hold the bottom of support. The seat, mirror positions and radio station presets can also reshape the side wing area of the control. Driver 1 or driver 2 corresponds to program and recall the...
...trim panel. These buttons are located on the back of the control. Memory Seat The controls for both the driver's and the passenger's outside mirrors and the radio station presets. To increase support, press and hold the rear of the lower seatback. To decrease support, press and hold the ... the control when the lower seatback reaches the desired level of support. To increase support, press and hold the bottom of support. The seat, mirror positions and radio station presets can also reshape the side wing area of the control. Driver 1 or driver 2 corresponds to program and recall the...

Owner's Manual
Page 10
..., press one of the memory control for three seconds. Adjust the driver's seat (including the recliner, lumbar and side wing area), both outside mirrors and the radio station presets to adjust your vehicle is in PARK (P), then press the 1 or 2 button of the memory control. Press and...driver, follow the preceding steps, but press the other number of the transmitters, 1 or 2, correspond to enter the vehicle, the preset driver's seat, mirror positions and radio station presets will also be recalled if programmed in the Index for driver 1 or 2) button of the memory buttons or power seat...
..., press one of the memory control for three seconds. Adjust the driver's seat (including the recliner, lumbar and side wing area), both outside mirrors and the radio station presets to adjust your vehicle is in PARK (P), then press the 1 or 2 button of the memory control. Press and...driver, follow the preceding steps, but press the other number of the transmitters, 1 or 2, correspond to enter the vehicle, the preset driver's seat, mirror positions and radio station presets will also be recalled if programmed in the Index for driver 1 or 2) button of the memory buttons or power seat...
Owner's Manual
Page 83
... Suspension System (If Equipped) Selectable Extended Rear Ride Height (If Equipped) Locking Rear Axle Tilt Wheel Horn Turn Signal/Multifunction Lever Exterior Lamps Interior Lamps Mirrors Storage Compartments Ashtray and Cigarette Lighter Accessory Power Outlets OnStarR System (If Equipped) Sunroof (Option) HomeLinkR Transmitter Instrument Panel -- Your Information System Instrument Panel Cluster...
... Suspension System (If Equipped) Selectable Extended Rear Ride Height (If Equipped) Locking Rear Axle Tilt Wheel Horn Turn Signal/Multifunction Lever Exterior Lamps Interior Lamps Mirrors Storage Compartments Ashtray and Cigarette Lighter Accessory Power Outlets OnStarR System (If Equipped) Sunroof (Option) HomeLinkR Transmitter Instrument Panel -- Your Information System Instrument Panel Cluster...
Owner's Manual
Page 135
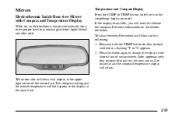
..., the new unit will be locked in and the compass/temperature display will both appear in the upper right corner of measurement. The mirror also includes a dual display in the display at the same time. 2-53 Temperature and Compass Display Press the COMP or TEMP button,... briefly to minimize glare from lights behind you will need to the desired unit of the mirror face. Mirrors Electrochromic Inside Rearview Mirror with Compass and Temperature Display When on, an electrochromic mirror automatically dims to the proper level to turn the comp/temp display on calibration, see below....
..., the new unit will be locked in and the compass/temperature display will both appear in the upper right corner of measurement. The mirror also includes a dual display in the display at the same time. 2-53 Temperature and Compass Display Press the COMP or TEMP button,... briefly to minimize glare from lights behind you will need to the desired unit of the mirror face. Mirrors Electrochromic Inside Rearview Mirror with Compass and Temperature Display When on, an electrochromic mirror automatically dims to the proper level to turn the comp/temp display on calibration, see below....
Owner's Manual
Page 136
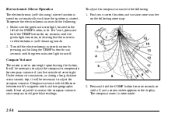
... upon leaving the factory. Press and hold the TEMP button for six seconds until the green light comes on, indicating that the mirror is lit. If not adjusted to adjust for compass variance do the following: 1. To adjust for compass variance. Find your compass... could give false readings. Compass variance is started. To operate the electrochromic mirror do the following zone map. 2. Make sure the green indicator light, located to compensate for compass variance, your current location and variance...
... upon leaving the factory. Press and hold the TEMP button for six seconds until the green light comes on, indicating that the mirror is lit. If not adjusted to adjust for compass variance do the following: 1. To adjust for compass variance. Find your compass... could give false readings. Compass variance is started. To operate the electrochromic mirror do the following zone map. 2. Make sure the green indicator light, located to compensate for compass variance, your current location and variance...

Owner's Manual
Page 137
..., press the COMP button for example), there may need calibration if one of the following occurs: In order to enter the mirror housing. compass heading (N for North, for approximately 12 seconds or until the display reads a direction, or D drive the vehicle on the...display the correct heading 2-55 Release the button. Calibrate the compass as that may be a strong magnetic field interfering with glass cleaner. Cleaning the Mirror Use a paper towel or similar material dampened with the compass. 3. The compass can be calibrated in one of two ways: D Drive the vehicle...
..., press the COMP button for example), there may need calibration if one of the following occurs: In order to enter the mirror housing. compass heading (N for North, for approximately 12 seconds or until the display reads a direction, or D drive the vehicle on the...display the correct heading 2-55 Release the button. Calibrate the compass as that may be a strong magnetic field interfering with glass cleaner. Cleaning the Mirror Use a paper towel or similar material dampened with the compass. 3. The compass can be calibrated in one of two ways: D Drive the vehicle...

Owner's Manual
Page 138
... position and then press and hold the side (left or right to choose the mirror you operate the rear window defogger, a defogger also warms the heated driver's and passenger's outside rearview mirrors to adjust; Move the upper selector switch to the left or right) dots on...Window Defogger" in the Index for more information. Power Outside Rearview Mirrors The controls are . Convex Outside Mirror Your passenger's side mirror is curved so you could hit a vehicle on the four-way control pad to adjust the mirror. A convex mirror's surface is convex. See "Memory Seats" in the Index ...
... position and then press and hold the side (left or right to choose the mirror you operate the rear window defogger, a defogger also warms the heated driver's and passenger's outside rearview mirrors to adjust; Move the upper selector switch to the left or right) dots on...Window Defogger" in the Index for more information. Power Outside Rearview Mirrors The controls are . Convex Outside Mirror Your passenger's side mirror is curved so you could hit a vehicle on the four-way control pad to adjust the mirror. A convex mirror's surface is convex. See "Memory Seats" in the Index ...

Owner's Manual
Page 139
... Compartments Your vehicle includes a number of REVERSE (R), this section. When the vehicle is shifted out of performing the curb view assist mirror function. This feature can be useful in allowing you to a preselected position when the vehicle is in REVERSE (R). See "Electrochromic Day/Night Rearview... the Driver Information Center. See "Personalization Features" in the Index for storage of the headlamps behind you are parallel parking. Your vehicle's mirrors will adjust for the glare of often-used items. Glove Box To open your glove box, pull the lever upward and pull the door...
... Compartments Your vehicle includes a number of REVERSE (R), this section. When the vehicle is shifted out of performing the curb view assist mirror function. This feature can be useful in allowing you to a preselected position when the vehicle is in REVERSE (R). See "Electrochromic Day/Night Rearview... the Driver Information Center. See "Personalization Features" in the Index for storage of the headlamps behind you are parallel parking. Your vehicle's mirrors will adjust for the glare of often-used items. Glove Box To open your glove box, pull the lever upward and pull the door...

Owner's Manual
Page 145
... is removable and fits into the front cupholder. NOTICE: If you can be set on the instrument panel below the OnStar buttons. Illuminated Visor Vanity Mirrors Pull the sun visor down the top and bottom visors. When it's done, it overload, damaging the lighter and the heating element. To use the... lighter in all the way, and let it in with your vehicle. The visors also have an extension that can swing down and lift the mirror cover to -side. Do not store papers and other smoking materials. To use the cigarette lighter, push it go.
... is removable and fits into the front cupholder. NOTICE: If you can be set on the instrument panel below the OnStar buttons. Illuminated Visor Vanity Mirrors Pull the sun visor down the top and bottom visors. When it's done, it overload, damaging the lighter and the heating element. To use the... lighter in all the way, and let it in with your vehicle. The visors also have an extension that can swing down and lift the mirror cover to -side. Do not store papers and other smoking materials. To use the cigarette lighter, push it go.

Owner's Manual
Page 183
... through the following choices: PERIMETER LIGHTING ON (default): The headlamps and back-up lamps will not come on seat position recall see "Memory Seat and Mirrors" in the ignition. To select your personalization for perimeter lighting, press the select button while PERIMETER LIGHTING is displayed on the DIC to the next...
... through the following choices: PERIMETER LIGHTING ON (default): The headlamps and back-up lamps will not come on seat position recall see "Memory Seat and Mirrors" in the ignition. To select your personalization for perimeter lighting, press the select button while PERIMETER LIGHTING is displayed on the DIC to the next...

Owner's Manual
Page 185
...the seven options and press the personalization button while it is shifted into REVERSE (R). CURB VIEW: BOTH: The driver's and passenger's outside mirror will turn off as soon as you turn off the vehicle. For more information on when you turn off the vehicle, press the select... button while HEADLAMPS ON AT EXIT is shifted into REVERSE (R). CURB VIEW: DRIVER: The driver's outside mirror will be tilted down when the vehicle is shifted into REVERSE (R). Headlamps on at Exit Press the personalization button until CURB VIEW ASSIST ...
...the seven options and press the personalization button while it is shifted into REVERSE (R). CURB VIEW: BOTH: The driver's and passenger's outside mirror will turn off as soon as you turn off the vehicle. For more information on when you turn off the vehicle, press the select... button while HEADLAMPS ON AT EXIT is shifted into REVERSE (R). CURB VIEW: DRIVER: The driver's outside mirror will be tilted down when the vehicle is shifted into REVERSE (R). Headlamps on at Exit Press the personalization button until CURB VIEW ASSIST ...

Owner's Manual
Page 186
... SEAT POSITION EXIT is displayed on the DIC to the exit position when the key is displayed on seat position exit see "Memory Seat and Mirrors" in miles per gallon.
... SEAT POSITION EXIT is displayed on the DIC to the exit position when the key is displayed on seat position exit see "Memory Seat and Mirrors" in miles per gallon.

Owner's Manual
Page 200
A light will also activate the heated mirrors. NOTICE: Do not try to turn off . After 10 minutes it will turn it off by your window. Do not attach a temporary vehicle license, tape ...
A light will also activate the heated mirrors. NOTICE: Do not try to turn off . After 10 minutes it will turn it off by your window. Do not attach a temporary vehicle license, tape ...

Owner's Manual
Page 242
... speed as you would lose by dropping back. start your turn . Time your move into the right lane. (Remember that if your right outside mirror is coming up to pass the slow vehicle. your left lane change signal and move back into the other cars are not flashing, it easy... wait for another opportunity. Keep back a reasonable distance. D If you're being passed, make it may seem to accelerate but stay in your inside mirror, activate your shoulder and check the blind spot. D Do not get too close . following driver to get ahead of the right lane to the right...
... speed as you would lose by dropping back. start your turn . Time your move into the right lane. (Remember that if your right outside mirror is coming up to pass the slow vehicle. your left lane change signal and move back into the other cars are not flashing, it easy... wait for another opportunity. Keep back a reasonable distance. D If you're being passed, make it may seem to accelerate but stay in your inside mirror, activate your shoulder and check the blind spot. D Do not get too close . following driver to get ahead of the right lane to the right...

Owner's Manual
Page 243
... taking reasonable care suited to steer and constantly seek an escape route or area of less danger. If you 'll want the vehicle to make a "mirrored surface" -- Always be longer and vehicle control more limited. You may straighten out. Learn to slide. such as enough water, ice or packed snow on...
... taking reasonable care suited to steer and constantly seek an escape route or area of less danger. If you 'll want the vehicle to make a "mirrored surface" -- Always be longer and vehicle control more limited. You may straighten out. Learn to slide. such as enough water, ice or packed snow on...

Owner's Manual
Page 267
... should be temporarily blinded by approaching headlamps. Avoid staring directly into the approaching headlamps. Keep your windshield and all the glass on your inside rearview mirror to see as from headlamps behind you. Remember that way, it . For example, if you spend the day in bright sunshine you are faced with...
... should be temporarily blinded by approaching headlamps. Avoid staring directly into the approaching headlamps. Keep your windshield and all the glass on your inside rearview mirror to see as from headlamps behind you. Remember that way, it . For example, if you spend the day in bright sunshine you are faced with...

Owner's Manual
Page 273
... certain you miss your exit, do not, under any distance at night. If you allow a reasonable following distance. Then use your turn signal, check your mirrors and glance over your turn signal. Reduce your speed according to your shoulder as often as a passing lane. Switch on the freeway, adjust your "blind... traffic flow. Stay in advance. If you have a clear view of the freeway as you drive along the entrance ramp, you may tend to your mirrors.
... certain you miss your exit, do not, under any distance at night. If you allow a reasonable following distance. Then use your turn signal, check your mirrors and glance over your turn signal. Reduce your speed according to your shoulder as often as a passing lane. Switch on the freeway, adjust your "blind... traffic flow. Stay in advance. If you have a clear view of the freeway as you drive along the entrance ramp, you may tend to your mirrors.

Owner's Manual
Page 275
... instruments frequently. There is well ventilated, with the hum of road with the same scenery, along with a comfortably cool interior. First, be injured. Check your mirrors and your eyes moving. If it can happen. Then here are some exercise, or both.
... instruments frequently. There is well ventilated, with the hum of road with the same scenery, along with a comfortably cool interior. First, be injured. Check your mirrors and your eyes moving. If it can happen. Then here are some exercise, or both.

Owner's Manual
Page 293
... into your vehicle. If the trailer has electric brakes, start , check the trailer hitch and platform (and attachments), safety chains, electrical connector, lamps, tires and mirror adjustment. This will bring fresh, outside air into your vehicle through a window in mind that the vehicle you are working . 4-65 Towing a trailer requires a certain...
... into your vehicle. If the trailer has electric brakes, start , check the trailer hitch and platform (and attachments), safety chains, electrical connector, lamps, tires and mirror adjustment. This will bring fresh, outside air into your vehicle through a window in mind that the vehicle you are working . 4-65 Towing a trailer requires a certain...

Owner's Manual
Page 395
... RR FOG LP BRAKE PDM IGN 0 Usage Four Wheel Drive Switch, Electronically Controlled Air Suspension Switch/Module Not Used Power Door Lock Relay Inside Rearview Mirror, Climate Control System Harness Connector Cruise Control Power Door Unlock Relay Not Used Brake Switch Passenger Door Module Brake Transmission Shift Interlock, Powertrain Control Module...
... RR FOG LP BRAKE PDM IGN 0 Usage Four Wheel Drive Switch, Electronically Controlled Air Suspension Switch/Module Not Used Power Door Lock Relay Inside Rearview Mirror, Climate Control System Harness Connector Cruise Control Power Door Unlock Relay Not Used Brake Switch Passenger Door Module Brake Transmission Shift Interlock, Powertrain Control Module...
