
Owner's Manual
Page 7
.../ POWER TAILGATE SWITCH HOOD RELEASE PARKING BRAKE (P.143) HANDLE (P.401) PEDAL (P.167) Vehicle with navigation system is shown. AUXILIARY INPUT JACKS (P.345) HEADPHONE CONNECTORS (P.346) ACCESSORY POWER SOCKET (P.184) : If equipped CONTINUED 2009 Pilot 3
.../ POWER TAILGATE SWITCH HOOD RELEASE PARKING BRAKE (P.143) HANDLE (P.401) PEDAL (P.167) Vehicle with navigation system is shown. AUXILIARY INPUT JACKS (P.345) HEADPHONE CONNECTORS (P.346) ACCESSORY POWER SOCKET (P.184) : If equipped CONTINUED 2009 Pilot 3

Owner's Manual
Page 8
Refer to the navigation system manual. If equipped 4WD models only 4 2009 Pilot Your Vehicle at a Glance HEADLIGHT/TURN SIGNAL/ FRONT FOG LIGHTS 3 (P.124) VEHICLE STABILITY ASSIST SYSTEM OFF SWITCH (P.436) PARKING SENSOR SYSTEM ... BUTTONS (P.361) PASSENGER AIRBAG OFF INDICATOR (P.34) WINDSHIELD WIPERS/ WASHERS (P.122) VTM-4 LOCK BUTTON 4 (P.422) REAR WINDOW DEFOGGER/HEATED MIRROR BUTTON 3 (P.128, 170) ACCESSORY POWER SOCKET (P.184) SEAT HEATER SWITCHES 3 (P.162) CRUISE CONTROL BUTTONS (P.348) STEERING WHEEL ADJUSTMENT (P.131) MULTI-INFORMATION BUTTONS 3 (P.85) 1: 2: 3: 4: To use...
Refer to the navigation system manual. If equipped 4WD models only 4 2009 Pilot Your Vehicle at a Glance HEADLIGHT/TURN SIGNAL/ FRONT FOG LIGHTS 3 (P.124) VEHICLE STABILITY ASSIST SYSTEM OFF SWITCH (P.436) PARKING SENSOR SYSTEM ... BUTTONS (P.361) PASSENGER AIRBAG OFF INDICATOR (P.34) WINDSHIELD WIPERS/ WASHERS (P.122) VTM-4 LOCK BUTTON 4 (P.422) REAR WINDOW DEFOGGER/HEATED MIRROR BUTTON 3 (P.128, 170) ACCESSORY POWER SOCKET (P.184) SEAT HEATER SWITCHES 3 (P.162) CRUISE CONTROL BUTTONS (P.348) STEERING WHEEL ADJUSTMENT (P.131) MULTI-INFORMATION BUTTONS 3 (P.85) 1: 2: 3: 4: To use...
Owner's Manual
Page 23
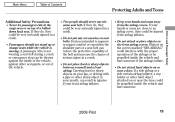
Do not put any accessories on or near a door. side curtain airbag inflates, a cup holder or other hard object attached on seat belts. A passenger who is moving. Do not attach .... Objects on Driver and Passenger Safety wearing a seat belt during a crash or emergency stop can be thrown against the inside the vehicle and hurt someone . 2009 Pilot 19 Passengers should never use the same seat belt.
Do not put any accessories on or near a door. side curtain airbag inflates, a cup holder or other hard object attached on seat belts. A passenger who is moving. Do not attach .... Objects on Driver and Passenger Safety wearing a seat belt during a crash or emergency stop can be thrown against the inside the vehicle and hurt someone . 2009 Pilot 19 Passengers should never use the same seat belt.
Owner's Manual
Page 62
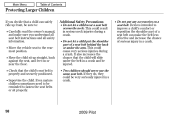
... arm. Additional Safety Precautions Do not let a child wear a seat belt across the neck. If they do, they could be sure to in a crash. 58 2009 Pilot This could result Do not put the shoulder part of a seat belt can make sure you decide that a child can safely ride up straight, back... very serious injuries during a crash. Protecting Larger Children If you understand all seat belt instructions and all safety information. Do not let a child put any accessories on or near the floor.
... arm. Additional Safety Precautions Do not let a child wear a seat belt across the neck. If they do, they could be sure to in a crash. 58 2009 Pilot This could result Do not put the shoulder part of a seat belt can make sure you decide that a child can safely ride up straight, back... very serious injuries during a crash. Protecting Larger Children If you understand all seat belt instructions and all safety information. Do not let a child put any accessories on or near the floor.

Owner's Manual
Page 67
... ...181 Conversation Mirror ...182 Sun Visor ...182 Vanity Mirror ...183 Coat Hooks ...183 Seat Under Tray ...184 Accessory Power Sockets...184 AC Power Outlet ...185 Cargo Hooks ...186 Cargo Net ...186 Instruments and Controls 2009 Pilot 63 Instruments and Controls This section gives information about the controls and displays that contribute to the...
... ...181 Conversation Mirror ...182 Sun Visor ...182 Vanity Mirror ...183 Coat Hooks ...183 Seat Under Tray ...184 Accessory Power Sockets...184 AC Power Outlet ...185 Cargo Hooks ...186 Cargo Net ...186 Instruments and Controls 2009 Pilot 63 Instruments and Controls This section gives information about the controls and displays that contribute to the...

Owner's Manual
Page 68
... (P.417) REAR HEATING/ COOLING CONTROLS (P.195) REAR CLIMATE CONTROL SYSTEM (P.202) GLASS HATCH RELEASE BUTTON/ POWER TAILGATE SWITCH (P.143) HOOD RELEASE HANDLE (P.401) PARKING BRAKE ACCESSORY POWER SOCKET (P.184) PEDAL (P.167) AUXILIARY INPUT JACKS (P.345) HEADPHONE CONNECTORS (P.346) Vehicle with navigation system is shown. : If equipped 64...
... (P.417) REAR HEATING/ COOLING CONTROLS (P.195) REAR CLIMATE CONTROL SYSTEM (P.202) GLASS HATCH RELEASE BUTTON/ POWER TAILGATE SWITCH (P.143) HOOD RELEASE HANDLE (P.401) PARKING BRAKE ACCESSORY POWER SOCKET (P.184) PEDAL (P.167) AUXILIARY INPUT JACKS (P.345) HEADPHONE CONNECTORS (P.346) Vehicle with navigation system is shown. : If equipped 64...

Owner's Manual
Page 80
... switch is in AUTO and the lights turn the ignition switch to the ACCESSORY (I) or the LOCK (0) position without turning off if you turn on the cruise control system by pressing the CRUISE button (see page 126 . 76 2009 Pilot This indicator comes on when you that the exterior lights are on. Cruise...
... switch is in AUTO and the lights turn the ignition switch to the ACCESSORY (I) or the LOCK (0) position without turning off if you turn on the cruise control system by pressing the CRUISE button (see page 126 . 76 2009 Pilot This indicator comes on when you that the exterior lights are on. Cruise...

Owner's Manual
Page 99
...RESET button. Instruments and Controls You can customize some vehicle control settings for ''DRIVER 1'' and ''DRIVER 2'' separately. Refer to CONTINUED customize. 2009 Pilot 95 If you want the settings as they were when the vehicle left the factory, select DEFAULT ALL, as described on the following pages ...98 . If you want to the normal screen. When the main menu displays ''Keyless Memory SettingsTM,'' you turn the ignition switch to the ACCESSORY (I) or the LOCK (0) position, or move the shift lever out of Park, the display will change to change the settings, the ignition...
...RESET button. Instruments and Controls You can customize some vehicle control settings for ''DRIVER 1'' and ''DRIVER 2'' separately. Refer to CONTINUED customize. 2009 Pilot 95 If you want the settings as they were when the vehicle left the factory, select DEFAULT ALL, as described on the following pages ...98 . If you want to the normal screen. When the main menu displays ''Keyless Memory SettingsTM,'' you turn the ignition switch to the ACCESSORY (I) or the LOCK (0) position, or move the shift lever out of Park, the display will change to change the settings, the ignition...

Owner's Manual
Page 125
... VOICE CONTROL BUTTONS (P.361) WINDSHIELD WIPERS/ WASHERS (P.122) PASSENGER AIRBAG OFF INDICATOR (P.34) VTM-4 LOCK BUTTON 4 (P.422) REAR WINDOW DEFOGGER/HEATED MIRROR BUTTON 3 (P.128, 170) ACCESSORY POWER SOCKET (P.184) SEAT HEATER SWITCHES 3 (P.162) CRUISE CONTROL BUTTONS (P.348) Instruments and Controls STEERING WHEEL ADJUSTMENT (P.131) MULTI-INFORMATION BUTTONS 3 (P.85) 1: 2: 3: 4: To ... RELEASE BUTTON/ POWER TAILGATE SWITCH 3 HORN 1 (P.143) PARKING BRAKE RELEASE VOICE CONTROL HANDLE (P.167) BUTTONS 2 Vehicle with navigation system. If equipped 4WD models only 2009 Pilot 121
... VOICE CONTROL BUTTONS (P.361) WINDSHIELD WIPERS/ WASHERS (P.122) PASSENGER AIRBAG OFF INDICATOR (P.34) VTM-4 LOCK BUTTON 4 (P.422) REAR WINDOW DEFOGGER/HEATED MIRROR BUTTON 3 (P.128, 170) ACCESSORY POWER SOCKET (P.184) SEAT HEATER SWITCHES 3 (P.162) CRUISE CONTROL BUTTONS (P.348) Instruments and Controls STEERING WHEEL ADJUSTMENT (P.131) MULTI-INFORMATION BUTTONS 3 (P.85) 1: 2: 3: 4: To ... RELEASE BUTTON/ POWER TAILGATE SWITCH 3 HORN 1 (P.143) PARKING BRAKE RELEASE VOICE CONTROL HANDLE (P.167) BUTTONS 2 Vehicle with navigation system. If equipped 4WD models only 2009 Pilot 121

Owner's Manual
Page 128
... 76 ). To signal a lane change, push lightly on as long as a reminder. The high beams stay on the lever, and hold the lever back. 124 2009 Pilot The lever will come on the headlights. AUTO 5. Fog lights on : If equipped Turning the switch to the...
... 76 ). To signal a lane change, push lightly on as long as a reminder. The high beams stay on the lever, and hold the lever back. 124 2009 Pilot The lever will come on the headlights. AUTO 5. Fog lights on : If equipped Turning the switch to the...
Owner's Manual
Page 139
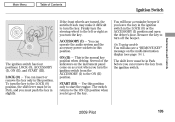
... (0) position, the shift lever must be in Park before you can remove the key from the ACCESSORY (I ) You can insert or remove the key only in slightly. 2009 Pilot 135 START (III) Use this position. ACCESSORY (I ) to the ON (II) position when you let go of the indicators on the instrument...The switch returns to the ON (II) position. You will also see a ''REMOVE KEY'' message on as you must be in the LOCK (0) or the ACCESSORY (I ), ON (II), and START (III). Firmly turn the steering wheel to start the engine. ON (II) This is the normal key position when driving...
... (0) position, the shift lever must be in Park before you can remove the key from the ACCESSORY (I ) You can insert or remove the key only in slightly. 2009 Pilot 135 START (III) Use this position. ACCESSORY (I ) to the ON (II) position when you let go of the indicators on the instrument...The switch returns to the ON (II) position. You will also see a ''REMOVE KEY'' message on as you must be in the LOCK (0) or the ACCESSORY (I ), ON (II), and START (III). Firmly turn the steering wheel to start the engine. ON (II) This is the normal key position when driving...

Owner's Manual
Page 143
...holding the switch until you move the shift lever to the ACCESSORY (I ) position. Release the switch and, within 5 seconds, turn the ignition switch to the Park (P) position. Move the shift lever to the LOCK (0) position. 2009 Pilot 139 All doors and tailgate unlock when you hear another click... (after about 9 mph (15 km/h). 3. Make sure the shift lever is the default setting. All doors and tailgate unlock whenever you turn the ignition switch to the ACCESSORY (I) position. ...
...holding the switch until you move the shift lever to the ACCESSORY (I ) position. Release the switch and, within 5 seconds, turn the ignition switch to the Park (P) position. Move the shift lever to the LOCK (0) position. 2009 Pilot 139 All doors and tailgate unlock when you hear another click... (after about 9 mph (15 km/h). 3. Make sure the shift lever is the default setting. All doors and tailgate unlock whenever you turn the ignition switch to the ACCESSORY (I) position. ...

Owner's Manual
Page 145
Push and hold the switch: Until you hear two more clicks (after about 10 seconds) to the ACCESSORY (I) position. To program the Ignition Switch Unlock mode: Unlocks the driver's door or all doors and tailgate when the ignition switch is in the ...the switch and, within 5 seconds, turn the ignition switch to activate all doors and tailgate unlock feature. 4. Move the shift lever to the LOCK (0) position. 2009 Pilot 141 Door Locks 3. Continue to the LOCK (0) position. 1. Instruments and Controls Or, until you hear another click (after about 5 seconds) to activate the driver's...
Push and hold the switch: Until you hear two more clicks (after about 10 seconds) to the ACCESSORY (I) position. To program the Ignition Switch Unlock mode: Unlocks the driver's door or all doors and tailgate when the ignition switch is in the ...the switch and, within 5 seconds, turn the ignition switch to activate all doors and tailgate unlock feature. 4. Move the shift lever to the LOCK (0) position. 2009 Pilot 141 Door Locks 3. Continue to the LOCK (0) position. 1. Instruments and Controls Or, until you hear another click (after about 5 seconds) to activate the driver's...

Owner's Manual
Page 149
... is covered with the tailgate not closed at all times while driving to avoid damaging the tailgate and to damage them. Do not install any accessories on page 59 . Be careful not to prevent exhaust gas from getting into the interior. You need to open or close it before you will.... If there is shown on the back of the way manually. It may cause the tailgate not to remove it the rest of the tailgate. 2009 Pilot 145 If there is opening or closing, it manually. If you push the tailgate release button inside the handle while the tailgate is snow or...
... is covered with the tailgate not closed at all times while driving to avoid damaging the tailgate and to damage them. Do not install any accessories on page 59 . Be careful not to prevent exhaust gas from getting into the interior. You need to open or close it before you will.... If there is shown on the back of the way manually. It may cause the tailgate not to remove it the rest of the tailgate. 2009 Pilot 145 If there is opening or closing, it manually. If you push the tailgate release button inside the handle while the tailgate is snow or...

Owner's Manual
Page 181
Interior Convenience Items SUNGLASSES HOLDER CONVERSATION MIRROR SUN VISOR INTEGRATED SUNSHADE COAT HOOKS ACCESSORY POWER SOCKET VANITY MIRROR Instruments and Controls GROCERY HOOK GLOVE BOX ACCESSORY POWER SOCKET CONSOLE COMPARTMENT ARMREST/BEVERAGE HOLDER STORAGE COMPARTMENTS BEVERAGE HOLDERS : If equipped 2009 Pilot 177
Interior Convenience Items SUNGLASSES HOLDER CONVERSATION MIRROR SUN VISOR INTEGRATED SUNSHADE COAT HOOKS ACCESSORY POWER SOCKET VANITY MIRROR Instruments and Controls GROCERY HOOK GLOVE BOX ACCESSORY POWER SOCKET CONSOLE COMPARTMENT ARMREST/BEVERAGE HOLDER STORAGE COMPARTMENTS BEVERAGE HOLDERS : If equipped 2009 Pilot 177

Owner's Manual
Page 188
Each socket is intended to supply power for 12 volt DC accessories that are located on the instrument panel, in the ACCESSORY (I) or ON (II) position. To use an accessory power socket, the ignition switch must be in the console compartment, back of the center console box, or behind ... front center edge of the tray. Use the tray by pulling on the passenger's side. Your vehicle has four accessory power sockets. Interior Convenience Items Seat Under Tray Accessory Power Sockets On Touring models Your vehicle has a seat under tray located under the front passenger seat. These are...
Each socket is intended to supply power for 12 volt DC accessories that are located on the instrument panel, in the ACCESSORY (I) or ON (II) position. To use an accessory power socket, the ignition switch must be in the console compartment, back of the center console box, or behind ... front center edge of the tray. Use the tray by pulling on the passenger's side. Your vehicle has four accessory power sockets. Interior Convenience Items Seat Under Tray Accessory Power Sockets On Touring models Your vehicle has a seat under tray located under the front passenger seat. These are...

Owner's Manual
Page 213
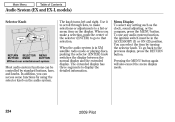
... the selected band. TUNE Use the TUNE knob to tune the radio to find a station with strong signals on the RDS, see SCAN in the ACCESSORY (I) or ON (II) position. To activate it . CONTINUED SCAN The scan function samples all stations with a strong signal. The band and frequency that station for... on the selected band: tune, skip, scan, the preset buttons, and auto select. Turn the knob to the right to tune to a lower frequency. Features 2009 Pilot 209 On the FM band, ST will then scan for about 10 seconds. You will scan for 10 seconds. The system will see page 211...
... the selected band. TUNE Use the TUNE knob to tune the radio to find a station with strong signals on the RDS, see SCAN in the ACCESSORY (I) or ON (II) position. To activate it . CONTINUED SCAN The scan function samples all stations with a strong signal. The band and frequency that station for... on the selected band: tune, skip, scan, the preset buttons, and auto select. Turn the knob to the right to tune to a lower frequency. Features 2009 Pilot 209 On the FM band, ST will then scan for about 10 seconds. You will scan for 10 seconds. The system will see page 211...

Owner's Manual
Page 221
... then skips to the next file. CONTINUED Do not use discs with variable bit rate and multi-session Maximum layers (including ROOT): 8 layers Features 2009 Pilot 217 Video CDs and DVD discs do not work in the display. In WMA format, ''WMA'' will see ''MP3'' in this unit. The specifications... for the radio. You will appear in the ACCESSORY (I) or ON (II) position. When playing a disc in MP3, you will see ''CD'' in the display. If you have a disc that is protected...
... then skips to the next file. CONTINUED Do not use discs with variable bit rate and multi-session Maximum layers (including ROOT): 8 layers Features 2009 Pilot 217 Video CDs and DVD discs do not work in the display. In WMA format, ''WMA'' will see ''MP3'' in this unit. The specifications... for the radio. You will appear in the ACCESSORY (I) or ON (II) position. When playing a disc in MP3, you will see ''CD'' in the display. If you have a disc that is protected...
Owner's Manual
Page 228
... to a list or menu item on the audio system. 224 2009 Pilot RETURN SELECTOR MENU BUTTON KNOB BUTTON Without rear entertainment system Most audio system functions can select the item by turning the selector knob. When the audio system is in the ACCESSORY (I) or ON (II) position. You can be in XM satellite...
... to a list or menu item on the audio system. 224 2009 Pilot RETURN SELECTOR MENU BUTTON KNOB BUTTON Without rear entertainment system Most audio system functions can select the item by turning the selector knob. When the audio system is in the ACCESSORY (I) or ON (II) position. You can be in XM satellite...

Owner's Manual
Page 230
... find a station with a strong signal. Turn the knob right to tune to a higher frequency, or left to tune to a desired frequency. Stereo reproduction in the ACCESSORY (I) or ON (II) position. Playing the FM/AM Radio (EX and EX-L models) To Play the Radio The ignition switch must be displayed if the... not available. Turn the system on automatically. On the AM band, AM noise reduction turns on by turning the same knob. To activate it . 226 2009 Pilot Adjust the volume by pushing the PWR/VOL knob. On the FM band, ST will be in AM is broadcasting in stereo. For more information...
... find a station with a strong signal. Turn the knob right to tune to a higher frequency, or left to tune to a desired frequency. Stereo reproduction in the ACCESSORY (I) or ON (II) position. Playing the FM/AM Radio (EX and EX-L models) To Play the Radio The ignition switch must be displayed if the... not available. Turn the system on automatically. On the AM band, AM noise reduction turns on by turning the same knob. To activate it . 226 2009 Pilot Adjust the volume by pushing the PWR/VOL knob. On the FM band, ST will be in AM is broadcasting in stereo. For more information...
