Owner's Manual
Page 440
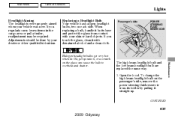
...and shatter. Passenger's side POWER STEERING FLUID RESERVOIR Halogen headlight bulbs get very hot when lit. The high beam headlight bulb and the low beam headlight bulb are replaced the same way. 1. CONTINUED Maintenance 437 2009 Odyssey If you touch the glass, clean it straight up. If... denatured alcohol and a clean cloth. Adjustments should be required. Main Menu Table Of Contents Lights Headlight Aiming The headlights were properly aimed when your skin or hard objects. When replacing a bulb, handle it by its holder by your dealer or other qualified technician.
...and shatter. Passenger's side POWER STEERING FLUID RESERVOIR Halogen headlight bulbs get very hot when lit. The high beam headlight bulb and the low beam headlight bulb are replaced the same way. 1. CONTINUED Maintenance 437 2009 Odyssey If you touch the glass, clean it straight up. If... denatured alcohol and a clean cloth. Adjustments should be required. Main Menu Table Of Contents Lights Headlight Aiming The headlights were properly aimed when your skin or hard objects. When replacing a bulb, handle it by its holder by your dealer or other qualified technician.
Owner's Manual
Page 441
... the bulb. BULB SOCKET 1. Pull the burned out bulb straight out of its socket. Remove the socket from the bulb by turning it in place. Replacing a Front Turn Signal Bulb CONNECTOR 2. Insert the new bulb into the socket until it is on the passenger's side, reinstall the power steering fluid reservoir. Make sure it bottoms. 438 2009 Odyssey
... the bulb. BULB SOCKET 1. Pull the burned out bulb straight out of its socket. Remove the socket from the bulb by turning it in place. Replacing a Front Turn Signal Bulb CONNECTOR 2. Insert the new bulb into the socket until it is on the passenger's side, reinstall the power steering fluid reservoir. Make sure it bottoms. 438 2009 Odyssey

Owner's Manual
Page 442
Turn it clockwise to make sure the new bulb is working . Open the hood. Pull the bulb straight out of its socket. Insert the socket back into the headlight assembly. Turn on the lights to lock it in place. 4. Insert the socket back into the headlight ...sure the new bulb is working . Turn on the lights to lock it in place. 4. Main Menu Table Of Contents Lights 3. Replacing a Front Parking/Side Marker Bulb 3. BULB SOCKET Maintenance 1. Remove the socket from the headlight assembly by turning it bottoms. 439 2009 Odyssey Push the new bulb straight into the...
Turn it clockwise to make sure the new bulb is working . Open the hood. Pull the bulb straight out of its socket. Insert the socket back into the headlight assembly. Turn on the lights to lock it in place. 4. Insert the socket back into the headlight ...sure the new bulb is working . Turn on the lights to lock it in place. 4. Main Menu Table Of Contents Lights 3. Replacing a Front Parking/Side Marker Bulb 3. BULB SOCKET Maintenance 1. Remove the socket from the headlight assembly by turning it bottoms. 439 2009 Odyssey Push the new bulb straight into the...

Owner's Manual
Page 443
... pulling its inner edge first, then the whole assembly out of the bumper. 3. Halogen bulbs get very hot when lit. Reinstall the fog light assembly, then tighten the screw. Turn on the fog lights to overheat and shatter. 440 2009 Odyssey Oil, perspiration, or a scratch on the tab and pulling the connector down. 4. Insert the...
... pulling its inner edge first, then the whole assembly out of the bumper. 3. Halogen bulbs get very hot when lit. Reinstall the fog light assembly, then tighten the screw. Turn on the fog lights to overheat and shatter. 440 2009 Odyssey Oil, perspiration, or a scratch on the tab and pulling the connector down. 4. Insert the...

Owner's Manual
Page 444
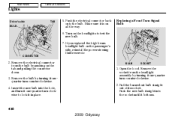
... lock it bottoms. 441 2009 Odyssey Snap the bolt covers into the light assembly, and turn counterclockwise. 5. Remove the socket by turning it straight out of the two bulbs is working. 7. Tighten the two bolts. Remove the bolts with a flat-tip screwdriver. Open the tailgate. 2.... with a Phillipshead screwdriver, and remove the light assembly from the rear pillar. 3. Install the rear light assembly in Rear Pillar) COVER BULBS 6. Main Menu Table Of Contents Lights Replacing Rear Bulbs (in the rear pillar. Remove the bulb by prying on the rear pillar by pulling...
... lock it bottoms. 441 2009 Odyssey Snap the bolt covers into the light assembly, and turn counterclockwise. 5. Remove the socket by turning it straight out of the two bulbs is working. 7. Tighten the two bolts. Remove the bolts with a flat-tip screwdriver. Open the tailgate. 2.... with a Phillipshead screwdriver, and remove the light assembly from the rear pillar. 3. Install the rear light assembly in Rear Pillar) COVER BULBS 6. Main Menu Table Of Contents Lights Replacing Rear Bulbs (in the rear pillar. Remove the bulb by prying on the rear pillar by pulling...

Owner's Manual
Page 445
... the socket into the socket until it bottoms. 442 2009 Odyssey Main Menu Table Of Contents Lights Replacing Rear Bulbs (in the notch on its socket. Open the tailgate. Determine which of its middle edge with a flat-tip screwdriver. 2. Push the new bulb straight into the light assembly by turning it one-quarter turn counterclockwise. 4. SOCKETS...
... the socket into the socket until it bottoms. 442 2009 Odyssey Main Menu Table Of Contents Lights Replacing Rear Bulbs (in the notch on its socket. Open the tailgate. Determine which of its middle edge with a flat-tip screwdriver. 2. Push the new bulb straight into the light assembly by turning it one-quarter turn counterclockwise. 4. SOCKETS...

Owner's Manual
Page 446
... with a Phillipshead screwdriver, then remove the light assembly from the light assembly by turning it bottoms. 443 2009 Odyssey Tighten the two screws and reinstall the covers. Reinstall the high-mount brake light assembly into the light assembly, and turn counterclockwise. 4. Remove the screws with a flat-tip screwdriver. 2. Pull the bulb straight out of its socket. Push...
... with a Phillipshead screwdriver, then remove the light assembly from the light assembly by turning it bottoms. 443 2009 Odyssey Tighten the two screws and reinstall the covers. Reinstall the high-mount brake light assembly into the light assembly, and turn counterclockwise. 4. Remove the screws with a flat-tip screwdriver. 2. Pull the bulb straight out of its socket. Push...

Owner's Manual
Page 518
... Light ...438 Headlights ...437 Rear Bulbs ...441, 442 Rear Turn Signal Light ...441 Specifications ...495 Bulbs, Halogen ...437 INDEX B Battery Charging System Indicator...67, 479 Jump Starting ...475 Maintenance ...458 Specifications ...494 Before Driving ...367 Belts, Seat ...8, 21 Beverage Holders ...195 Bluetooth HandsFreeLink ...325 Booster Seats ...57 Brakes Anti-lock System (ABS) ...392 CONTINUED I 2009 Odyssey
... Light ...438 Headlights ...437 Rear Bulbs ...441, 442 Rear Turn Signal Light ...441 Specifications ...495 Bulbs, Halogen ...437 INDEX B Battery Charging System Indicator...67, 479 Jump Starting ...475 Maintenance ...458 Specifications ...494 Before Driving ...367 Belts, Seat ...8, 21 Beverage Holders ...195 Bluetooth HandsFreeLink ...325 Booster Seats ...57 Brakes Anti-lock System (ABS) ...392 CONTINUED I 2009 Odyssey

Owner's Manual
Page 521
... Rating) ...405 Glove Boxes...201 GVWR (Gross Vehicle Weight Rating) ...405 Automatic Lighting Off ...138 Daytime Running Lights ...138 High Beam Indicator ...73 Reminder Chime...136 Replacing Halogen Bulbs ...437 Turning on ...136 Headphones...315 Head Restraints ...171 Heated Mirror ...192 Heater......385 High-Low Beam Switch ...135 HomeLink Universal Transceiver...322 Hood, Opening the ...370 Horn ...4, 133 I H Halogen Headlight Bulbs...429 HandsFreeLink ...325 Hazard Warning Flashers...140 Headlights ...136 Aiming ...437 Identification Number, Vehicle...492 Ignition Keys...142 Switch ...144 ...
... Rating) ...405 Glove Boxes...201 GVWR (Gross Vehicle Weight Rating) ...405 Automatic Lighting Off ...138 Daytime Running Lights ...138 High Beam Indicator ...73 Reminder Chime...136 Replacing Halogen Bulbs ...437 Turning on ...136 Headphones...315 Head Restraints ...171 Heated Mirror ...192 Heater......385 High-Low Beam Switch ...135 HomeLink Universal Transceiver...322 Hood, Opening the ...370 Horn ...4, 133 I H Halogen Headlight Bulbs...429 HandsFreeLink ...325 Hazard Warning Flashers...140 Headlights ...136 Aiming ...437 Identification Number, Vehicle...492 Ignition Keys...142 Switch ...144 ...
Owner's Manual
Page 522
... and Hazard Warning ...72 Vehicle Stability Assist (VSA ) System ...70, 394 VSA Activation ...70 Washer Level ...74 Individual Map Lights ...206 Infant Restraint ...43 Infant Seats ...45 LATCH Anchorage System ...48 Lower Anchors ...48 Tether Anchorage Points ...54 Inflation, Proper... LATCH Anchorage System...48 Light Control Switch ...205 Lights Bulb Replacement ...437 Indicator ...73 Interior ...205 Parking ...135 Turn Signal ...136 Load Limits...378, 404 LOCK (Ignition Key Position) ...144 J Jacking up the Vehicle ...468 Jack, Tire ...467 Jump Starting ...475 CONTINUED INDEX V 2009 Odyssey
... and Hazard Warning ...72 Vehicle Stability Assist (VSA ) System ...70, 394 VSA Activation ...70 Washer Level ...74 Individual Map Lights ...206 Infant Restraint ...43 Infant Seats ...45 LATCH Anchorage System ...48 Lower Anchors ...48 Tether Anchorage Points ...54 Inflation, Proper... LATCH Anchorage System...48 Light Control Switch ...205 Lights Bulb Replacement ...437 Indicator ...73 Interior ...205 Parking ...135 Turn Signal ...136 Load Limits...378, 404 LOCK (Ignition Key Position) ...144 J Jacking up the Vehicle ...468 Jack, Tire ...467 Jump Starting ...475 CONTINUED INDEX V 2009 Odyssey
Owner's Manual
Page 524
...221 Readiness Codes ...480 Rear Audio Control Panel ...290 Rear A/C Unit ...216 Rear Entertainment System ...285 Rear Lights, Bulb Replacement ...441, 442 Rearview Camera and Monitor ...365 Rear View Mirror...190 Rear Window Defogger ...140 Rear ...Remote Transmitter ...145 Removing the Second Row Seats ...177 Replacement Information Engine Oil and Filter ...428 Fuses ...482 Light Bulbs ...437 Timing Belt ...436 Tires ...454 Wiper Blades ...445 Replacing Seat Belts After a Crash ...24 Reporting Safety... ...8 Safety Labels, Location of ...61 Safety Messages ...ii INDEX CONTINUED VII 2009 Odyssey
...221 Readiness Codes ...480 Rear Audio Control Panel ...290 Rear A/C Unit ...216 Rear Entertainment System ...285 Rear Lights, Bulb Replacement ...441, 442 Rearview Camera and Monitor ...365 Rear View Mirror...190 Rear Window Defogger ...140 Rear ...Remote Transmitter ...145 Removing the Second Row Seats ...177 Replacement Information Engine Oil and Filter ...428 Fuses ...482 Light Bulbs ...437 Timing Belt ...436 Tires ...454 Wiper Blades ...445 Replacing Seat Belts After a Crash ...24 Reporting Safety... ...8 Safety Labels, Location of ...61 Safety Messages ...ii INDEX CONTINUED VII 2009 Odyssey

Owner's Manual
Page 525
... Station Procedure ...369 Setting the Clock ...281 Shift Lever Position Indicators ...386 Shift Lock Release ...389 Side Airbags ...9, 31 Off Indicator ...35, 68 Side Marker Lights, Bulb Replacement ...439 Signaling Turns ...136 Sliding Doors ...161 Snow Tires ...455 Sound System ...221 Spare Tire Inflating ...465 Specifications ...495 Specifications Charts...494 Speed Control... Buttons...82, 282, 319 Stereo Sound System ...221 Storing Your Vehicle ...459 Second Row Plus-One Seat ...178 Sunglasses Holder ...197 Sun Visor...198 VIII 2009 Odyssey
... Station Procedure ...369 Setting the Clock ...281 Shift Lever Position Indicators ...386 Shift Lock Release ...389 Side Airbags ...9, 31 Off Indicator ...35, 68 Side Marker Lights, Bulb Replacement ...439 Signaling Turns ...136 Sliding Doors ...161 Snow Tires ...455 Sound System ...221 Spare Tire Inflating ...465 Specifications ...495 Specifications Charts...494 Speed Control... Buttons...82, 282, 319 Stereo Sound System ...221 Storing Your Vehicle ...459 Second Row Plus-One Seat ...178 Sunglasses Holder ...197 Sun Visor...198 VIII 2009 Odyssey


