Owner's Manual
Page 7
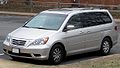
... equipped 4 2009 Odyssey Main Menu Your Vehicle at a Glance PEDAL POSITION ADJUSTMENT SWITCH 3 (P.193) POWER SLIDING DOOR SWITCH 3 (P.162) MOONROOF SWITCH 3 (P.189) POWER TAILGATE SWITCH 3 (P.158)/ VEHICLE STABILITY ASSIST (VSA) OFF SWITCH (P.395) PARKING SENSOR SYSTEM SWITCH 3 (P.361) VEHICLE STABILITY ASSIST (VSA) OFF SWITCH (P.395) REMOTE AUDIO CONTROL BUTTONS (P.282) 3 HEADLIGHTS/TURN SIGNAL...
... equipped 4 2009 Odyssey Main Menu Your Vehicle at a Glance PEDAL POSITION ADJUSTMENT SWITCH 3 (P.193) POWER SLIDING DOOR SWITCH 3 (P.162) MOONROOF SWITCH 3 (P.189) POWER TAILGATE SWITCH 3 (P.158)/ VEHICLE STABILITY ASSIST (VSA) OFF SWITCH (P.395) PARKING SENSOR SYSTEM SWITCH 3 (P.361) VEHICLE STABILITY ASSIST (VSA) OFF SWITCH (P.395) REMOTE AUDIO CONTROL BUTTONS (P.282) 3 HEADLIGHTS/TURN SIGNAL...
Owner's Manual
Page 66
... of your vehicle. All the essential controls are within easy reach. Windshield Wipers and Washers ...134 Rear Window Wiper and Washer ...135 Turn Signal and Headlights...135 Instrument Panel Brightness ...139 Hazard Warning Button ...140 Rear Window Defogger ...140 Steering Wheel Adjustment ...141 Keys and Locks...142 Immobilizer System...143 Ignition... and Controls Control Locations ...64 Instrument Panel ...65 Instrument Panel Indicators ...67 Gauges ...77 Multi-Information Display ...81 Controls Near the Steering Wheel ...133 63 2009 Odyssey
... of your vehicle. All the essential controls are within easy reach. Windshield Wipers and Washers ...134 Rear Window Wiper and Washer ...135 Turn Signal and Headlights...135 Instrument Panel Brightness ...139 Hazard Warning Button ...140 Rear Window Defogger ...140 Steering Wheel Adjustment ...141 Keys and Locks...142 Immobilizer System...143 Ignition... and Controls Control Locations ...64 Instrument Panel ...65 Instrument Panel Indicators ...67 Gauges ...77 Multi-Information Display ...81 Controls Near the Steering Wheel ...133 63 2009 Odyssey
Owner's Manual
Page 76
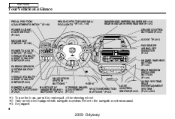
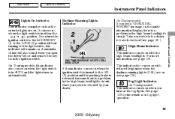
...138 for information on with reduced brightness when the daytime running lights (DRL) are on the multiinformation display, there is in the high beam headlight's circuit. On Touring models, this indicator will also sound when you see page 89 ). Daytime Running Lights Indicator On Touring models If ... is a problem in AUTO and the lights turn on automatically. High Beam Indicator This indicator comes on fog light operation. 73 2009 Odyssey If you turn the ignition switch to have it means there is in the high beam headlight's circuit. It comes on (see page 136 .
...138 for information on with reduced brightness when the daytime running lights (DRL) are on the multiinformation display, there is in the high beam headlight's circuit. On Touring models, this indicator will also sound when you see page 89 ). Daytime Running Lights Indicator On Touring models If ... is a problem in AUTO and the lights turn on automatically. High Beam Indicator This indicator comes on fog light operation. 73 2009 Odyssey If you turn the ignition switch to have it means there is in the high beam headlight's circuit. It comes on (see page 136 .
Owner's Manual
Page 102
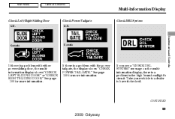
... Controls Canada Canada If there is a problem with the power tailgate, the display shows ''CHECK POWER TAILGATE.'' See page 158 for more information. CONTINUED 99 2009 Odyssey If you see a ''CHECK DRL SYSTEM'' message on the multiinformation display, there is a problem with either power sliding door, the multiinformation display shows ''CHECK LEFT... Multi-Information Display Check Left/Right Sliding Door U.S. Take your vehicle to a dealer to have it checked. If there is a problem in the high beam headlight's circuit. Check Power Tailgate U.S.
... Controls Canada Canada If there is a problem with the power tailgate, the display shows ''CHECK POWER TAILGATE.'' See page 158 for more information. CONTINUED 99 2009 Odyssey If you see a ''CHECK DRL SYSTEM'' message on the multiinformation display, there is a problem with either power sliding door, the multiinformation display shows ''CHECK LEFT... Multi-Information Display Check Left/Right Sliding Door U.S. Take your vehicle to a dealer to have it checked. If there is a problem in the high beam headlight's circuit. Check Power Tailgate U.S.
Owner's Manual
Page 105
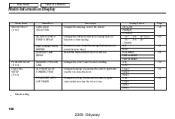
...after you refuel. Resets the elapsed time of your current trip. POSITION SETUP (P. 116) LIGHTING SETUP (P. 118) MEMORY POSITION LINK INTERIOR LIGHT DIMMING TIME HEADLIGHT AUTO OFF TIMER Changes the driver's seat to reset when you close the doors. Setting Option ENGLISH FRENCH SPANISH 5F° 0°F 5F° ...OFF 15 sec 30 sec 60 sec 0 sec 15 sec 30 sec 60 sec Page 108 110 112 114 116 118 120 : Default setting 102 2009 Odyssey Causes trip meter A and the average fuel economy to a stored setting. Changes how long (in the display. DISPLAY TRIP A RESET WITH REFUEL ...
...after you refuel. Resets the elapsed time of your current trip. POSITION SETUP (P. 116) LIGHTING SETUP (P. 118) MEMORY POSITION LINK INTERIOR LIGHT DIMMING TIME HEADLIGHT AUTO OFF TIMER Changes the driver's seat to reset when you close the doors. Setting Option ENGLISH FRENCH SPANISH 5F° 0°F 5F° ...OFF 15 sec 30 sec 60 sec 0 sec 15 sec 30 sec 60 sec Page 108 110 112 114 116 118 120 : Default setting 102 2009 Odyssey Causes trip meter A and the average fuel economy to a stored setting. Changes how long (in the display. DISPLAY TRIP A RESET WITH REFUEL ...
Owner's Manual
Page 121
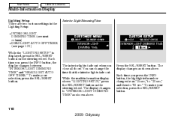
... Light Dimming Time The interior lights fade out when you press the INFO button, the display changes between ''INTERIOR LIGHT DIMMING TIME'' and ''HEADLIGHT AUTO OFF TIMER.'' To make your selection, press the SEL/RESET button. While the multi-information display shows ''LIGHTING SETUP,'' press the SEL.../RESET button on the steering wheel. The display changes to ''60 sec.'' To make your selection, press the SEL/RESET button. 118 2009 Odyssey You can change the time that the interior lights fade out. Press the SEL/RESET button. Each time you press the INFO button, the ...
... Light Dimming Time The interior lights fade out when you press the INFO button, the display changes between ''INTERIOR LIGHT DIMMING TIME'' and ''HEADLIGHT AUTO OFF TIMER.'' To make your selection, press the SEL/RESET button. While the multi-information display shows ''LIGHTING SETUP,'' press the SEL.../RESET button on the steering wheel. The display changes to ''60 sec.'' To make your selection, press the SEL/RESET button. 118 2009 Odyssey You can change the time that the interior lights fade out. Press the SEL/RESET button. Each time you press the INFO button, the ...

Owner's Manual
Page 123
...to enter your selection. 120 2009 Odyssey Each time you remove the key from ''0 sec,'' to ''15 sec,'' to ''30 sec,'' and then to ''60 sec.'' Press the INFO button repeatedly until the desired time appears, then press the SEL/RESET button to display ''HEADLIGHT AUTO OFF TIMER'' as shown... above . The display changes as shown above . Main Menu Table Of Contents Multi-Information Display Headlight Auto Off Timer The headlights, parking lights, taillights, and license plate light turn off after the selected time when you press the INFO button, the highlighted ...
...to enter your selection. 120 2009 Odyssey Each time you remove the key from ''0 sec,'' to ''15 sec,'' to ''30 sec,'' and then to ''60 sec.'' Press the INFO button repeatedly until the desired time appears, then press the SEL/RESET button to display ''HEADLIGHT AUTO OFF TIMER'' as shown... above . The display changes as shown above . Main Menu Table Of Contents Multi-Information Display Headlight Auto Off Timer The headlights, parking lights, taillights, and license plate light turn off after the selected time when you press the INFO button, the highlighted ...

Owner's Manual
Page 124
Main Menu Table Of Contents Multi-Information Display Instruments and Controls When your selection is entered, you will see ''EXIT,'' then press the SEL/RESET button. 121 2009 Odyssey To exit ''HEADLIGHT AUTO OFF TIMER,'' press the INFO button until you see the above display for several seconds, and then the display goes back to ''CUSTOMIZE MENU.'' If you fail to enter your selection, you will see the above display for several seconds, and the display goes back to ''CUSTOMIZE MENU.'' Repeat the setup.
Main Menu Table Of Contents Multi-Information Display Instruments and Controls When your selection is entered, you will see ''EXIT,'' then press the SEL/RESET button. 121 2009 Odyssey To exit ''HEADLIGHT AUTO OFF TIMER,'' press the INFO button until you see the above display for several seconds, and then the display goes back to ''CUSTOMIZE MENU.'' If you fail to enter your selection, you will see the above display for several seconds, and the display goes back to ''CUSTOMIZE MENU.'' Repeat the setup.
Owner's Manual
Page 136
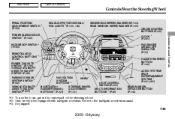
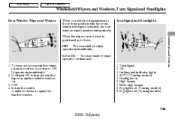
Refer to the navigation system manual. 3: If equipped 133 2009 Odyssey Main Menu Table Of Contents Controls Near the Steering Wheel PEDAL POSITION ADJUSTMENT SWITCH (P.193) POWER SLIDING DOOR SWITCH 3 (P.162) MOONROOF SWITCH ... TAILGATE SWITCH 3 (P.158)/ VEHICLE STABILITY ASSIST (VSA) OFF SWITCH (P.395) PARKING SENSOR SYSTEM SWITCH 3 (P.352) VEHICLE STABILITY ASSIST (VSA) OFF SWITCH (P.395) 3 3 HEADLIGHTS/TURN SIGNAL/ FOG LIGHTS 3 (P.135, 138) WINDSHIELD WIPERS/WASHERS (P.134) REAR WINDOW WIPER/WASHER (P.135) CRUISE CONTROL BUTTONS (P.319) CLOCK (P.281) 3 Instruments and Controls ...
Refer to the navigation system manual. 3: If equipped 133 2009 Odyssey Main Menu Table Of Contents Controls Near the Steering Wheel PEDAL POSITION ADJUSTMENT SWITCH (P.193) POWER SLIDING DOOR SWITCH 3 (P.162) MOONROOF SWITCH ... TAILGATE SWITCH 3 (P.158)/ VEHICLE STABILITY ASSIST (VSA) OFF SWITCH (P.395) PARKING SENSOR SYSTEM SWITCH 3 (P.352) VEHICLE STABILITY ASSIST (VSA) OFF SWITCH (P.395) 3 3 HEADLIGHTS/TURN SIGNAL/ FOG LIGHTS 3 (P.135, 138) WINDSHIELD WIPERS/WASHERS (P.134) REAR WINDOW WIPER/WASHER (P.135) CRUISE CONTROL BUTTONS (P.319) CLOCK (P.281) 3 Instruments and Controls ...
Owner's Manual
Page 138
... . 3. Fog lights on the rear window wiper, rotate the switch clockwise to turn on (Touring models) Turn Signal and Headlights Instruments and Controls 135 2009 Odyssey LO or HI The rear window wiper operates continuously. 1. It operates intermittently. 2. Turn signal 2. Fog lights off (Touring models) ... automatically. Flash high beams 8. AUTO (Touring models) 5. Main Menu Table Of Contents Windshield Wipers and Washers, Turn Signal and Headlights Rear Window Wiper and Washer When you shift the transmission to spray the window washer. 1. To turn the window wiper on and...
... . 3. Fog lights on the rear window wiper, rotate the switch clockwise to turn on (Touring models) Turn Signal and Headlights Instruments and Controls 135 2009 Odyssey LO or HI The rear window wiper operates continuously. 1. It operates intermittently. 2. Turn signal 2. Fog lights off (Touring models) ... automatically. Flash high beams 8. AUTO (Touring models) 5. Main Menu Table Of Contents Windshield Wipers and Washers, Turn Signal and Headlights Rear Window Wiper and Washer When you shift the transmission to spray the window washer. 1. To turn the window wiper on and...
Owner's Manual
Page 139
... will come on the lever to the ACCESSORY (I) or the LOCK (0) position. The high beam indicator will stay on the headlights. Main Menu Table Of Contents Turn Signal, Headlights Turn Signal Push down on (see page 73 ). This indicator stays on if you leave the light switch on as you ... ignition switch to signal a left lever controls the lights. Pull it back to return to signal a right turn . Headlights The rotating switch on the lever, and hold the lever back. 136 2009 Odyssey To signal a lane change, push lightly on the left turn and up to low beams. To flash the high...
... will come on the lever to the ACCESSORY (I) or the LOCK (0) position. The high beam indicator will stay on the headlights. Main Menu Table Of Contents Turn Signal, Headlights Turn Signal Push down on (see page 73 ). This indicator stays on if you leave the light switch on as you ... ignition switch to signal a left lever controls the lights. Pull it back to return to signal a right turn . Headlights The rotating switch on the lever, and hold the lever back. 136 2009 Odyssey To signal a lane change, push lightly on the left turn and up to low beams. To flash the high...
Owner's Manual
Page 140
... outside light level becomes low (at any time. Main Menu Table Of Contents Headlights On Touring models AUTO The automatic lighting feature turns on the headlights, all other exterior lights, and the instrument panel lights when it . 137 2009 Odyssey To turn them on again, either turn the ignition switch to the ON (II...
... outside light level becomes low (at any time. Main Menu Table Of Contents Headlights On Touring models AUTO The automatic lighting feature turns on the headlights, all other exterior lights, and the instrument panel lights when it . 137 2009 Odyssey To turn them on again, either turn the ignition switch to the ON (II...
Owner's Manual
Page 141
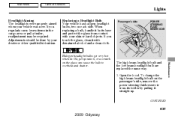
...driver's door open the door and get out, the lights turn on with reduced brightness when you set the time. 138 2009 Odyssey Main Menu Table Of Contents Headlights Fog Lights On Touring models Automatic Lighting Off Feature On EX, EX-L and Touring models only Turn the fog lights on ...reminder chime. You can use the fog lights only when the headlights are turned off the headlights, parking lights, taillights, side marker lights, license plate lights, and instrument panel lights within 15 seconds, the lights go off when...
...driver's door open the door and get out, the lights turn on with reduced brightness when you set the time. 138 2009 Odyssey Main Menu Table Of Contents Headlights Fog Lights On Touring models Automatic Lighting Off Feature On EX, EX-L and Touring models only Turn the fog lights on ...reminder chime. You can use the fog lights only when the headlights are turned off the headlights, parking lights, taillights, side marker lights, license plate lights, and instrument panel lights within 15 seconds, the lights go off when...
Owner's Manual
Page 142
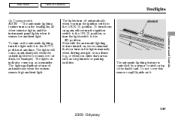
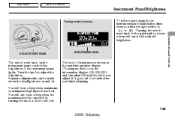
Separate adjustments can be made when the headlights are on the information display (LX, EX, EX-L and Canadian DX models) while you finish adjusting. 139 2009 Odyssey You will hear a beep when maximum or minimum brightness is shown. The level of the instrument panel lights. Instruments and Controls SELECT/RESET KNOB BRIGHTNESS ...
Separate adjustments can be made when the headlights are on the information display (LX, EX, EX-L and Canadian DX models) while you finish adjusting. 139 2009 Odyssey You will hear a beep when maximum or minimum brightness is shown. The level of the instrument panel lights. Instruments and Controls SELECT/RESET KNOB BRIGHTNESS ...
Owner's Manual
Page 193
... you shift to reverse with the ignition switch in the ON (II) position, the rear view is on, the mirror darkens when it senses the headlights of the mirror. Flip the tab on the bottom edge of the inside mirror can automatically darken to turn on the left side of the... more information, see page 366 . Press the button again to reduce glare. Main Menu Table Of Contents Mirrors On U.S. The night position reduces glare from headlights behind you . When it is shown on this feature. 190 2009 Odyssey To turn off this feature, press the button on as a reminder.
... you shift to reverse with the ignition switch in the ON (II) position, the rear view is on, the mirror darkens when it senses the headlights of the mirror. Flip the tab on the bottom edge of the inside mirror can automatically darken to turn on the left side of the... more information, see page 366 . Press the button again to reduce glare. Main Menu Table Of Contents Mirrors On U.S. The night position reduces glare from headlights behind you . When it is shown on this feature. 190 2009 Odyssey To turn off this feature, press the button on as a reminder.
Owner's Manual
Page 321
... after you exit the vehicle, press the LOCK button on the remote transmitter within 5 seconds. The security system will cause it . 318 2009 Odyssey Before you the system is set , the horn will also be activated if a passenger inside the locked vehicle turns the ignition switch on the... instrument panel starts blinking immediately to alarm. The alarm will beep once. The horn sounds and a combination of headlights, parking lights, side marker lights, and taillights flashes if someone attempts to it to show you leave the vehicle, make sure the doors...
... after you exit the vehicle, press the LOCK button on the remote transmitter within 5 seconds. The security system will cause it . 318 2009 Odyssey Before you the system is set , the horn will also be activated if a passenger inside the locked vehicle turns the ignition switch on the... instrument panel starts blinking immediately to alarm. The alarm will beep once. The horn sounds and a combination of headlights, parking lights, side marker lights, and taillights flashes if someone attempts to it to show you leave the vehicle, make sure the doors...

Owner's Manual
Page 426
Maintenance CONTINUED 423 2009 Odyssey See page 371 . See page 372 . See page 437 . According to state and federal regulations, failure to perform maintenance on the items marked with the ... intervals. Engine oil level Check every time you fill the fuel tank. See page 433 . See page 435 . Vehicles: Maintenance, replacement, or repair of the headlights, parking lights, taillights, high-mount brake light, and license plate lights monthly. See page 451 . Owner's Maintenance Checks You should be done by the odometer...
Maintenance CONTINUED 423 2009 Odyssey See page 371 . See page 372 . See page 437 . According to state and federal regulations, failure to perform maintenance on the items marked with the ... intervals. Engine oil level Check every time you fill the fuel tank. See page 433 . See page 435 . Vehicles: Maintenance, replacement, or repair of the headlights, parking lights, taillights, high-mount brake light, and license plate lights monthly. See page 451 . Owner's Maintenance Checks You should be done by the odometer...
Owner's Manual
Page 440
... vehicle was new. Open the hood. CONTINUED Maintenance 437 2009 Odyssey Adjustments should be required. Oil, perspiration, or a scratch on each side. Passenger's side POWER STEERING FLUID RESERVOIR Halogen headlight bulbs get very hot when lit. Main Menu Table Of Contents Lights Headlight Aiming The headlights were properly aimed when your skin or hard objects...
... vehicle was new. Open the hood. CONTINUED Maintenance 437 2009 Odyssey Adjustments should be required. Oil, perspiration, or a scratch on each side. Passenger's side POWER STEERING FLUID RESERVOIR Halogen headlight bulbs get very hot when lit. Main Menu Table Of Contents Lights Headlight Aiming The headlights were properly aimed when your skin or hard objects...
Owner's Manual
Page 441
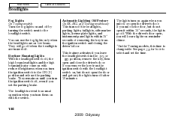
... clockwise to test the new bulb. 7. Make sure it bottoms. 438 2009 Odyssey Open the hood. Main Menu Table Of Contents Lights Driver's side BULB TAB 5. If you replaced the high beam headlight bulb on the headlights to lock it in place. Remove the electrical connector from the... headlight assembly by turning it one -quarter turn counterclockwise. 4. Insert the new bulb into the socket...
... clockwise to test the new bulb. 7. Make sure it bottoms. 438 2009 Odyssey Open the hood. Main Menu Table Of Contents Lights Driver's side BULB TAB 5. If you replaced the high beam headlight bulb on the headlights to lock it in place. Remove the electrical connector from the... headlight assembly by turning it one -quarter turn counterclockwise. 4. Insert the new bulb into the socket...

Owner's Manual
Page 442
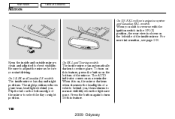
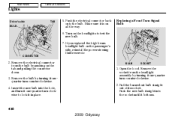
Turn on the lights to make sure the new bulb is working . Insert the socket back into the headlight assembly. Replacing a Front Parking/Side Marker Bulb 3. BULB SOCKET Maintenance 1. Pull the bulb straight out of its socket. Push the new bulb straight into the ...socket until it in place. 4. Main Menu Table Of Contents Lights 3. Insert the socket back into the headlight assembly. Turn it clockwise to lock it one-quarter turn counterclockwise. 2. Turn on the lights to make sure the new bulb is working . Open the...
Turn on the lights to make sure the new bulb is working . Insert the socket back into the headlight assembly. Replacing a Front Parking/Side Marker Bulb 3. BULB SOCKET Maintenance 1. Pull the bulb straight out of its socket. Push the new bulb straight into the ...socket until it in place. 4. Main Menu Table Of Contents Lights 3. Insert the socket back into the headlight assembly. Turn it clockwise to lock it one-quarter turn counterclockwise. 2. Turn on the lights to make sure the new bulb is working . Open the...


