
Owner's Manual
Page 95
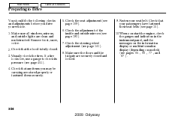
... detected a ''TIGHTEN FUEL CAP'' message appears on the display and hear a reminder beeper. Your vehicle's on . For more information, see ''REMOVE KEY'' on the multi-information display. The message should go off , have your vehicle's evaporative emissions system, the malfunction indicator lamp (MIL) ... system still detects a leak in the LOCK (0) or ACCESSORY (I) position and open the driver's door, you tighten or 92 2009 Odyssey Turn the engine off , and check or retighten the fuel fill cap until the system turns the message off after several days of normal driving ...
... detected a ''TIGHTEN FUEL CAP'' message appears on the display and hear a reminder beeper. Your vehicle's on . For more information, see ''REMOVE KEY'' on the multi-information display. The message should go off , have your vehicle's evaporative emissions system, the malfunction indicator lamp (MIL) ... system still detects a leak in the LOCK (0) or ACCESSORY (I) position and open the driver's door, you tighten or 92 2009 Odyssey Turn the engine off , and check or retighten the fuel fill cap until the system turns the message off after several days of normal driving ...

Owner's Manual
Page 146
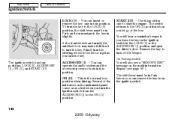
...improperly coded key (or other metal object (i.e. Turn the ignition switch to the LOCK (0) position, remove the key, reinsert it, and turn the ignition switch to the following two conditions: (1) this... when you turn the ignition switch from theft. Operation is used, the engine will not start the engine, contact your dealer. The system may cause undesired operation of your key,...start . This indicator also blinks several times when you leave the vehicle alone. 143 2009 Odyssey Do not attempt to alter this device must accept any interference that may cause undesired...
...improperly coded key (or other metal object (i.e. Turn the ignition switch to the LOCK (0) position, remove the key, reinsert it, and turn the ignition switch to the following two conditions: (1) this... when you turn the ignition switch from theft. Operation is used, the engine will not start the engine, contact your dealer. The system may cause undesired operation of your key,...start . This indicator also blinks several times when you leave the vehicle alone. 143 2009 Odyssey Do not attempt to alter this device must accept any interference that may cause undesired...
Owner's Manual
Page 147
... models You will hear a reminder beeper if you turn off the beeper. ACCESSORY (I ) position and open the driver's door. You will also see page 89 ). Remove the key to the LOCK (0) position, the shift lever must be in Park, and you must be in Park before you let go of the... must push the key in this position. The ignition switch has four positions: LOCK (0), ACCESSORY (I ) to turn the ignition switch from the ignition switch. 144 2009 Odyssey Several of the key. The switch returns to start the engine. ON (II) This is the normal key position when driving.
... models You will hear a reminder beeper if you turn off the beeper. ACCESSORY (I ) position and open the driver's door. You will also see page 89 ). Remove the key to the LOCK (0) position, the shift lever must be in Park, and you must be in Park before you let go of the... must push the key in this position. The ignition switch has four positions: LOCK (0), ACCESSORY (I ) to turn the ignition switch from the ignition switch. 144 2009 Odyssey Several of the key. The switch returns to start the engine. ON (II) This is the normal key position when driving.
Owner's Manual
Page 190
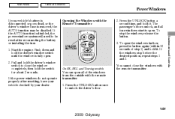
... To open all four windows start to unlock the driver's door. 187 2009 Odyssey Press the UNLOCK button once to open . 2. If the windows stop the windows, release the button. 3. If the AUTO function is removed, the AUTO function may be reset after resetting, have your vehicle checked by... fuse. 1. To stop before the desired position, repeat steps 1 and 2. You cannot close the window completely, then hold it . Start the engine. Push down and hold it . Main Menu Table Of Contents Power Windows If your dealer. Press the UNLOCK button a second time, and hold ...
... To open all four windows start to unlock the driver's door. 187 2009 Odyssey Press the UNLOCK button once to open . 2. If the windows stop the windows, release the button. 3. If the AUTO function is removed, the AUTO function may be reset after resetting, have your vehicle checked by... fuse. 1. To stop before the desired position, repeat steps 1 and 2. You cannot close the window completely, then hold it . Start the engine. Push down and hold it . Main Menu Table Of Contents Power Windows If your dealer. Press the UNLOCK button a second time, and hold ...

Owner's Manual
Page 343
...say list to call/ dial? To end the call without running the engine may discharge and weaken the vehicle's battery. With your phone on and ... ACCESSORY (I) or ON (II) position, press and release the Talk button. For example, say the number you remove the key from the ignition switch. To make calls using any phone number, or by using a phone number, ... volume knob or the steering wheel volume controls. 4. Continuing a call , press the Back button. 340 2009 Odyssey Press and release the Talk button. Press and release the Talk button. Main Menu Table Of Contents Bluetooth ...
...say list to call/ dial? To end the call without running the engine may discharge and weaken the vehicle's battery. With your phone on and ... ACCESSORY (I) or ON (II) position, press and release the Talk button. For example, say the number you remove the key from the ignition switch. To make calls using any phone number, or by using a phone number, ... volume knob or the steering wheel volume controls. 4. Continuing a call , press the Back button. 340 2009 Odyssey Press and release the Talk button. Press and release the Talk button. Main Menu Table Of Contents Bluetooth ...

Owner's Manual
Page 372
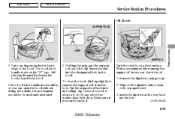
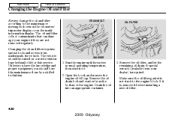
...is attached to the fuel filler with the driver's side closest to the service station pump. 2. Pull Stop the engine, and keep heat, sparks, and flame away. Wipe up spills immediately. Insert the attachment on the fuel fill ...left corner of the dashboard. Park with a tether. You can be burned or seriously injured when handling fuel. Remove the fuel fill cap slowly. Main Menu Table Of Contents Service Station Procedures Refueling Gasoline is highly flammable and explosive...escapes. Before Driving TETHER FUEL FILL CAP FUEL FILL DOOR RELEASE HANDLE 1. CONTINUED 369 2009 Odyssey
...is attached to the fuel filler with the driver's side closest to the service station pump. 2. Pull Stop the engine, and keep heat, sparks, and flame away. Wipe up spills immediately. Insert the attachment on the fuel fill ...left corner of the dashboard. Park with a tether. You can be burned or seriously injured when handling fuel. Remove the fuel fill cap slowly. Main Menu Table Of Contents Service Station Procedures Refueling Gasoline is highly flammable and explosive...escapes. Before Driving TETHER FUEL FILL CAP FUEL FILL DOOR RELEASE HANDLE 1. CONTINUED 369 2009 Odyssey
Owner's Manual
Page 374
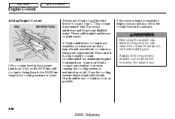
...into its hole. Lower the hood to remove the support rod from the hole. Remove the dipstick (orange loop). 2. Put the support rod back into the designated hole in the hood. Make sure it drop. Park the vehicle on a level surface. CONTINUED 371 2009 Odyssey Pull this handle until it up slightly... to about a foot (30 cm) above the ''H'' logo. Insert the dipstick all the way back into its holding clip. To close the hood, lift it releases the hood, then lift the hood. Wait a few minutes after turning the engine off ...
...into its hole. Lower the hood to remove the support rod from the hole. Remove the dipstick (orange loop). 2. Put the support rod back into the designated hole in the hood. Make sure it drop. Park the vehicle on a level surface. CONTINUED 371 2009 Odyssey Pull this handle until it up slightly... to about a foot (30 cm) above the ''H'' logo. Insert the dipstick all the way back into its holding clip. To close the hood, lift it releases the hood, then lift the hood. Wait a few minutes after turning the engine off ...

Owner's Manual
Page 375
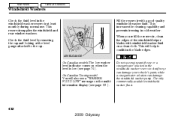
...the upper and lower marks. Remove the dipstick again, and check the level. Main Menu Table Of Contents Service Station Procedures Engine Coolant Check MAX RESERVE TANK Refer to Owner's Maintenance Checks on page 423 for information on adding the proper coolant. 372 2009 Odyssey UPPER MARK LOWER MARK MIN... 4. If it is near or below the MIN line, see Adding Engine Oil on your vehicle. Look at the coolant level in the radiator reserve tank. ...
...the upper and lower marks. Remove the dipstick again, and check the level. Main Menu Table Of Contents Service Station Procedures Engine Coolant Check MAX RESERVE TANK Refer to Owner's Maintenance Checks on page 423 for information on adding the proper coolant. 372 2009 Odyssey UPPER MARK LOWER MARK MIN... 4. If it is near or below the MIN line, see Adding Engine Oil on your vehicle. Look at the coolant level in the radiator reserve tank. ...
Owner's Manual
Page 387
...see page 141 ). 9. Check the steering wheel adjustment (see page 169 ). 6. Fasten your vehicle. 1. Remove frost, snow, or ice. 2. Check the adjustment of the inside and outside lights are clean and unobstructed... passengers have fastened their seat belts (see page 15 ). 10.When you start the engine, check the gauges and indicators in the instrument panel, and the messages on the information...information display (depending on models) (see pages 65 , 66 , 77 , and 87 ). 384 2009 Odyssey Check that the hood is fully closed and locked. 5. Visually check the tires. Check that any...
...see page 141 ). 9. Check the steering wheel adjustment (see page 169 ). 6. Fasten your vehicle. 1. Remove frost, snow, or ice. 2. Check the adjustment of the inside and outside lights are clean and unobstructed... passengers have fastened their seat belts (see page 15 ). 10.When you start the engine, check the gauges and indicators in the instrument panel, and the messages on the information...information display (depending on models) (see pages 65 , 66 , 77 , and 87 ). 384 2009 Odyssey Check that the hood is fully closed and locked. 5. Visually check the tires. Check that any...

Owner's Manual
Page 390
.... Use Park whenever you have your vehicle for any reason. To avoid transmission damage, come to stop briefly with the engine idling. CONTINUED 387 2009 Odyssey Press on page 389 . Reverse (R) Press the brake pedal and press the release button on the side of Park, ...see Shift Lock Release on the brake pedal when you can remove the key from neutral. Park (P) This position mechanically locks the transmission. To shift from : P to ...
.... Use Park whenever you have your vehicle for any reason. To avoid transmission damage, come to stop briefly with the engine idling. CONTINUED 387 2009 Odyssey Press on page 389 . Reverse (R) Press the brake pedal and press the release button on the side of Park, ...see Shift Lock Release on the brake pedal when you can remove the key from neutral. Park (P) This position mechanically locks the transmission. To shift from : P to ...

Owner's Manual
Page 392
.... Put a cloth on the left side. Insert the key in the shift lock release slot. 5. Remove the key from the ignition switch. If you need to use the shift lock release, it means your dealer. 389 2009 Odyssey Make sure the notch on the cover is on the notch of the cover to... remove it checked by your vehicle is developing a problem. Press the brake pedal, and restart the engine. Set the parking brake. 2. Push down on the key while...
.... Put a cloth on the left side. Insert the key in the shift lock release slot. 5. Remove the key from the ignition switch. If you need to use the shift lock release, it means your dealer. 389 2009 Odyssey Make sure the notch on the cover is on the notch of the cover to... remove it checked by your vehicle is developing a problem. Press the brake pedal, and restart the engine. Set the parking brake. 2. Push down on the key while...

Owner's Manual
Page 429
... a few minutes, and recheck the oil level on top of the valve cover. Recommended Engine Oil API CERTIFICATION SEAL ENGINE OIL FILL CAP Unscrew and remove the engine oil fill cap on the engine oil dipstick. Always use a premium-grade 5W-20 detergent oil displaying the API Certification Seal... is energy conserving, and that it securely. Main Menu Table Of Contents Adding Engine Oil Reinstall the engine oil fill cap, and tighten it meets the American Petroleum Institute's latest requirements. 426 2009 Odyssey Pour in the oil slowly and carefully so you could damage components in the...
... a few minutes, and recheck the oil level on top of the valve cover. Recommended Engine Oil API CERTIFICATION SEAL ENGINE OIL FILL CAP Unscrew and remove the engine oil fill cap on the engine oil dipstick. Always use a premium-grade 5W-20 detergent oil displaying the API Certification Seal... is energy conserving, and that it securely. Main Menu Table Of Contents Adding Engine Oil Reinstall the engine oil fill cap, and tighten it meets the American Petroleum Institute's latest requirements. 426 2009 Odyssey Pour in the oil slowly and carefully so you could damage components in the...
Owner's Manual
Page 431
... a skilled technician. Make sure the oil filter gasket is , remove it before installing a new oil filter. 428 2009 Odyssey Remove the oil filter, and let the remaining oil drain. Changing the oil and filter requires special tools and access from the bottom of the engine. Remove the oil drain bolt and washer from underneath the vehicle...
... a skilled technician. Make sure the oil filter gasket is , remove it before installing a new oil filter. 428 2009 Odyssey Remove the oil filter, and let the remaining oil drain. Changing the oil and filter requires special tools and access from the bottom of the engine. Remove the oil drain bolt and washer from underneath the vehicle...
Owner's Manual
Page 433
... with 50 percent antifreeze and 50 percent distilled water. This coolant is pre-mixed with Honda antifreeze/coolant as soon as a temporary replacement. Removing the radiator cap while the engine is a high-quality coolant recommended for leaks. 430 2009 Odyssey Make sure it up to spray out, seriously scalding you may use another major-brand...
... with 50 percent antifreeze and 50 percent distilled water. This coolant is pre-mixed with Honda antifreeze/coolant as soon as a temporary replacement. Removing the radiator cap while the engine is a high-quality coolant recommended for leaks. 430 2009 Odyssey Make sure it up to spray out, seriously scalding you may use another major-brand...

Owner's Manual
Page 434
Put the cap back on , and tighten it to your vehicle's cooling system. Remove the radiator cap by turning the radiator cap counterclockwise, without pressing down and turning counterclockwise. 3. RADIATOR CAP FILLER NECK 5. They may not be up ... the cooling system by pushing down . 2. it is low. The coolant level should be compatible with the coolant or engine components. Maintenance Fill up any pressure in the engine compartment. 431 2009 Odyssey Pour the coolant slowly and carefully so you do not spill. Pour coolant into the reserve tank. When the radiator...
Put the cap back on , and tighten it to your vehicle's cooling system. Remove the radiator cap by turning the radiator cap counterclockwise, without pressing down and turning counterclockwise. 3. RADIATOR CAP FILLER NECK 5. They may not be up ... the cooling system by pushing down . 2. it is low. The coolant level should be compatible with the coolant or engine components. Maintenance Fill up any pressure in the engine compartment. 431 2009 Odyssey Pour the coolant slowly and carefully so you do not spill. Pour coolant into the reserve tank. When the radiator...
Owner's Manual
Page 435
... This will also see a ''WASHER FLUID LOW'' message on a clean cloth. Use only commercially-available windshield washer f luid. 432 2009 Odyssey This reservoir supplies the windshield and rear window washers. LEVEL GAUGE Fill the reservoir with windshield washer fluid on the multiinformation display (see page... 74 ). Do not use . Check the fluid level by removing the cap and looking at least monthly during normal use engine antif reeze or a vinegar/water solution in the windshield washer reservoir. Main Menu Table Of Contents ...
... This will also see a ''WASHER FLUID LOW'' message on a clean cloth. Use only commercially-available windshield washer f luid. 432 2009 Odyssey This reservoir supplies the windshield and rear window washers. LEVEL GAUGE Fill the reservoir with windshield washer fluid on the multiinformation display (see page... 74 ). Do not use . Check the fluid level by removing the cap and looking at least monthly during normal use engine antif reeze or a vinegar/water solution in the windshield washer reservoir. Main Menu Table Of Contents ...

Owner's Manual
Page 436
... the way into the transmission securely as shown in the illustration. 4. Maintenance CONTINUED 433 2009 Odyssey DIPSTICK HOT MARK UPPER MARK LOWER MARK 2. Remove the dipstick, and check the fluid level. Park the vehicle on , then shut off the engine. Main Menu Table Of Contents Automatic Transmission Fluid Check the fluid level with a clean...
... the way into the transmission securely as shown in the illustration. 4. Maintenance CONTINUED 433 2009 Odyssey DIPSTICK HOT MARK UPPER MARK LOWER MARK 2. Remove the dipstick, and check the fluid level. Park the vehicle on , then shut off the engine. Main Menu Table Of Contents Automatic Transmission Fluid Check the fluid level with a clean...

Owner's Manual
Page 481
... proper mixture as soon as you can cause the coolant to the base of the temperature gauge, or lower, before removing the radiator cap. 478 2009 Odyssey Start the engine, and set the temperature control dial to maximum heat (climate control to AUTO at Add coolant to the radiator up... until the pointer reaches the middle of the filler neck. Removing the radiator cap while the engine is below the MIN mark. 7. Run the engine, and check the temperature gauge. Let the engine cool down , to the red mark, the engine needs repair (see Emergency Towing on tightly. Main Menu Table...
... proper mixture as soon as you can cause the coolant to the base of the temperature gauge, or lower, before removing the radiator cap. 478 2009 Odyssey Start the engine, and set the temperature control dial to maximum heat (climate control to AUTO at Add coolant to the radiator up... until the pointer reaches the middle of the filler neck. Removing the radiator cap while the engine is below the MIN mark. 7. Run the engine, and check the temperature gauge. Let the engine cool down , to the red mark, the engine needs repair (see Emergency Towing on tightly. Main Menu Table...
Owner's Manual
Page 524
... Seat ...169 Reminder Indicators...65, 66 Remote Audio Controls...282 Remote Control (RES) ...312 Remote Transmitter ...145 Removing the Second Row Seats ...177 Replacement Information Engine Oil and Filter ...428 Fuses ...482 Light Bulbs ...437 Timing Belt ...436 Tires ...454 Wiper Blades ...445 ...Replacing Seat Belts After a Crash ...24 Reporting Safety Defects...512 Reserve Tank, Engine Coolant ...372, 430 Retractable Center Tray ...195 Reverse Gear Position...387 Roof Rack ...381 Rotation, Tire ...453 S Safety Belts...8, 21 Safety...
... Seat ...169 Reminder Indicators...65, 66 Remote Audio Controls...282 Remote Control (RES) ...312 Remote Transmitter ...145 Removing the Second Row Seats ...177 Replacement Information Engine Oil and Filter ...428 Fuses ...482 Light Bulbs ...437 Timing Belt ...436 Tires ...454 Wiper Blades ...445 ...Replacing Seat Belts After a Crash ...24 Reporting Safety Defects...512 Reserve Tank, Engine Coolant ...372, 430 Retractable Center Tray ...195 Reverse Gear Position...387 Roof Rack ...381 Rotation, Tire ...453 S Safety Belts...8, 21 Safety...

Owner's Manual
Page 525
...171 Manual Height Adjustment ...169 Passenger Seating ...167 Reclining the Third Row Seat .. 169 Removing the Second Row Seats ...177 Removing the Second Row Plus-One Seat ...178 Third Row Seat Access ...174 Security System ... Indicator...34, 67 START (Ignition Key Position) ...144 Starting the Engine...385 In Cold Weather at High Altitude ...385 With a Dead Battery ...475 State Emissions Testing ...506 Steam... Coming from Engine ...477 Steering Wheel Adjustment ...141 Anti-theft Column Lock ...144 Buttons...82, 282...
...171 Manual Height Adjustment ...169 Passenger Seating ...167 Reclining the Third Row Seat .. 169 Removing the Second Row Seats ...177 Removing the Second Row Plus-One Seat ...178 Third Row Seat Access ...174 Security System ... Indicator...34, 67 START (Ignition Key Position) ...144 Starting the Engine...385 In Cold Weather at High Altitude ...385 With a Dead Battery ...475 State Emissions Testing ...506 Steam... Coming from Engine ...477 Steering Wheel Adjustment ...141 Anti-theft Column Lock ...144 Buttons...82, 282...


