

Owner's Manual
Page 254
Push this handle up to about a foot (30 cm) above the fender, then let it up the hood. Put the support rod back into the designated hole in its holding clip. Main Menu Table Of Contents Service Station Procedures Oil Check SUPPORT ROD DIPSTICK Before Driving LATCH GRIP Except Si 2. Make sure...the hood near the center. Slide your fingers under the front edge of its clip by holding the grip, and insert the end into its tube. Wipe off before you feel the hood latch handle. CONTINUED 251 2009 Civic Sedan If the hood latch handle moves stiffly, or if you can open the...
Push this handle up to about a foot (30 cm) above the fender, then let it up the hood. Put the support rod back into the designated hole in its holding clip. Main Menu Table Of Contents Service Station Procedures Oil Check SUPPORT ROD DIPSTICK Before Driving LATCH GRIP Except Si 2. Make sure...the hood near the center. Slide your fingers under the front edge of its clip by holding the grip, and insert the end into its tube. Wipe off before you feel the hood latch handle. CONTINUED 251 2009 Civic Sedan If the hood latch handle moves stiffly, or if you can open the...
Owner's Manual
Page 316
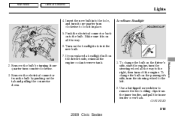
... the electrical connector back onto the bulb. Low Beam Headlight HOLDING CLIP BULB TAB 2. CONTINUED Maintenance 313 2009 Civic Sedan Remove the electrical connector from the inner fender, and pull the inner fender cover back. Use a flat-tipped screwdriver to remove the two holding clips from the bulb by turning it onequarter turn the steering wheel...
... the electrical connector back onto the bulb. Low Beam Headlight HOLDING CLIP BULB TAB 2. CONTINUED Maintenance 313 2009 Civic Sedan Remove the electrical connector from the inner fender, and pull the inner fender cover back. Use a flat-tipped screwdriver to remove the two holding clips from the bulb by turning it onequarter turn the steering wheel...

Owner's Manual
Page 317
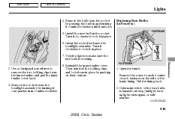
... to the right, then turn clockwise to the left. Then reinstall the holding clips, and lock them in place. 6. Reinstall the inner fender cover. Push the electrical connector back onto the bulb. Make sure it is ...the steering wheel all the way. 7. Replacing the Front Side Marker/ Parking/Turn Signal Light Bulb HOLDING CLIP SOCKET TAB 3. Main Menu Table Of Contents Lights 5. Remove the bulb by turning it onequarter turn the... pushing on the passenger's side, turn counterclockwise. 314 2009 Civic Sedan To change the bulb on the tab and pulling the connector down. 4.
... to the right, then turn clockwise to the left. Then reinstall the holding clips, and lock them in place. 6. Reinstall the inner fender cover. Push the electrical connector back onto the bulb. Make sure it is ...the steering wheel all the way. 7. Replacing the Front Side Marker/ Parking/Turn Signal Light Bulb HOLDING CLIP SOCKET TAB 3. Main Menu Table Of Contents Lights 5. Remove the bulb by turning it onequarter turn the... pushing on the passenger's side, turn counterclockwise. 314 2009 Civic Sedan To change the bulb on the tab and pulling the connector down. 4.
Owner's Manual
Page 318
...it counterclockwise until it one-quarter turn signal, or side marker. CONTINUED 315 2009 Civic Sedan Main Menu Table Of Contents Lights 4. Install the new bulb in place. 7. Maintenance Replacing Rear Bulbs (In Fenders) FASTENER 2. Remove the socket from the center of each fastener on their ...turning it unlocks. 5. Turn it clockwise to remove the two holding clips, and lock them in place. 6. Pull the lining back. 2. Open the trunk. Remove the bulb from the inner fender, and pull the inner fender cover back. 3. Determine which of the trunk lining. Use a flat...
...it counterclockwise until it one-quarter turn signal, or side marker. CONTINUED 315 2009 Civic Sedan Main Menu Table Of Contents Lights 4. Install the new bulb in place. 7. Maintenance Replacing Rear Bulbs (In Fenders) FASTENER 2. Remove the socket from the center of each fastener on their ...turning it unlocks. 5. Turn it clockwise to remove the two holding clips, and lock them in place. 6. Pull the lining back. 2. Open the trunk. Remove the bulb from the inner fender, and pull the inner fender cover back. 3. Determine which of the trunk lining. Use a flat...