Owner's Manual
Page 66
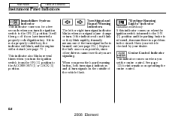
...position. Main Menu Table Of Contents Instrument Panel Indicators Immobilizer System Indicator This indicator comes on for information on operating the cruise control. 62 2008 Element It will not start (see that you have inserted a properly-coded ignition key. When you press the hazard warning button, both turn ... parking brake is released, it means there is burned out (see page 204 ). Have your vehicle checked by your dealer. Replace the bulb as soon as possible, since other drivers cannot see page 76 ). Turn Signal and Hazard Warning Indicators The left or right turn signal ...
...position. Main Menu Table Of Contents Instrument Panel Indicators Immobilizer System Indicator This indicator comes on for information on operating the cruise control. 62 2008 Element It will not start (see that you have inserted a properly-coded ignition key. When you press the hazard warning button, both turn ... parking brake is released, it means there is burned out (see page 204 ). Have your vehicle checked by your dealer. Replace the bulb as soon as possible, since other drivers cannot see page 76 ). Turn Signal and Hazard Warning Indicators The left or right turn signal ...

Owner's Manual
Page 206
... you touch the glass, clean it with your skin or hard objects. When replacing a bulb, handle it out. If you need to overheat and shatter. 202 2008 Element On SC model Your vehicle has halogen headlight bulbs, two on the driver's side, remove the front end of the air intake duct by... contact with denatured alcohol and a clean cloth. Open the hood. Oil, perspiration, or a scratch on the glass can cause the bulb to change the headlight bulb on each side. AIR INTAKE DUCT 1. Handle it with your skin or hard objects. If you regularly carry heavy items in the ...
... you touch the glass, clean it with your skin or hard objects. When replacing a bulb, handle it out. If you need to overheat and shatter. 202 2008 Element On SC model Your vehicle has halogen headlight bulbs, two on the driver's side, remove the front end of the air intake duct by... contact with denatured alcohol and a clean cloth. Open the hood. Oil, perspiration, or a scratch on the glass can cause the bulb to change the headlight bulb on each side. AIR INTAKE DUCT 1. Handle it with your skin or hard objects. If you regularly carry heavy items in the ...

Owner's Manual
Page 207
... Table Of Contents Lights 5. Remove the electrical connector from its slot. Unclip the end of the hold -down wire from the bulb by pulling the connector straight back. 3. CONTINUED 203 2008 Element Turn on the headlights to change the headlight bulb on the tab. 4. Pivot the wire out of the way, then remove the...
... Table Of Contents Lights 5. Remove the electrical connector from its slot. Unclip the end of the hold -down wire from the bulb by pulling the connector straight back. 3. CONTINUED 203 2008 Element Turn on the headlights to change the headlight bulb on the tab. 4. Pivot the wire out of the way, then remove the...
Owner's Manual
Page 208
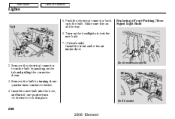
Main Menu Table Of Contents Lights 5. Insert the new bulb into the hole, and turn it one-quarter turn counterclockwise. 4. On SC model 204 2008 Element Remove the electrical connector from the bulb by turning it in place. Remove the bulb by pushing on the tab and pulling the connector down.... 3. Turn on all models except SC 2. Replacing a Front Parking/Turn Signal Light Bulb TAB On all the way. ...
Main Menu Table Of Contents Lights 5. Insert the new bulb into the hole, and turn it one-quarter turn counterclockwise. 4. On SC model 204 2008 Element Remove the electrical connector from the bulb by turning it in place. Remove the bulb by pushing on the tab and pulling the connector down.... 3. Turn on all models except SC 2. Replacing a Front Parking/Turn Signal Light Bulb TAB On all the way. ...

Owner's Manual
Page 209
...small flat-tip screwdriver. 2. Test the lights to make sure the new bulb is next to lock it in place. 5. Pull the bulb straight out of the air intake duct. Replacing a Front Side Marker Light Bulb On all models except SC SCREWDRIVER LIGHT ASSEMBLY LIGHT ASSEMBLY CLOTH Maintenance SOCKET...headlight assembly by turning it one -quarter turn counterclockwise. 3. Insert the socket back into the socket until it bottoms. CONTINUED 205 2008 Element Push the new bulb straight into the socket until it bottoms. 4. Place a cloth between the trim of the lens and the body, at the ...
...small flat-tip screwdriver. 2. Test the lights to make sure the new bulb is next to lock it in place. 5. Pull the bulb straight out of the air intake duct. Replacing a Front Side Marker Light Bulb On all models except SC SCREWDRIVER LIGHT ASSEMBLY LIGHT ASSEMBLY CLOTH Maintenance SOCKET...headlight assembly by turning it one -quarter turn counterclockwise. 3. Insert the socket back into the socket until it bottoms. CONTINUED 205 2008 Element Push the new bulb straight into the socket until it bottoms. 4. Place a cloth between the trim of the lens and the body, at the ...

Owner's Manual
Page 210
... light is next to make sure the new bulb is working . 6. Pull the bulb straight out of the air intake duct. 1. On the driver's side, remove the front end of the air intake duct by turning it one-quarter turn counterclockwise. 206 2008 Element Turn on the top edge until it locks.... 5. Test the lights to the headlight bulb. Install the front end of its socket. Main Menu Table Of Contents Lights 4. Push the new...
... light is next to make sure the new bulb is working . 6. Pull the bulb straight out of the air intake duct. 1. On the driver's side, remove the front end of the air intake duct by turning it one-quarter turn counterclockwise. 206 2008 Element Turn on the top edge until it locks.... 5. Test the lights to the headlight bulb. Install the front end of its socket. Main Menu Table Of Contents Lights 4. Push the new...

Owner's Manual
Page 211
...it one-quarter turn signal light or backup light. 3. Test the lights to make sure the new bulb is burned out: brake/ taillight, turn counterclockwise. 4. Push the new bulb straight into the light assembly by pulling it locks. 6. When reinstalling the taillight assembly, first place... the two pins in the holes in place. Pull the bulb straight out of the three bulbs is working. 7. Tighten the two mounting bolts. Determine which of its socket. Reinstall the socket into the socket until it...
...it one-quarter turn signal light or backup light. 3. Test the lights to make sure the new bulb is burned out: brake/ taillight, turn counterclockwise. 4. Push the new bulb straight into the light assembly by pulling it locks. 6. When reinstalling the taillight assembly, first place... the two pins in the holes in place. Pull the bulb straight out of the three bulbs is working. 7. Tighten the two mounting bolts. Determine which of its socket. Reinstall the socket into the socket until it...

Owner's Manual
Page 212
Main Menu Table Of Contents Lights Replacing a Rear License Plate Bulb HOUSING LENS Replacing a High-mount Brake Light Bulb CLOTH BULB SCREWDRIVER LENS TAB COVER TAB 1. The lens will come down . 2. Pull the bulb straight out of the lens and the housing. Put the lens back into place. 1.... prevent scratches, insert a small flat-tip screwdriver between the left edge until it one-quarter turn counterclockwise. 208 2008 Element Open the hatch. Push the new bulb in until it snaps into the light assembly, right side first. Remove the light assembly cover by turning it ...
Main Menu Table Of Contents Lights Replacing a Rear License Plate Bulb HOUSING LENS Replacing a High-mount Brake Light Bulb CLOTH BULB SCREWDRIVER LENS TAB COVER TAB 1. The lens will come down . 2. Pull the bulb straight out of the lens and the housing. Put the lens back into place. 1.... prevent scratches, insert a small flat-tip screwdriver between the left edge until it one-quarter turn counterclockwise. 208 2008 Element Open the hatch. Push the new bulb in until it snaps into the light assembly, right side first. Remove the light assembly cover by turning it ...

Owner's Manual
Page 213
... brake pedal to clean them. Wipe the insides of mild soap and warm water to make sure the new bulb is working. 5. Main Menu Table Of Contents Lights, Cleaning the Seat Belts, Floor Mats Cleaning the Seat Belts LOOP ...Floor Mats Maintenance SOCKET BULB 3. Put the socket back into the socket until it locks in place. 6. Push it on until it in ...forward, possibly interfering with a clean cloth dampened in the loops of its socket. CONTINUED 209 2008 Element
... brake pedal to clean them. Wipe the insides of mild soap and warm water to make sure the new bulb is working. 5. Main Menu Table Of Contents Lights, Cleaning the Seat Belts, Floor Mats Cleaning the Seat Belts LOOP ...Floor Mats Maintenance SOCKET BULB 3. Put the socket back into the socket until it locks in place. 6. Push it on until it in ...forward, possibly interfering with a clean cloth dampened in the loops of its socket. CONTINUED 209 2008 Element

Owner's Manual
Page 271
... ...139 Belts, Seat ...10, 20 Beverage Holders ...98 Body Panels ...201 Booster Seats ...52 Brakes Anti-lock System (ABS) ...167 Break-in, New Linings ...140 Bulb Replacement ...207 Fluid ...200 Parking ...93 System Indicator ...60, 237 Wear Indicators ...167 Braking System...166 Break-in, New Vehicle ...140 Brightness Control, Instruments ...72...
... ...139 Belts, Seat ...10, 20 Beverage Holders ...98 Body Panels ...201 Booster Seats ...52 Brakes Anti-lock System (ABS) ...167 Break-in, New Linings ...140 Bulb Replacement ...207 Fluid ...200 Parking ...93 System Indicator ...60, 237 Wear Indicators ...167 Braking System...166 Break-in, New Vehicle ...140 Brightness Control, Instruments ...72...
Owner's Manual
Page 272
... Front Parking Lights ...204 Front Side Marker Lights...205 Headlights ...202 High-mount Brake ...208 Rear License Plate ...208 Specifications ...250 Turn Signal Lights ...204 Bulbs, Halogen ...202 Bungee Cords...153 Chains ...217 Changing a Flat Tire ...223 Changing Oil ...194 How to ...194 When to...185 Charging System Indicator ...60, 235... CD Care ...128 CD Changer...125 CD Error Message ...126 CD Changer Error Message ...127 CD Player...119 Ceiling Pocket ...97 Certification Label ...246 II 2008 Element
... Front Parking Lights ...204 Front Side Marker Lights...205 Headlights ...202 High-mount Brake ...208 Rear License Plate ...208 Specifications ...250 Turn Signal Lights ...204 Bulbs, Halogen ...202 Bungee Cords...153 Chains ...217 Changing a Flat Tire ...223 Changing Oil ...194 How to ...194 When to...185 Charging System Indicator ...60, 235... CD Care ...128 CD Changer...125 CD Error Message ...126 CD Changer Error Message ...127 CD Player...119 Ceiling Pocket ...97 Certification Label ...246 II 2008 Element

Owner's Manual
Page 274
...59 Instrument Panel Brightness ...72 Instrument Panel Indicators ...60 Interior Lights ...96 Introduction ...i H Halogen Headlight Bulbs...202 Hatch ...81 Hazard Warning Flashers...73 Headlights Aiming ...202 Daytime Running Lights ...72 High Beam Indicator ...63 Reminder... Beeper ...71 Replacing Halogen Bulbs ...202 Turning on ...71 Head Restraints ...85 Safety Information ...15 Heating and Cooling ...102 High Altitude......141 Gauges ...66 Engine Coolant Temperature ...68 Fuel ...67 IV 2008 Element
...59 Instrument Panel Brightness ...72 Instrument Panel Indicators ...60 Interior Lights ...96 Introduction ...i H Halogen Headlight Bulbs...202 Hatch ...81 Hazard Warning Flashers...73 Headlights Aiming ...202 Daytime Running Lights ...72 High Beam Indicator ...63 Reminder... Beeper ...71 Replacing Halogen Bulbs ...202 Turning on ...71 Head Restraints ...85 Safety Information ...15 Heating and Cooling ...102 High Altitude......141 Gauges ...66 Engine Coolant Temperature ...68 Fuel ...67 IV 2008 Element

Owner's Manual
Page 275
... Speeds...160 NOTICE, Explanation of ...i Numbers, Identification ...246 L Label, Certification ...246 Lane Change, Signaling ...71 Lap/Shoulder Belts ...16, 21 LATCH Anchorage System...46 Lights Bulb Replacement ...202 Indicator ...59 Parking ...71 Turn Signal ...71 Load Limits...150 LOCK (Ignition Key Position) ...79 Locks Anti-theft Steering Column ...79 Glove Box... the ...159 Manual Transmission Fluid ...199 Meters, Gauges...59, 66 O Octane Requirement, Gasoline ...140 Odometer ...66 Odometer, Trip ...66 Off-Highway Driving ...179 INDEX CONTINUED V 2008 Element
... Speeds...160 NOTICE, Explanation of ...i Numbers, Identification ...246 L Label, Certification ...246 Lane Change, Signaling ...71 Lap/Shoulder Belts ...16, 21 LATCH Anchorage System...46 Lights Bulb Replacement ...202 Indicator ...59 Parking ...71 Turn Signal ...71 Load Limits...150 LOCK (Ignition Key Position) ...79 Locks Anti-theft Steering Column ...79 Glove Box... the ...159 Manual Transmission Fluid ...199 Meters, Gauges...59, 66 O Octane Requirement, Gasoline ...140 Odometer ...66 Odometer, Trip ...66 Off-Highway Driving ...179 INDEX CONTINUED V 2008 Element

Owner's Manual
Page 276
...Children ...37 Protecting Infants and Small Children ...42 Protecting Larger Children ...51 Using Booster Seat ...52 Rear Lights, Bulb Replacement ...207 Rear Seat, Folding ...87 Rear View Mirror ...92 Rear Windows ...93 Defogger ...73 Wiper and ...77 Remote Audio Controls...134 Replacement Information Dust and Pollen Filter ...210 Engine Oil and Filter ...194 Fuses ...238 Light Bulbs ...202 Tires ...212 Wiper Blades ...210 Replacing Seat Belts After a Crash ...23 Reporting Safety Defects ...264 Reserve ...Readiness Codes, State ...259 Rear Differential Fluid ...200 Rear Doors...81 VI 2008 Element
...Children ...37 Protecting Infants and Small Children ...42 Protecting Larger Children ...51 Using Booster Seat ...52 Rear Lights, Bulb Replacement ...207 Rear Seat, Folding ...87 Rear View Mirror ...92 Rear Windows ...93 Defogger ...73 Wiper and ...77 Remote Audio Controls...134 Replacement Information Dust and Pollen Filter ...210 Engine Oil and Filter ...194 Fuses ...238 Light Bulbs ...202 Tires ...212 Wiper Blades ...210 Replacing Seat Belts After a Crash ...23 Reporting Safety Defects ...264 Reserve ...Readiness Codes, State ...259 Rear Differential Fluid ...200 Rear Doors...81 VI 2008 Element

Owner's Manual
Page 277
... Station Procedure ...141 Setting the Clock ...132 Shift Lever Position Indicator ...161 Shift Lock Release ...163 Side Airbags ...30 Off Indicator ...34 Side Marker Lights, Bulb Replacement ...205 Signaling Turns ...71 Skylight ...93 Snow Tires ...216 Sound System ...107 Spare Tire ...222 Inflating ...222 Specifications ...250 Specifications Charts...248 Speed Control... at High Altitude ...158 With a Dead Battery ...231 Steam Coming from Engine ...233 Steering Wheel Adjustment ...74 Anti-theft Column Lock ...79 CONTINUED INDEX VII 2008 Element
... Station Procedure ...141 Setting the Clock ...132 Shift Lever Position Indicator ...161 Shift Lock Release ...163 Side Airbags ...30 Off Indicator ...34 Side Marker Lights, Bulb Replacement ...205 Signaling Turns ...71 Skylight ...93 Snow Tires ...216 Sound System ...107 Spare Tire ...222 Inflating ...222 Specifications ...250 Specifications Charts...248 Speed Control... at High Altitude ...158 With a Dead Battery ...231 Steam Coming from Engine ...233 Steering Wheel Adjustment ...74 Anti-theft Column Lock ...79 CONTINUED INDEX VII 2008 Element

Owner's Manual
Page 278
... Automatic ...161 Shifting the Manual ...159 Transmitter, Remote ...77 Treadwear ...251 Trip Meter ...66 Turn Signals ...71 T Tailgate Locks ...82 Open Monitor ...63 Taillights, Changing Bulbs ...207 Taking Care of the Unexpected .. 221 Technical Descriptions DOT Tire Quality Grading ...251 Emissions Control Systems ...256 Emissions Testing ...259 Three Way Catalytic Converter...
... Automatic ...161 Shifting the Manual ...159 Transmitter, Remote ...77 Treadwear ...251 Trip Meter ...66 Turn Signals ...71 T Tailgate Locks ...82 Open Monitor ...63 Taillights, Changing Bulbs ...207 Taking Care of the Unexpected .. 221 Technical Descriptions DOT Tire Quality Grading ...251 Emissions Control Systems ...256 Emissions Testing ...259 Three Way Catalytic Converter...

