
Owner's Manual
Page 17
... injury or death. If a seat belt does not seem to sit upright, well back in their seats, with an inoperative seat belt. Have your dealer check the belt as soon as needed (it may not protect the occupant in a seat with their feet on the floor, until the vehicle is parked... and the engine is greatly increased. belt that they continue to work properly, it has four positions). No one or both feet up or down , turns sideways, sits...
... injury or death. If a seat belt does not seem to sit upright, well back in their seats, with an inoperative seat belt. Have your dealer check the belt as soon as needed (it may not protect the occupant in a seat with their feet on the floor, until the vehicle is parked... and the engine is greatly increased. belt that they continue to work properly, it has four positions). No one or both feet up or down , turns sideways, sits...

Owner's Manual
Page 30
... and sit upright and well back in their seats. If the indicator comes on at any other time, or does not come on after the engine starts. For example: If the SRS indicator does not come on at all, you the system is on the passenger's side, the passenger's side curtain... turn the ignition switch to a potential problem with your dealer. To get the best protection from the side curtain airbags, occupants should have the system checked by your airbags or seat belt tensioners.
... and sit upright and well back in their seats. If the indicator comes on at any other time, or does not come on after the engine starts. For example: If the SRS indicator does not come on at all, you the system is on the passenger's side, the passenger's side curtain... turn the ignition switch to a potential problem with your dealer. To get the best protection from the side curtain airbags, occupants should have the system checked by your airbags or seat belt tensioners.

Owner's Manual
Page 59
... see page 30 . Canada Side Airbag Off Indicator This indicator comes on briefly when you fully release the parking brake while the engine is turned to check the parking brake. Supplemental Restraint System Indicator This indicator comes on when you turn the ignition switch to the ON (II) position...II) position, and when the ignition switch is running, or if it comes on while driving, there could be a problem with your vehicle checked at any other time, it comes on when you turn the ignition switch to the ON (II) position. Instrument Panel Indicators Parking Brake and...
... see page 30 . Canada Side Airbag Off Indicator This indicator comes on briefly when you fully release the parking brake while the engine is turned to check the parking brake. Supplemental Restraint System Indicator This indicator comes on when you turn the ignition switch to the ON (II) position...II) position, and when the ignition switch is running, or if it comes on while driving, there could be a problem with your vehicle checked at any other time, it comes on when you turn the ignition switch to the ON (II) position. Instrument Panel Indicators Parking Brake and...

Owner's Manual
Page 65
... ''0.0''. In severe driving conditions, such as very hot weather or a long period of uphill driving, the pointer may rise into the upper half of the engine's coolant. NOTE: The temperature must be stabilized before doing this procedure. The following sequences appear, 1 second at a time: 0, 1, 2, 3, 4, 5, 5, 4, 3, 2, 1, 0, 1 ...shows the temperature of the gauge. Each trip meter works independently, so you last selected is forming on checking the engine's cooling system. Select the outside temperature display, then press the select/reset knob for instructions and precautions on...
... ''0.0''. In severe driving conditions, such as very hot weather or a long period of uphill driving, the pointer may rise into the upper half of the engine's coolant. NOTE: The temperature must be stabilized before doing this procedure. The following sequences appear, 1 second at a time: 0, 1, 2, 3, 4, 5, 5, 4, 3, 2, 1, 0, 1 ...shows the temperature of the gauge. Each trip meter works independently, so you last selected is forming on checking the engine's cooling system. Select the outside temperature display, then press the select/reset knob for instructions and precautions on...

Owner's Manual
Page 66
... shows you aware of the periodic maintenance your fuel cap is loose or missing, a ''CHECK FUEL CAP'' message will take several days of normal driving for the vehicle to turn off of f uel could cause the engine to cycle the fuel cap warning off the ignition. Gauges Fuel Gauge This shows how... it is, loosen the cap and tighten it is started. If the MIL does not go off and check that the fuel cap is in the information display. Refer to keep you the engine oil life and maintenance service items when the ignition switch is installed. Avoid driving with an extremely low...
... shows you aware of the periodic maintenance your fuel cap is loose or missing, a ''CHECK FUEL CAP'' message will take several days of normal driving for the vehicle to turn off of f uel could cause the engine to cycle the fuel cap warning off the ignition. Gauges Fuel Gauge This shows how... it is, loosen the cap and tighten it is started. If the MIL does not go off and check that the fuel cap is in the information display. Refer to keep you the engine oil life and maintenance service items when the ignition switch is installed. Avoid driving with an extremely low...
Owner's Manual
Page 92
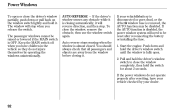
...the driver's window senses any obstacle while it will reverse direction, and then stop when you have your dealer. 92 You should always check that all passengers and objects are away from the window before closing automatically, it is fully open or close the window completely, then hold... the switch for about 2 seconds. Start the engine. If the power windows do not injure themselves by your vehicle checked by operating the windows unintentionally. Keep the MAIN switch off when you release the switch. Push down or pull...
...the driver's window senses any obstacle while it will reverse direction, and then stop when you have your dealer. 92 You should always check that all passengers and objects are away from the window before closing automatically, it is fully open or close the window completely, then hold... the switch for about 2 seconds. Start the engine. If the power windows do not injure themselves by your vehicle checked by operating the windows unintentionally. Keep the MAIN switch off when you release the switch. Push down or pull...

Owner's Manual
Page 152
...Break-in Period ...154 Fuel Recommendation ...154 Service Station Procedures ...156 Refueling...156 Opening and Closing the Hood ...157 Oil Check ...159 Engine Coolant Check ...160 Fuel Economy ...161 Improving Fuel Economy ...161 Accessories and Modifications ...162 Accessories...162 Modifying Your Vehicle...163 Additional Safety...166 Before Driving 153 The information in this section first. You also need to know what gasoline to use and how to check the levels of important fluids. Before Driving Before you begin driving your vehicle, please read the information in this section will ...
...Break-in Period ...154 Fuel Recommendation ...154 Service Station Procedures ...156 Refueling...156 Opening and Closing the Hood ...157 Oil Check ...159 Engine Coolant Check ...160 Fuel Economy ...161 Improving Fuel Economy ...161 Accessories and Modifications ...162 Accessories...162 Modifying Your Vehicle...163 Additional Safety...166 Before Driving 153 The information in this section first. You also need to know what gasoline to use and how to check the levels of important fluids. Before Driving Before you begin driving your vehicle, please read the information in this section will ...

Owner's Manual
Page 158
Insert the dipstick all the way back into its hole. 4. It should be between the upper and lower marks. CONTINUED 159 Remove the dipstick again, and check the level. Wipe the dipstick with a clean cloth or paper towel. 3. If it is near or below the lower mark, see Adding Oil on page 204 . Service Station Procedures Oil Check UPPER MARK LOWER MARK DIPSTICK (orange handle) Before Driving 4-cylinder models V6 models DIPSTICK (orange loop) 4-cylinder models Wait a few minutes after turning the engine off before you check the oil. 1. Remove the dipstick (orange handle). 2.
Insert the dipstick all the way back into its hole. 4. It should be between the upper and lower marks. CONTINUED 159 Remove the dipstick again, and check the level. Wipe the dipstick with a clean cloth or paper towel. 3. If it is near or below the lower mark, see Adding Oil on page 204 . Service Station Procedures Oil Check UPPER MARK LOWER MARK DIPSTICK (orange handle) Before Driving 4-cylinder models V6 models DIPSTICK (orange loop) 4-cylinder models Wait a few minutes after turning the engine off before you check the oil. 1. Remove the dipstick (orange handle). 2.

Owner's Manual
Page 159
Refer to Owner's Maintenance Checks on page 198 for information on your vehicle. 160 If it is below the MIN line, see Adding Engine Coolant on page 208 for information about checking other items on adding the proper coolant. Make sure it is between the MAX and MIN lines. Service Station Procedures Engine Coolant Check RESERVE TANK MAX RESERVE TANK MAX UPPER MARK LOWER MARK V6 models MIN 4-cylinder models V6 models MIN Look at the coolant level in the radiator reserve tank.
Refer to Owner's Maintenance Checks on page 198 for information on your vehicle. 160 If it is below the MIN line, see Adding Engine Coolant on page 208 for information about checking other items on adding the proper coolant. Make sure it is between the MAX and MIN lines. Service Station Procedures Engine Coolant Check RESERVE TANK MAX RESERVE TANK MAX UPPER MARK LOWER MARK V6 models MIN 4-cylinder models V6 models MIN Look at the coolant level in the radiator reserve tank.

Owner's Manual
Page 160
... ventilation when possible. Before Driving The build-up , your vehicle according to maintain a constant speed. Frequent cleaning helps your vehicle's underside adds weight and rolling resistance. Always drive in the highest gear possible. Drive moderately. See Owner's Maintenance Checks on the engine which uses more fuel. Try to the maintenance messages displayed on...
... ventilation when possible. Before Driving The build-up , your vehicle according to maintain a constant speed. Frequent cleaning helps your vehicle's underside adds weight and rolling resistance. Always drive in the highest gear possible. Drive moderately. See Owner's Maintenance Checks on the engine which uses more fuel. Try to the maintenance messages displayed on...

Owner's Manual
Page 167
...(see pages 58 to 66 ). 168 Check that the trunk is fully closed and locked. 10. When you may be carrying are clean and unobstructed. Remove frost, snow, or ice. 2. Check that any items you start the engine, check the gauges and indicators in the instrument panel... (see page 16 ). 6. If a tire looks low, use a gauge to 87 ). 7. Check the steering wheel adjustment (see pages 85 to check its pressure. 5. Fasten your vehicle. 1. Check the seat adjustment (...
...(see pages 58 to 66 ). 168 Check that the trunk is fully closed and locked. 10. When you may be carrying are clean and unobstructed. Remove frost, snow, or ice. 2. Check that any items you start the engine, check the gauges and indicators in the instrument panel... (see page 16 ). 6. If a tire looks low, use a gauge to 87 ). 7. Check the steering wheel adjustment (see pages 85 to check its pressure. 5. Fasten your vehicle. 1. Check the seat adjustment (...

Owner's Manual
Page 171
... go into the tachometer's red zone. If you are in, the engine speed will run normally when you cannot accidentally shift from fifth to reverse instead of the neutral gate, then shift to the ACCESSORY (I) or LOCK (0) position. 3. Have the vehicle checked by a limiter in and out. This is moving. If you...
... go into the tachometer's red zone. If you are in, the engine speed will run normally when you cannot accidentally shift from fifth to reverse instead of the neutral gate, then shift to the ACCESSORY (I) or LOCK (0) position. 3. Have the vehicle checked by a limiter in and out. This is moving. If you...

Owner's Manual
Page 176
Have the vehicle checked by your vehicle is on the left side. Make sure the notch on the shift lever and move the shift lever out of Park to use the shift lock release, it means your dealer. Driving SHIFT LOCK RELEASE SLOT 5. Depress the brake pedal and restart the engine. 177 Automatic Transmission RELEASE BUTTON If you press the release button on the cover is developing a problem. Push down on the key while you need to neutral. 6. Remove the key from the shift lock release slot, then reinstall the cover.
Have the vehicle checked by your vehicle is on the left side. Make sure the notch on the shift lever and move the shift lever out of Park to use the shift lock release, it means your dealer. Driving SHIFT LOCK RELEASE SLOT 5. Depress the brake pedal and restart the engine. 177 Automatic Transmission RELEASE BUTTON If you press the release button on the cover is developing a problem. Push down on the key while you need to neutral. 6. Remove the key from the shift lock release slot, then reinstall the cover.

Owner's Manual
Page 178
Check the brakes after driving through deep water. If one circuit should develop a problem, you will hear a distinctive, metallic screeching sound when you apply the brake ... the accelerator and downshifting to occasionally squeal or squeak when you . Braking System Your vehicle is equipped with the right-rear brake, etc.). Use the engine to assist the brakes by taking your driving. Driving 179 If the brake pads need replacing, you do . A power assist helps reduce the effort needed...
Check the brakes after driving through deep water. If one circuit should develop a problem, you will hear a distinctive, metallic screeching sound when you apply the brake ... the accelerator and downshifting to occasionally squeal or squeak when you . Braking System Your vehicle is equipped with the right-rear brake, etc.). Use the engine to assist the brakes by taking your driving. Driving 179 If the brake pads need replacing, you do . A power assist helps reduce the effort needed...

Owner's Manual
Page 183
Check the loading of the trailer weight. Tongue Load: The weight that is too heavy can make the trailer unstable and cause it to tow a trailer ... the load limits, use it to sway. 184 Too little tongue load can seriously affect your vehicle's handling and performance. You can also damage the engine and drivetrain. Towing a load that the tongue of the trailer and everything in this section. Total Trailer Weight: The maximum allowable weight of a fully-loaded...
Check the loading of the trailer weight. Tongue Load: The weight that is too heavy can make the trailer unstable and cause it to tow a trailer ... the load limits, use it to sway. 184 Too little tongue load can seriously affect your vehicle's handling and performance. You can also damage the engine and drivetrain. Towing a load that the tongue of the trailer and everything in this section. Total Trailer Weight: The maximum allowable weight of a fully-loaded...

Owner's Manual
Page 189
...Maintenance Minder ...193 Maintenance Record ...200 Fluid Locations...202 Adding Engine Oil ...204 Recommended Engine Oil...204 Synthetic Oil ...205 Engine Oil Additives ...205 Changing the Oil and Filter ...206 Engine Coolant ...208 Adding Engine Coolant ...208 Windshield Washers ...210 Transmission Fluid ...211 Automatic Transmission... ...231 Replacing Tires Wheels ...232 Wheels and Tires ...232 Winter Driving ...233 Snow Tires ...233 Tire Chains ...234 Checking the Battery ...235 Vehicle Storage ...236 Maintenance 191 If you have the skills and tools to perform more complex maintenance ...
...Maintenance Minder ...193 Maintenance Record ...200 Fluid Locations...202 Adding Engine Oil ...204 Recommended Engine Oil...204 Synthetic Oil ...205 Engine Oil Additives ...205 Changing the Oil and Filter ...206 Engine Coolant ...208 Adding Engine Coolant ...208 Windshield Washers ...210 Transmission Fluid ...211 Automatic Transmission... ...231 Replacing Tires Wheels ...232 Wheels and Tires ...232 Winter Driving ...233 Snow Tires ...233 Tire Chains ...234 Checking the Battery ...235 Vehicle Storage ...236 Maintenance 191 If you have the skills and tools to perform more complex maintenance ...

Owner's Manual
Page 195
...the display without doing the service, the system will not show the proper maintenance intervals. Keep all receipts as previously described. Check your vehicle best and can provide competent, efficient service. Maintenance Minder Important Maintenance Precautions If you have the person who is ... maintenance item code(s) will disappear, and the engine oil life will no longer have maintenance done. Make sure to ''100.'' Your authorized Honda dealer knows your warranty booklet for another 5 seconds. We recommend the use of Honda parts and fluids whenever you will reset to have...
...the display without doing the service, the system will not show the proper maintenance intervals. Keep all receipts as previously described. Check your vehicle best and can provide competent, efficient service. Maintenance Minder Important Maintenance Precautions If you have the person who is ... maintenance item code(s) will disappear, and the engine oil life will no longer have maintenance done. Make sure to ''100.'' Your authorized Honda dealer knows your warranty booklet for another 5 seconds. We recommend the use of Honda parts and fluids whenever you will reset to have...

Owner's Manual
Page 196
... Minder U.S. However, all maintenance services should check the following items at the specified intervals. Engine oil level Check every time you fill the fuel tank. Automatic transmission Check the fluid level monthly. See page 159 . Lights Check the operation of emissions control devices and systems may be performed in accordance with will not void your emissions...
... Minder U.S. However, all maintenance services should check the following items at the specified intervals. Engine oil level Check every time you fill the fuel tank. Automatic transmission Check the fluid level monthly. See page 159 . Lights Check the operation of emissions control devices and systems may be performed in accordance with will not void your emissions...
Owner's Manual
Page 197
... every 15,000 miles (24,000 km). Maintenance Minder Symbol A B Maintenance Main Items Replace engine oil 1 Replace engine oil 1 and oil filter Inspect front and rear brakes Check parking brake adjustment Inspect these conditions, have high concentrations of soot in the air from industry and... from diesel-powered vehicles, replace every 15,000 miles (24,000 km). Inspect valve clearance Replace engine coolant Maintenance Minder 3 1: If ...
... every 15,000 miles (24,000 km). Maintenance Minder Symbol A B Maintenance Main Items Replace engine oil 1 Replace engine oil 1 and oil filter Inspect front and rear brakes Check parking brake adjustment Inspect these conditions, have high concentrations of soot in the air from industry and... from diesel-powered vehicles, replace every 15,000 miles (24,000 km). Inspect valve clearance Replace engine coolant Maintenance Minder 3 1: If ...
Owner's Manual
Page 285
...to ...206 Change, When to ...193 Checking Engine ...159 Pressure Indicator ...58, 253 Selecting Proper Viscosity Chart ...204 ON (Ignition Key Position) ...76 Outside Mirrors ...90 Outside Temperature ...64 Overheating, Engine ...251 Owner's Maintenance Checks ...198 Protecting Adults and Teens...13 Additional...Window Defogger ...72 Reclining the Seat Backs ...85 Recommended Shift Speeds ...171 Reminder Lights ...58 Remote Transmitter ...78 Replacement Information Engine Oil and Filter ...206 Fuses ...257 S Safety Belts...10, 20 Safety Defects, Reporting...282 Safety Features ...9 Airbags ...11...
...to ...206 Change, When to ...193 Checking Engine ...159 Pressure Indicator ...58, 253 Selecting Proper Viscosity Chart ...204 ON (Ignition Key Position) ...76 Outside Mirrors ...90 Outside Temperature ...64 Overheating, Engine ...251 Owner's Maintenance Checks ...198 Protecting Adults and Teens...13 Additional...Window Defogger ...72 Reclining the Seat Backs ...85 Recommended Shift Speeds ...171 Reminder Lights ...58 Remote Transmitter ...78 Replacement Information Engine Oil and Filter ...206 Fuses ...257 S Safety Belts...10, 20 Safety Defects, Reporting...282 Safety Features ...9 Airbags ...11...

