
Owner's Manual
Page 5
ACCESSORY POWER SOCKETS (P.113) : If equipped 3 Your Vehicle at a Glance INSTRUMENT PANEL INDICATORS (P.57) GAUGES (P.67) DRIVER'S FRONT AIRBAG (P.9, 23) REAR VIEW MIRROR WITH COMPASS (P.166) ...
ACCESSORY POWER SOCKETS (P.113) : If equipped 3 Your Vehicle at a Glance INSTRUMENT PANEL INDICATORS (P.57) GAUGES (P.67) DRIVER'S FRONT AIRBAG (P.9, 23) REAR VIEW MIRROR WITH COMPASS (P.166) ...

Owner's Manual
Page 19
... Safety seriously injured in the pickup bed. A passenger who is moving. CONTINUED 17 This will reduce the risk of the vehicle. Do not put any accessories on your lap, or driving with a pipe or other occupants, or out of serious injury in a crash. Never let passengers ride inside of the vehicle...
... Safety seriously injured in the pickup bed. A passenger who is moving. CONTINUED 17 This will reduce the risk of the vehicle. Do not put any accessories on your lap, or driving with a pipe or other occupants, or out of serious injury in a crash. Never let passengers ride inside of the vehicle...

Owner's Manual
Page 52
... in serious neck injuries during a crash. Two children should never use the same seat belt. This could be injured. Do not let a child put any accessories on a seat belt. If they do, they could improve a child's comfort or reposition the shoulder part of a seat belt can make the belt less effective...
... in serious neck injuries during a crash. Two children should never use the same seat belt. This could be injured. Do not let a child put any accessories on a seat belt. If they do, they could improve a child's comfort or reposition the shoulder part of a seat belt can make the belt less effective...
Owner's Manual
Page 56
... Interior Convenience Items ...109 Center Console ...110 Console Compartments ...110 Cargo Hooks ...111 Beverage Holders ...111 Glove Box ...112 Coat Hooks ...112 Sunglasses Holder ...112 Accessory Power Sockets...113 Sun Visor ...114 Vanity Mirror ...114 Interior Lights ...115 Bed Lights ...117 Instruments and Controls 55
... Interior Convenience Items ...109 Center Console ...110 Console Compartments ...110 Cargo Hooks ...111 Beverage Holders ...111 Glove Box ...112 Coat Hooks ...112 Sunglasses Holder ...112 Accessory Power Sockets...113 Sun Visor ...114 Vanity Mirror ...114 Interior Lights ...115 Bed Lights ...117 Instruments and Controls 55

Owner's Manual
Page 57
CENTER CONSOLE (P.110) ACCESSORY POWER SOCKETS (P.113) : If equipped 56 Control Locations REAR VIEW MIRROR WITH COMPASS (P.166) INSTRUMENT PANEL INDICATORS (P.57) GAUGES (P.67) PARKING BRAKE RELEASE HANDLE (P.106) AUDIO SYSTEM (P.131) AUXILIARY INPUT JACK (P.159) HEATING/COOLING CONTROLS (P.120) CLIMATE CONTROL SYSTEM (P.126) GLOVE BOX (P.112) MIRROR CONTROLS (P.108) POWER DOOR LOCK MASTER SWITCH (P.80) POWER WINDOW SWITCHES (P.102) HOOD RELEASE HANDLE (P.177) FUEL FILL DOOR PARKING BRAKE RELEASE HANDLE (P.175) PEDAL (P.106) Vehicle with navigation system is shown.
CENTER CONSOLE (P.110) ACCESSORY POWER SOCKETS (P.113) : If equipped 56 Control Locations REAR VIEW MIRROR WITH COMPASS (P.166) INSTRUMENT PANEL INDICATORS (P.57) GAUGES (P.67) PARKING BRAKE RELEASE HANDLE (P.106) AUDIO SYSTEM (P.131) AUXILIARY INPUT JACK (P.159) HEATING/COOLING CONTROLS (P.120) CLIMATE CONTROL SYSTEM (P.126) GLOVE BOX (P.112) MIRROR CONTROLS (P.108) POWER DOOR LOCK MASTER SWITCH (P.80) POWER WINDOW SWITCHES (P.102) HOOD RELEASE HANDLE (P.177) FUEL FILL DOOR PARKING BRAKE RELEASE HANDLE (P.175) PEDAL (P.106) Vehicle with navigation system is shown.

Owner's Manual
Page 61
... go off if you have inserted a properly-coded ignition key. This indicator comes on , your vehicle checked at any other time, there is a reminder to ACCESSORY (I) or LOCK (0). 60 This indicator also blinks several times when you turn the ignition switch from ON (II) to check the parking brake. Canada Parking...
... go off if you have inserted a properly-coded ignition key. This indicator comes on , your vehicle checked at any other time, there is a reminder to ACCESSORY (I) or LOCK (0). 60 This indicator also blinks several times when you turn the ignition switch from ON (II) to check the parking brake. Canada Parking...

Owner's Manual
Page 64
... your dealer to the system. 63 Continuing to drive with the A/T temperature indicator on for a few seconds when you turn the headlight control dial to ACCESSORY (I) or LOCK (0) without turning off the headlight control dial, this indicator remains on .
... your dealer to the system. 63 Continuing to drive with the A/T temperature indicator on for a few seconds when you turn the headlight control dial to ACCESSORY (I) or LOCK (0) without turning off the headlight control dial, this indicator remains on .

Owner's Manual
Page 67
... On Indicator This indicator reminds you that the In-Bed Trunk is not completely closed when you turn the ignition switch from ON (II) to ACCESSORY (I) or LOCK (0) without closing the back window, you do not close it, the indicator stays on for more information. If you will hear five beeps... and see the indicator blink. With the ignition switch in the ACCESSORY (I ) or LOCK (0). It will remain on . See page 92 for more information. 66 If you remove the ignition key and open the In-Bed ...
... On Indicator This indicator reminds you that the In-Bed Trunk is not completely closed when you turn the ignition switch from ON (II) to ACCESSORY (I) or LOCK (0) without closing the back window, you do not close it, the indicator stays on for more information. If you will hear five beeps... and see the indicator blink. With the ignition switch in the ACCESSORY (I ) or LOCK (0). It will remain on . See page 92 for more information. 66 If you remove the ignition key and open the In-Bed ...

Owner's Manual
Page 75
... on reminder chime. 74 The lights will turn on and remove the key from the ignition switch, you will go off. Turning the dial to ACCESSORY (I) or LOCK (0). This feature activates if you leave the lights on the parking lights, taillights, instrument panel lights, and license plate lights. If you open...
... on reminder chime. 74 The lights will turn on and remove the key from the ignition switch, you will go off. Turning the dial to ACCESSORY (I) or LOCK (0). This feature activates if you leave the lights on the parking lights, taillights, instrument panel lights, and license plate lights. If you open...

Owner's Manual
Page 80
.... The switch returns to start the engine. Remove the key to ON (II). The ignition switch has four positions: LOCK (0), ACCESSORY (I ) position and open the driver's door. ACCESSORY (I ) to turn the key. Ignition Switch LOCK (0) You can insert or remove the key only in this position. Several of... the key. The shift lever must be in Park, and you can remove the key from ACCESSORY (I ) You can operate the audio system and the accessory power sockets in this position. Instruments and Controls 79 To turn the key, the shift lever must push the ...
.... The switch returns to start the engine. Remove the key to ON (II). The ignition switch has four positions: LOCK (0), ACCESSORY (I ) position and open the driver's door. ACCESSORY (I ) to turn the key. Ignition Switch LOCK (0) You can insert or remove the key only in this position. Several of... the key. The shift lever must be in Park, and you can remove the key from ACCESSORY (I ) You can operate the audio system and the accessory power sockets in this position. Instruments and Controls 79 To turn the key, the shift lever must push the ...

Owner's Manual
Page 104
...the back window. With the ignition switch in the LOCK (0) position, the indicator goes off after reinstalling the fuse. 1. With the ignition switch in the ACCESSORY (I ) or LOCK (0) without closing automatically, it . Back Window Open Indicator This indicator comes on when you turn the ignition switch from the window ... AUTO function may be reset after about 3 minutes. You should always check that all passengers and objects are away from ON (II) to ACCESSORY (I ) position, the indicator goes off after resetting, have your vehicle checked by your dealer. Start the engine.
...the back window. With the ignition switch in the LOCK (0) position, the indicator goes off after reinstalling the fuse. 1. With the ignition switch in the ACCESSORY (I ) or LOCK (0) without closing automatically, it . Back Window Open Indicator This indicator comes on when you turn the ignition switch from the window ... AUTO function may be reset after about 3 minutes. You should always check that all passengers and objects are away from ON (II) to ACCESSORY (I ) position, the indicator goes off after resetting, have your vehicle checked by your dealer. Start the engine.

Owner's Manual
Page 110
Interior Convenience Items VANITY MIRROR SUNGLASSES HOLDER CENTER UPPER POCKET GLOVE BOX ACCESSORY POWER SOCKETS CENTER POCKET SUN VISOR CENTER CONSOLE CONSOLE COMPARTMENT BEVERAGE HOLDER COAT HOOK ACCESSORY POWER SOCKET Instruments and Controls CENTER LOWER POCKET : On vehicle without navigation system BEVERAGE HOLDERS 109
Interior Convenience Items VANITY MIRROR SUNGLASSES HOLDER CENTER UPPER POCKET GLOVE BOX ACCESSORY POWER SOCKETS CENTER POCKET SUN VISOR CENTER CONSOLE CONSOLE COMPARTMENT BEVERAGE HOLDER COAT HOOK ACCESSORY POWER SOCKET Instruments and Controls CENTER LOWER POCKET : On vehicle without navigation system BEVERAGE HOLDERS 109

Owner's Manual
Page 114
... is on the back of the center console. Instruments and Controls There are three accessory power sockets in the ACCESSORY (I) or ON (II) position. 113 Two accessory power sockets are rated 120 watts or less (10 amps). To use an accessory power socket, the ignition switch must be 120 watts or less (10 amps...). These sockets are intended to supply power for 12 volt DC accessories that are above the center pocket on the dashboard, and another is being used, the combined power rating of the sockets will power an automotive ...
... is on the back of the center console. Instruments and Controls There are three accessory power sockets in the ACCESSORY (I) or ON (II) position. 113 Two accessory power sockets are rated 120 watts or less (10 amps). To use an accessory power socket, the ignition switch must be 120 watts or less (10 amps...). These sockets are intended to supply power for 12 volt DC accessories that are above the center pocket on the dashboard, and another is being used, the combined power rating of the sockets will power an automotive ...

Owner's Manual
Page 118
... lever in the pickup bed: a light on , then go off and cannot be used. 117 The indicator on the instrument panel also comes on to ACCESSORY (I) or LOCK (0) without turning off the bed lights, the lights and the indicator will remain on each front upper and rear bottom side. To turn...
... lever in the pickup bed: a light on , then go off and cannot be used. 117 The indicator on the instrument panel also comes on to ACCESSORY (I) or LOCK (0) without turning off the bed lights, the lights and the indicator will remain on each front upper and rear bottom side. To turn...

Owner's Manual
Page 134
.... If you want to listen to a lower frequency. When it finds one station on AM, and two stations on the system (see SCAN in the ACCESSORY (I) or ON (II) position. On the FM band, ST will see page 136 ). Adjust the volume by pushing the PWR button or the AM/FM...
.... If you want to listen to a lower frequency. When it finds one station on AM, and two stations on the system (see SCAN in the ACCESSORY (I) or ON (II) position. On the FM band, ST will see page 136 ). Adjust the volume by pushing the PWR button or the AM/FM...

Owner's Manual
Page 141
... (music title). RTL model only Your audio system is a registered trademark of receiving XM Satellite Radio anywhere in several categories. In channel mode, you to ACCESSORY (I) or ON (II). You may experience periods when XM Radio does not transmit the artist's name and song title information. If this happens, there is...
... (music title). RTL model only Your audio system is a registered trademark of receiving XM Satellite Radio anywhere in several categories. In channel mode, you to ACCESSORY (I) or ON (II). You may experience periods when XM Radio does not transmit the artist's name and song title information. If this happens, there is...

Owner's Manual
Page 145
.... If the service has not been activated after 36 hours, contact XM Radio. With the ignition switch in the display. You will appear in the ACCESSORY (I .D. Driving in the display. bar until ''0'' appears in tunnels. XM Radio will play. As required by the FCC: Changes or modifications not expressly approved by...
.... If the service has not been activated after 36 hours, contact XM Radio. With the ignition switch in the display. You will appear in the ACCESSORY (I .D. Driving in the display. bar until ''0'' appears in tunnels. XM Radio will play. As required by the FCC: Changes or modifications not expressly approved by...

Owner's Manual
Page 149
... will see RDM in the display. The label can also play a CD until you will get out of the track playing is shown in the ACCESSORY (I) or ON (II) position, insert a CD about halfway into the CD slot. The number of scan mode. You will see SCAN in the order they...
... will see RDM in the display. The label can also play a CD until you will get out of the track playing is shown in the ACCESSORY (I) or ON (II) position, insert a CD about halfway into the CD slot. The number of scan mode. You will see SCAN in the order they...

Owner's Manual
Page 151
... system LOAD BUTTON LOAD INDICATOR Your audio system has an in-dash CD changer that holds up and cause the CD to jam in the ACCESSORY (I) or ON (II) position. The screen folds down, and the CD changer appears. To load only one CD, press and release the LOAD button. To...
... system LOAD BUTTON LOAD INDICATOR Your audio system has an in-dash CD changer that holds up and cause the CD to jam in the ACCESSORY (I) or ON (II) position. The screen folds down, and the CD changer appears. To load only one CD, press and release the LOAD button. To...
Owner's Manual
Page 159
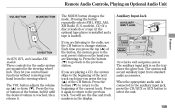
... Optional Audio Unit VOL BUTTON MODE BUTTON The MODE button changes the mode. If you control basic functions without removing your hand from standard audio accessories. They let you are listening to select the unit. 159 The VOL button adjusts the volume up ( ) or down ( ). Press the bottom ( ) to return to...
... Optional Audio Unit VOL BUTTON MODE BUTTON The MODE button changes the mode. If you control basic functions without removing your hand from standard audio accessories. They let you are listening to select the unit. 159 The VOL button adjusts the volume up ( ) or down ( ). Press the bottom ( ) to return to...
