
Owner's Manual
Page 20
.... Children depend on top of the dashboard, could be sure to or placed on the covers marked ''SRS AIRBAG,'' in a crash. Do not put any accessories on the airbag covers. Carrying hard or sharp objects on top of the dashboard, they Keep your car, be propelled inside the car and hurt...
.... Children depend on top of the dashboard, could be sure to or placed on the covers marked ''SRS AIRBAG,'' in a crash. Do not put any accessories on the airbag covers. Carrying hard or sharp objects on top of the dashboard, they Keep your car, be propelled inside the car and hurt...

Owner's Manual
Page 32
... belt, severely compromise the protective capability of the seat belt and increase the chance of serious injury in a crash. Do not let a child put any accessories on a seat belt. be directly secured with the lap/ shoulder belt.
... belt, severely compromise the protective capability of the seat belt and increase the chance of serious injury in a crash. Do not let a child put any accessories on a seat belt. be directly secured with the lap/ shoulder belt.
Owner's Manual
Page 44
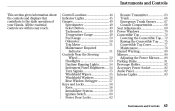
... controls are within easy reach. Instruments and Controls This section gives information about the controls and displays that contribute to the daily operation of your Honda. Control Locations ...44 Indicator Lights...45 Gauges ...49 Speedometer ...49 Select Button ...49 Tachometer ...49 Temperature Gauge ...49 Fuel Gauge ...50 Odometer ... Convertible Top Cover ...77 Maintenance ...78 Hazard Warning ...80 Mirrors ...80 Adjusting the Power Mirrors ...80 Parking Brake ...81 Beverage Holder ...82 Accessory Power Socket ...82 Audio Panel...82 Interior Lights ...83 Instruments and Controls 43
... controls are within easy reach. Instruments and Controls This section gives information about the controls and displays that contribute to the daily operation of your Honda. Control Locations ...44 Indicator Lights...45 Gauges ...49 Speedometer ...49 Select Button ...49 Tachometer ...49 Temperature Gauge ...49 Fuel Gauge ...50 Odometer ... Convertible Top Cover ...77 Maintenance ...78 Hazard Warning ...80 Mirrors ...80 Adjusting the Power Mirrors ...80 Parking Brake ...81 Beverage Holder ...82 Accessory Power Socket ...82 Audio Panel...82 Interior Lights ...83 Instruments and Controls 43

Owner's Manual
Page 49
... a few seconds when you are signaling. If it is a problem with the headlight switch off if you turn the ignition switch from ON (II) to ACCESSORY (I) or LOCK (0). It will not start (see page 200 ). This indicator also blinks several times when you have inserted a properly-coded ignition key. Indicator Lights...
... a few seconds when you are signaling. If it is a problem with the headlight switch off if you turn the ignition switch from ON (II) to ACCESSORY (I) or LOCK (0). It will not start (see page 200 ). This indicator also blinks several times when you have inserted a properly-coded ignition key. Indicator Lights...

Owner's Manual
Page 54
... switch to high beams, push the turn signal lever forward until you hold the lever back, no matter what position the headlight switch is in ACCESSORY (I) or LOCK (0), you will stay on for as long as you hear a click. Controls Near the Steering Wheel Headlights If you leave the lights on...
... switch to high beams, push the turn signal lever forward until you hold the lever back, no matter what position the headlight switch is in ACCESSORY (I) or LOCK (0), you will stay on for as long as you hear a click. Controls Near the Steering Wheel Headlights If you leave the lights on...

Owner's Manual
Page 60
...keep other devices to blink, it , and turn the ignition switch to start the engine, contact your Honda dealer. Electrical problems could result that may not recognize your car undriveable. Do not attempt to alter this ... remove the key, reinsert it means the system does not recognize the coding of your key, contact your Honda dealer. The Immobilizer System indicator will also blink several times when you cannot start . CONTINUED Instruments and Controls ...fuel system is near the ignition switch when you turn the switch to ACCESSORY (I) or LOCK (0). When you insert the key.
...keep other devices to blink, it , and turn the ignition switch to start the engine, contact your Honda dealer. Electrical problems could result that may not recognize your car undriveable. Do not attempt to alter this ... remove the key, reinsert it means the system does not recognize the coding of your key, contact your Honda dealer. The Immobilizer System indicator will also blink several times when you cannot start . CONTINUED Instruments and Controls ...fuel system is near the ignition switch when you turn the switch to ACCESSORY (I) or LOCK (0). When you insert the key.

Owner's Manual
Page 61
... insert or remove the key only in this device must push the key in slightly as you turn it difficult to turn the key from ACCESSORY to LOCK, you turn the key. This device complies with Part 15 of the steering column. Ignition Switch LOCK (0) You can cause you remove the... key. It has three positions: • LOCK (0) • ACCESSORY (I) • ON (II) Removing the key from the ignition switch only when parked. 60 Instruments and Controls To switch from LOCK to...
... insert or remove the key only in this device must push the key in slightly as you turn it difficult to turn the key from ACCESSORY to LOCK, you turn the key. This device complies with Part 15 of the steering column. Ignition Switch LOCK (0) You can cause you remove the... key. It has three positions: • LOCK (0) • ACCESSORY (I) • ON (II) Removing the key from the ignition switch only when parked. 60 Instruments and Controls To switch from LOCK to...

Owner's Manual
Page 62
... as a test when you can operate the audio system and the accessory power socket. You will not start if the Immobilizer System does not recognize the key's coding (see page 135 ). Several of the lights on the ... switch in this position, you turn off the beeper. Instruments and Controls 61 The engine can be started with the key in the LOCK (0) or ACCESSORY (I ) In this position by pressing the engine START button (see page 59 ). ON (II) This is the normal key position when driving. Keys and Locks...
... as a test when you can operate the audio system and the accessory power socket. You will not start if the Immobilizer System does not recognize the key's coding (see page 135 ). Several of the lights on the ... switch in this position, you turn off the beeper. Instruments and Controls 61 The engine can be started with the key in the LOCK (0) or ACCESSORY (I ) In this position by pressing the engine START button (see page 59 ). ON (II) This is the normal key position when driving. Keys and Locks...

Owner's Manual
Page 83
... on the front edge. A spilled liquid that is intended to page 94 for 12 volt DC accessories that are using the beverage holder. Beverage Holder, Accessory Power Socket, Audio Panel Beverage Holder Accessory Power Socket Audio Panel To open the audio panel, push on the top center and let the .... Be careful when you or your passenger. This socket is very hot can also damage the upholstery, carpeting, and electrical components in ACCESSORY (I) or ON (II). To use the accessory power socket, pull out on it until it latches. The ignition switch must be in the interior.
... on the front edge. A spilled liquid that is intended to page 94 for 12 volt DC accessories that are using the beverage holder. Beverage Holder, Accessory Power Socket, Audio Panel Beverage Holder Accessory Power Socket Audio Panel To open the audio panel, push on the top center and let the .... Be careful when you or your passenger. This socket is very hot can also damage the upholstery, carpeting, and electrical components in ACCESSORY (I) or ON (II). To use the accessory power socket, pull out on it until it latches. The ignition switch must be in the interior.

Owner's Manual
Page 95
... SEEK bar you press, the system scans upward or downward from the current frequency. You can use any of five methods to is broadcasting in ACCESSORY (I) or ON (II) to a desired frequency. SEEK The SEEK function searches the band for a station with a strong signal. Turn the knob right or left to...
... SEEK bar you press, the system scans upward or downward from the current frequency. You can use any of five methods to is broadcasting in ACCESSORY (I) or ON (II) to a desired frequency. SEEK The SEEK function searches the band for a station with a strong signal. Turn the knob right or left to...

Owner's Manual
Page 100
TIME DISPLAY CLOCK BUTTON H BUTTON R BUTTON M BUTTON 100 Comfort and Convenience Features If an error occurs while operating the CD player or optional CD changer, the display will show the error code and will not switch to the time display after five seconds. It shows operation mode of your audio system usually shows the time when the ignition switch is corrected (see pages 111 and 112 ). Audio System Digital Clock The display of radio, CD player, or optional CD changer when you operate them, and goes back to the time display until the error is in ACCESSORY (I) or ON (II).
TIME DISPLAY CLOCK BUTTON H BUTTON R BUTTON M BUTTON 100 Comfort and Convenience Features If an error occurs while operating the CD player or optional CD changer, the display will show the error code and will not switch to the time display after five seconds. It shows operation mode of your audio system usually shows the time when the ignition switch is corrected (see pages 111 and 112 ). Audio System Digital Clock The display of radio, CD player, or optional CD changer when you operate them, and goes back to the time display until the error is in ACCESSORY (I) or ON (II).

Owner's Manual
Page 105
... BUTTON CONTINUED Comfort and Convenience Features 105 CD-RW discs will pull it in the rest of the track that is playing is shown in ACCESSORY (I) or ON (II), insert the disc into the CD slot. Play only standard round discs.
... BUTTON CONTINUED Comfort and Convenience Features 105 CD-RW discs will pull it in the rest of the track that is playing is shown in ACCESSORY (I) or ON (II), insert the disc into the CD slot. Play only standard round discs.

Owner's Manual
Page 118
... Filling the Fuel Tank ...121 Opening the Hood ...122 Oil Check ...123 Engine Coolant Check ...124 Fuel Economy ...125 Car Condition ...125 Driving Habits ...125 Accessories and Modifications ...126 Accessories...126 Modifications ...127 Additional Safety Precaution...127 Carrying Cargo ...128 General Precautions ...131 Before Driving 119 If you plan to add any...
... Filling the Fuel Tank ...121 Opening the Hood ...122 Oil Check ...123 Engine Coolant Check ...124 Fuel Economy ...125 Car Condition ...125 Driving Habits ...125 Accessories and Modifications ...126 Accessories...126 Modifications ...127 Additional Safety Precaution...127 Carrying Cargo ...128 General Precautions ...131 Before Driving 119 If you plan to add any...

Owner's Manual
Page 125
... all instructions in which you can be sure to read the following information. Accessories and Modifications Modifying your car, or installing some non-Honda accessories, can make any modifications or add any accessories, be hurt or killed. Before you to deploy. Improper accessories or modifications can affect your car's handling and stability. (See ''Modifications'' on...
... all instructions in which you can be sure to read the following information. Accessories and Modifications Modifying your car, or installing some non-Honda accessories, can make any modifications or add any accessories, be hurt or killed. Before you to deploy. Improper accessories or modifications can affect your car's handling and stability. (See ''Modifications'' on...
Owner's Manual
Page 126
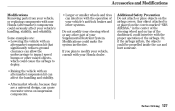
Accessories and Modifications Modifications Removing parts from your vehicle, or replacing components with an aftermarket suspension kit can affect the handling and stability. Additional Safety Precaution ... components. Larger or smaller wheels and tires can interfere with the operation of your vehicle's anti-lock brakes and other systems. Do not modify your Honda dealer. Modifications could be propelled inside the car and hurt someone. If you plan to deploy. Any object attached to or placed on the covers...
Accessories and Modifications Modifications Removing parts from your vehicle, or replacing components with an aftermarket suspension kit can affect the handling and stability. Additional Safety Precaution ... components. Larger or smaller wheels and tires can interfere with the operation of your vehicle's anti-lock brakes and other systems. Do not modify your Honda dealer. Modifications could be propelled inside the car and hurt someone. If you plan to deploy. Any object attached to or placed on the covers...

Owner's Manual
Page 128
... Compartment Store or secure all load limits and other loading guidelines in which you can carry: Add up the weight of all occupants, cargo, and accessories. Before Driving 129 Carrying Cargo Load Limit The maximum load for your car is the total weight of cargo you can be thrown around and...
... Compartment Store or secure all load limits and other loading guidelines in which you can carry: Add up the weight of all occupants, cargo, and accessories. Before Driving 129 Carrying Cargo Load Limit The maximum load for your car is the total weight of cargo you can be thrown around and...

Owner's Manual
Page 133
... engine does not start within 15 seconds, or starts but stalls right away, repeat step 5 with the accelerator pedal pressed half-way down all electrical accessories to ON (II) position. Driving 135 Apply the parking brake. 2. The ENGINE START button has no more than 15 seconds. If the engine does not...
... engine does not start within 15 seconds, or starts but stalls right away, repeat step 5 with the accelerator pedal pressed half-way down all electrical accessories to ON (II) position. Driving 135 Apply the parking brake. 2. The ENGINE START button has no more than 15 seconds. If the engine does not...

Owner's Manual
Page 134
... start , return to step 2. 136 Driving If the engine fails to reduce the drain on the battery. 2. Use the following procedure: 1. Turn off all electrical accessories to start in cold weather.
... start , return to step 2. 136 Driving If the engine fails to reduce the drain on the battery. 2. Use the following procedure: 1. Turn off all electrical accessories to start in cold weather.

Owner's Manual
Page 178
... Check the battery condition by looking at the test indicator window on the battery explains the test indicator's colors. WARNING: Battery posts, terminals, and related accessories contain lead and lead compounds. To remove it off the battery with a solution of your car's battery monthly. Dry off with grease to help prevent...
... Check the battery condition by looking at the test indicator window on the battery explains the test indicator's colors. WARNING: Battery posts, terminals, and related accessories contain lead and lead compounds. To remove it off the battery with a solution of your car's battery monthly. Dry off with grease to help prevent...

Owner's Manual
Page 223
... ( ) terminal on the booster battery. 4. Do not connect this jumper cable to any other end to the negative ( ) terminal on your Honda's battery. Connect one jumper cable to the metal projection near the intake manifold as shown in Neutral and set the parking brake. 3. Turn off ...all the electrical accessories: heater, A/C, stereo system, lights, etc. Connect the other end to the positive ( ) terminal on the booster battery. CONTINUED Taking Care of ...
... ( ) terminal on the booster battery. 4. Do not connect this jumper cable to any other end to the negative ( ) terminal on your Honda's battery. Connect one jumper cable to the metal projection near the intake manifold as shown in Neutral and set the parking brake. 3. Turn off ...all the electrical accessories: heater, A/C, stereo system, lights, etc. Connect the other end to the positive ( ) terminal on the booster battery. CONTINUED Taking Care of ...