Owner's Manual
Page 4
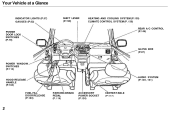
Your Vehicle at a Glance INDICATOR LIGHTS (P.57) GAUGES (P.62) SHIFT LEVER (P.199) HEATING AND COOLING SYSTEM (P.130) CLIMATE CONTROL SYSTEM (P. 138) REAR A/C CONTROL (P.146) POWER DOOR LOCK SWITCHES (P.79) GLOVE BOX (P.87) POWER WINDOW SWITCHES (P.113) HOOD RELEASE HANDLE (P.184) CENTER TABLE (P:117) AUDIO SYSTEM (P.149, 161) FUEL FILL DOOR RELEASE (P.183) PARKING BRAKE PEDAL (P. 116) ACCESSORY POWER SOCKET (P.124)
Your Vehicle at a Glance INDICATOR LIGHTS (P.57) GAUGES (P.62) SHIFT LEVER (P.199) HEATING AND COOLING SYSTEM (P.130) CLIMATE CONTROL SYSTEM (P. 138) REAR A/C CONTROL (P.146) POWER DOOR LOCK SWITCHES (P.79) GLOVE BOX (P.87) POWER WINDOW SWITCHES (P.113) HOOD RELEASE HANDLE (P.184) CENTER TABLE (P:117) AUDIO SYSTEM (P.149, 161) FUEL FILL DOOR RELEASE (P.183) PARKING BRAKE PEDAL (P. 116) ACCESSORY POWER SOCKET (P.124)

Owner's Manual
Page 22
... seat belt and increase the chance of the dashboard, they could be propelled inside the car and hurt someone. Protecting Adults Do not put any accessories on the airbag covers. Carrying hard or sharp objects on your lap, or driving with the proper operation of the dashboard, could be injured if...
... seat belt and increase the chance of the dashboard, they could be propelled inside the car and hurt someone. Protecting Adults Do not put any accessories on the airbag covers. Carrying hard or sharp objects on your lap, or driving with the proper operation of the dashboard, could be injured if...

Owner's Manual
Page 43
... increases the chance that the child will slide under the arm. To determine if a lap/shoulder belt properly fits a child, have the child put any accessories on a seat belt. Follow the instructions on the seat belt. This could cause very serious injuries during a crash. However, if the belt touches or crosses...
... increases the chance that the child will slide under the arm. To determine if a lap/shoulder belt properly fits a child, have the child put any accessories on a seat belt. Follow the instructions on the seat belt. This could cause very serious injuries during a crash. However, if the belt touches or crosses...
Owner's Manual
Page 60
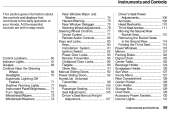
Instruments and Controls This section gives information about the controls and displays that contribute to the daily operation of your Honda. Rear Window Wiper and Washer...74 Hazard Warning...75 Rear Window Defogger...75 Steering Wheel Adjustment...76 Steering Wheel Controls......Holder...126 Sun Visor...127 Vanity Mirror...127 Rear Compartment...128 Center Pocket...128 Coin Holder...128 Storage Box...129 Coat Hook...129 Accessory Power Sockets...130 Interior Lights...131 Instruments and Controls Control Locations...60 Indicator Lights...61 Gauges...66 Controls Near the Steering Wheel...69...
Instruments and Controls This section gives information about the controls and displays that contribute to the daily operation of your Honda. Rear Window Wiper and Washer...74 Hazard Warning...75 Rear Window Defogger...75 Steering Wheel Adjustment...76 Steering Wheel Controls......Holder...126 Sun Visor...127 Vanity Mirror...127 Rear Compartment...128 Center Pocket...128 Coin Holder...128 Storage Box...129 Coat Hook...129 Accessory Power Sockets...130 Interior Lights...131 Instruments and Controls Control Locations...60 Indicator Lights...61 Gauges...66 Controls Near the Steering Wheel...69...
Owner's Manual
Page 64
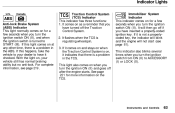
.... If this light comes on for a few seconds when you have turned off the Traction Control System. This light also comes on , your dealer to ACCESSORY (I) or LOCK (0). This indicator also blinks several times when you have it checked. With the light on when you turn the ignition switch from ON...
.... If this light comes on for a few seconds when you have turned off the Traction Control System. This light also comes on , your dealer to ACCESSORY (I) or LOCK (0). This indicator also blinks several times when you have it checked. With the light on when you turn the ignition switch from ON...
Owner's Manual
Page 71
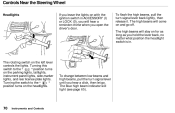
... 65). The high beams will stay on for as long as you hold the lever back, no matter what position the headlight switch is in ACCESSORY (I) or LOCK (0), you will hear a reminder chime when you open the driver's door. Instruments and Controls Turning this switch to the position turns on the...
... 65). The high beams will stay on for as long as you hold the lever back, no matter what position the headlight switch is in ACCESSORY (I) or LOCK (0), you will hear a reminder chime when you open the driver's door. Instruments and Controls Turning this switch to the position turns on the...
Owner's Manual
Page 82
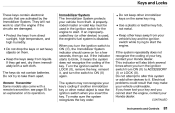
.... Keys and Locks These keys contain electronic circuits that may not recognize your Honda dealer. Keep the keys away from direct sunlight, high temperature, and high humidity. To make your vehicle from ON (II) to ACCESSORY (I) or LOCK (0). Use a plastic or leather key fob, not metal. A properlycoded master or valet key must...
.... Keys and Locks These keys contain electronic circuits that may not recognize your Honda dealer. Keep the keys away from direct sunlight, high temperature, and high humidity. To make your vehicle from ON (II) to ACCESSORY (I) or LOCK (0). Use a plastic or leather key fob, not metal. A properlycoded master or valet key must...

Owner's Manual
Page 83
.... The ignition switch is subject to the following two conditions: (1) This device may not cause harmful interference, and (2) this position. Firmly turn the key from ACCESSORY to operate the equipment. To switch from LOCK to the right as you turn it difficult to turn the steering wheel to the left or... to ACCESSORY. The shift lever must also be in this device must accept any interference that may sometimes make it . If the front wheels are turned, ...
.... The ignition switch is subject to the following two conditions: (1) This device may not cause harmful interference, and (2) this position. Firmly turn the key from ACCESSORY to operate the equipment. To switch from LOCK to the right as you turn it difficult to turn the steering wheel to the left or... to ACCESSORY. The shift lever must also be in this device must accept any interference that may sometimes make it . If the front wheels are turned, ...
Owner's Manual
Page 84
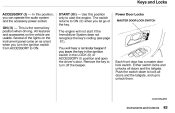
... ON. START (III) - Push the switch down to lock all doors and the tailgate. All features and accessories on as a test when you can operate the audio system and the accessory power socket. The switch returns to unlock them. Several of the key. You will not start the engine. CONTINUED Instruments ... and unlocks all doors and the tailgate, and up to ON (II) when you leave the key in the ignition switch in the LOCK (0) or ACCESSORY (I ) - The engine will hear a reminder beeper if you let go of the lights on the instrument panel come on the vehicle are usable. Keys and...
... ON. START (III) - Push the switch down to lock all doors and the tailgate. All features and accessories on as a test when you can operate the audio system and the accessory power socket. The switch returns to unlock them. Several of the key. You will not start the engine. CONTINUED Instruments ... and unlocks all doors and the tailgate, and up to ON (II) when you leave the key in the ignition switch in the LOCK (0) or ACCESSORY (I ) - The engine will hear a reminder beeper if you let go of the lights on the instrument panel come on the vehicle are usable. Keys and...
Owner's Manual
Page 131
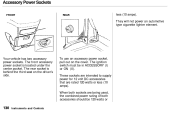
... Instruments and Controls They will not power an automotive type cigarette lighter element. When both accessories should be in ACCESSORY (I) or ON (II). These sockets are intended to supply power for 12 volt DC accessories that are being used, the combined power rating of both sockets are rated 120 watts ...or less (10 amps). The rear socket is located under the center pocket. The front accessory power socket is behind the third seat on the...
... Instruments and Controls They will not power an automotive type cigarette lighter element. When both accessories should be in ACCESSORY (I) or ON (II). These sockets are intended to supply power for 12 volt DC accessories that are being used, the combined power rating of both sockets are rated 120 watts ...or less (10 amps). The rear socket is located under the center pocket. The front accessory power socket is behind the third seat on the...
Owner's Manual
Page 134
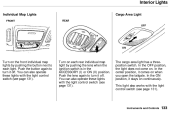
... FRONT REAR OFF Cargo Area Light ON Turn on the front individual map lights by pushing the lens when the ignition switch is in the ACCESSORY (I) or ON (II) position. You can also operate these lights with the light control switch (see page 131). In the center position, it off . This...
... FRONT REAR OFF Cargo Area Light ON Turn on the front individual map lights by pushing the lens when the ignition switch is in the ACCESSORY (I) or ON (II) position. You can also operate these lights with the light control switch (see page 131). In the center position, it off . This...
Owner's Manual
Page 163
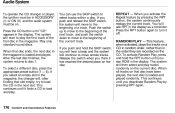
... tune to a higher frequency, or the lower part ( ) to tune to a desired frequency. Turn the system on AM is displayed. To change the frequency in ACCESSORY CD or ON (II) to change bands, press the AM/FM button. SEEK - On the FM band, ST will start to operate the audio system.
... tune to a higher frequency, or the lower part ( ) to tune to a desired frequency. Turn the system on AM is displayed. To change the frequency in ACCESSORY CD or ON (II) to change bands, press the AM/FM button. SEEK - On the FM band, ST will start to operate the audio system.
Owner's Manual
Page 170
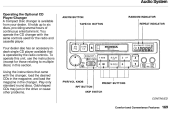
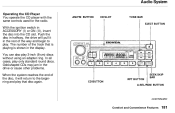
... and cassette player. Audio System Operating the Optional CD Player/Changer A Compact Disc changer is operated by the radio controls. Your dealer also has an accessory indash single CD player available that came with the same controls used for those relating to six discs, providing several hours of continuous entertainment. Using...
... and cassette player. Audio System Operating the Optional CD Player/Changer A Compact Disc changer is operated by the radio controls. Your dealer also has an accessory indash single CD player available that came with the same controls used for those relating to six discs, providing several hours of continuous entertainment. Using...
Owner's Manual
Page 171
.... When you see RPT in the display as a reminder. RANDOM PLAY - Audio System To operate the CD changer or player, the ignition must be in ACCESSORY (I) or ON (II) and the audio system must be on the CD. The system will then select and play . To select a different disc, press the...
.... When you see RPT in the display as a reminder. RANDOM PLAY - Audio System To operate the CD changer or player, the ignition must be in ACCESSORY (I) or ON (II) and the audio system must be on the CD. The system will then select and play . To select a different disc, press the...

Owner's Manual
Page 175
Adjust the volume by pushing the PWR/ VOL knob. The frequency numbers will be in ACCESSORY CD or ON (II) to find radio stations on the selected band: TUNE, SEEK, SCAN or the Preset buttons. To change bands, press the A M / F M button. ...
Adjust the volume by pushing the PWR/ VOL knob. The frequency numbers will be in ACCESSORY CD or ON (II) to find radio stations on the selected band: TUNE, SEEK, SCAN or the Preset buttons. To change bands, press the A M / F M button. ...
Owner's Manual
Page 182
.../RDM BUTTON CONTINUED Comfort and Convenience Features In all cases, play 3-inch (8-cm) discs without using an adapter ring. Odd-shaped CDs may jam in ACCESSORY (I) or ON (II), insert the disc into the CD slot. Push the disc in halfway, the drive will pull it will return to play that...
.../RDM BUTTON CONTINUED Comfort and Convenience Features In all cases, play 3-inch (8-cm) discs without using an adapter ring. Odd-shaped CDs may jam in ACCESSORY (I) or ON (II), insert the disc into the CD slot. Push the disc in halfway, the drive will pull it will return to play that...
Owner's Manual
Page 195
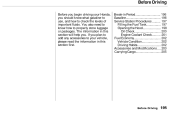
... Hood...198 Oil Check...200 Engine Coolant Check...201 Fuel Economy...202 Vehicle Condition...202 Driving Habits...202 Accessories and Modifications...203 Carrying Cargo...205 Before Driving Before Driving Before you begin driving your Honda, you should know how to your vehicle, please read the information in this section will help you...
... Hood...198 Oil Check...200 Engine Coolant Check...201 Fuel Economy...202 Vehicle Condition...202 Driving Habits...202 Accessories and Modifications...203 Carrying Cargo...205 Before Driving Before Driving Before you begin driving your Honda, you should know how to your vehicle, please read the information in this section will help you...
Owner's Manual
Page 203
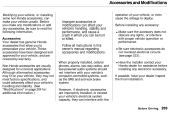
... cause a crash in this owner's manual regarding accessories and modifications. Accessories Your dealer has genuine Honda accessories that allow you to deploy. Non-Honda accessories are covered by warranty. Be sure electronic accessories do not overload electrical circuits (see page 323). These accessories have your vehicle. Have the installer contact your Honda dealer for additional information.) operation of your...
... cause a crash in this owner's manual regarding accessories and modifications. Accessories Your dealer has genuine Honda accessories that allow you to deploy. Non-Honda accessories are covered by warranty. Be sure electronic accessories do not overload electrical circuits (see page 323). These accessories have your vehicle. Have the installer contact your Honda dealer for additional information.) operation of your...
Owner's Manual
Page 204
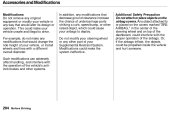
... steering wheel and on the airbag covers. This could be propelled inside the vehicle and hurt someone. For example, do not make the system ineffective. Accessories and Modifications Modifications Do not remove any original equipment or modify your airbags to drive. Such modifications can adversely affect handling, and interfere with a different...
... steering wheel and on the airbag covers. This could be propelled inside the vehicle and hurt someone. For example, do not make the system ineffective. Accessories and Modifications Modifications Do not remove any original equipment or modify your airbags to drive. Such modifications can adversely affect handling, and interfere with a different...

Owner's Manual
Page 206
... the total weight of all items that could injure their knees during a crash. Carrying Items in the Passenger Compartment Store or secure all occupants, cargo, accessories, and the tongue weight if you can carry. If the lid is 1,277 Ibs (580 kg). If you can affect handling and stability and cause...
... the total weight of all items that could injure their knees during a crash. Carrying Items in the Passenger Compartment Store or secure all occupants, cargo, accessories, and the tongue weight if you can carry. If the lid is 1,277 Ibs (580 kg). If you can affect handling and stability and cause...
