
Owner's Manual
Page 6
... Drive with Tethers...43 Additional Information About Your Seat Belts...45 Seat Belt System Components...45 Lap/Shoulder Belt...45 Seat Belt Maintenance...47 Additional Information About Your SRS...48 SRS Components...48 How Your Airbags Work...48 How the Automatic Seat Belt Tensioners Work......50 How the SRS Indicator Light Works...50 SRS Service...51 Additional Safety Precautions...52 Carbon Monoxide Hazard...53 Safety Labels...54 Important Safety Precautions ...6 Your Vehicle's Safety...
... Drive with Tethers...43 Additional Information About Your Seat Belts...45 Seat Belt System Components...45 Lap/Shoulder Belt...45 Seat Belt Maintenance...47 Additional Information About Your SRS...48 SRS Components...48 How Your Airbags Work...48 How the Automatic Seat Belt Tensioners Work......50 How the SRS Indicator Light Works...50 SRS Service...51 Additional Safety Precautions...52 Carbon Monoxide Hazard...53 Safety Labels...54 Important Safety Precautions ...6 Your Vehicle's Safety...
Owner's Manual
Page 52
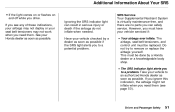
... a knowledgeable body shop. SRS Service Your Supplemental Restraint System is virtually maintenance-free, and there are no parts you to an authorized Honda dealer as soon as possible. This must be done by a dealer as soon as possible if the SRS light alerts you to remove or replace the airbags yourself. The airbags...
... a knowledgeable body shop. SRS Service Your Supplemental Restraint System is virtually maintenance-free, and there are no parts you to an authorized Honda dealer as soon as possible. This must be done by a dealer as soon as possible if the SRS light alerts you to remove or replace the airbags yourself. The airbags...

Owner's Manual
Page 58
... INDICATOR TRACTION CONTROL SYSTEM INDICATOR MAINTENANCE REQUIRED INDICATOR CRUISE CONTROL INDICATOR SUPPLEMENTAL RESTRAINT SYSTEM INDICATOR ANTI-LOCK BRAKE SYSTEM INDICATOR* PARKING BRAKE AND BRAKE SYSTEM INDICATOR* POWER SLIDING DOOR INDICATOR LOW OIL PRESSURE INDICATOR CHARGING SYSTEM INDICATOR MALFUNCTION INDICATOR LAMP LOW FUEL INDICATOR SEAT BELT REMINDER LIGHT DOOR AND BRAKE LAMP MONITOR...
... INDICATOR TRACTION CONTROL SYSTEM INDICATOR MAINTENANCE REQUIRED INDICATOR CRUISE CONTROL INDICATOR SUPPLEMENTAL RESTRAINT SYSTEM INDICATOR ANTI-LOCK BRAKE SYSTEM INDICATOR* PARKING BRAKE AND BRAKE SYSTEM INDICATOR* POWER SLIDING DOOR INDICATOR LOW OIL PRESSURE INDICATOR CHARGING SYSTEM INDICATOR MALFUNCTION INDICATOR LAMP LOW FUEL INDICATOR SEAT BELT REMINDER LIGHT DOOR AND BRAKE LAMP MONITOR...

Owner's Manual
Page 65
...indicator reminds you that it will light for two seconds when you first turn the ignition switch ON (II), and then flash for ten seconds. If you turn the ignition switch ON (II). 3. Turn off the engine. 2. Gauges Maintenance Required Indicator Your dealer will remain... pages 224 ,228. Refer to take your Honda dealer, reset the indicator as a constant reminder. Hold the button for Normal and Severe Driving Conditions on for scheduled maintenance. For the first 6,000 miles (9,600 km) after completing the scheduled maintenance. Instruments and Controls Between 6,000 miles (9,600...
...indicator reminds you that it will light for two seconds when you first turn the ignition switch ON (II), and then flash for ten seconds. If you turn the ignition switch ON (II). 3. Turn off the engine. 2. Gauges Maintenance Required Indicator Your dealer will remain... pages 224 ,228. Refer to take your Honda dealer, reset the indicator as a constant reminder. Hold the button for Normal and Severe Driving Conditions on for scheduled maintenance. For the first 6,000 miles (9,600 km) after completing the scheduled maintenance. Instruments and Controls Between 6,000 miles (9,600...

Owner's Manual
Page 220
...262 Winter Driving...262 Snow Tires...263 Tire Chains...263 Lights...264 Headlight Aiming...266 Replacing Bulbs...266 Storing Your Vehicle...275 Maintenance If you have the skills and tools to perform more complex maintenance tasks on how to obtain a copy, or see your...to follow basic maintenance safety precautions. See page 333 for simple maintenance tasks you may want to purchase the Service Manual. This section also includes Maintenance Schedules for normal driving and severe driving conditions, a Maintenance Record, and instructions for information on your Honda, you may want...
...262 Winter Driving...262 Snow Tires...263 Tire Chains...263 Lights...264 Headlight Aiming...266 Replacing Bulbs...266 Storing Your Vehicle...275 Maintenance If you have the skills and tools to perform more complex maintenance tasks on how to obtain a copy, or see your...to follow basic maintenance safety precautions. See page 333 for simple maintenance tasks you may want to purchase the Service Manual. This section also includes Maintenance Schedules for normal driving and severe driving conditions, a Maintenance Record, and instructions for information on your Honda, you may want...

Owner's Manual
Page 232
... pressure monthly. See page 242 . See page 257. See page 187 . Maintenance If weather conditions cause you to use the washers frequently, check the reservoir each time you fill the fuel tank. Lights - Engine oil level - See page 243. Check the operation of how to... wear and foreign objects. Check every time you are unsure of the headlights, parking lights, taillights, high-mount brake light, turn to perform any check, turn signals, brake lights, and license plate light monthly. See page 186. Windshield washer fluid - Check the fluid level monthly. See...
... pressure monthly. See page 242 . See page 257. See page 187 . Maintenance If weather conditions cause you to use the washers frequently, check the reservoir each time you fill the fuel tank. Lights - Engine oil level - See page 243. Check the operation of how to... wear and foreign objects. Check every time you are unsure of the headlights, parking lights, taillights, high-mount brake light, turn to perform any check, turn signals, brake lights, and license plate light monthly. See page 186. Windshield washer fluid - Check the fluid level monthly. See...
Owner's Manual
Page 237
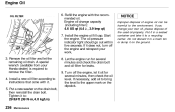
...8. Remove the oil filter and let the remaining oil drain. Tighten it does not, turn off the engine, let it . 5. The oil pressure indicator light should go out within five seconds. If it to remove the filter. 4. A special wrench (available from your work. 3. Refill the engine with it... sit for leaks. 9. Turn off the engine and reinspect your Honda dealer) is required to : 29 lbf.ft (39 N.m,4.0 kgf.m) Maintenance OIL FILTER NOTICE Improper disposal of the used oil properly. Engine Oil 6.
...8. Remove the oil filter and let the remaining oil drain. Tighten it does not, turn off the engine, let it . 5. The oil pressure indicator light should go out within five seconds. If it to remove the filter. 4. A special wrench (available from your work. 3. Refill the engine with it... sit for leaks. 9. Turn off the engine and reinspect your Honda dealer) is required to : 29 lbf.ft (39 N.m,4.0 kgf.m) Maintenance OIL FILTER NOTICE Improper disposal of the used oil properly. Engine Oil 6.

Owner's Manual
Page 243
... blade edges. Check the reservoir's fluid level by removing the cap and looking at least monthly during normal usage. This will light when the level is located behind the passenger's side headlight. LEVEL GAUGE Use only commercially-available windshield washer fluid. Antifreeze can ... vinegar/water solution can damage the windshield washer pump. This increases the cleaning capability and prevents freezing in the windshield washer reservoir. Maintenance On Canadian models The low washer level indicator will help to the cap. When you stop for fuel. NOTICE Do not use...
... blade edges. Check the reservoir's fluid level by removing the cap and looking at least monthly during normal usage. This will light when the level is located behind the passenger's side headlight. LEVEL GAUGE Use only commercially-available windshield washer fluid. Antifreeze can ... vinegar/water solution can damage the windshield washer pump. This increases the cleaning capability and prevents freezing in the windshield washer reservoir. Maintenance On Canadian models The low washer level indicator will help to the cap. When you stop for fuel. NOTICE Do not use...

Owner's Manual
Page 256
Releasing refrigerant into the atmosphere can do a couple of things to the front surface. Maintenance Any major maintenance, such as before, have the air conditioning system serviced, make sure the air conditioning works efficiently. This circulates the lubricating oil contained in the ...soft-bristle brush to remove them . You can damage the environment. Run it for at least once a week during the cold weather months. Use a light spray from a hose or a soft brush to clean them . Air Conditioning System Your vehicle's air conditioning is a sealed system.
Releasing refrigerant into the atmosphere can do a couple of things to the front surface. Maintenance Any major maintenance, such as before, have the air conditioning system serviced, make sure the air conditioning works efficiently. This circulates the lubricating oil contained in the ...soft-bristle brush to remove them . You can damage the environment. Run it for at least once a week during the cold weather months. Use a light spray from a hose or a soft brush to clean them . Air Conditioning System Your vehicle's air conditioning is a sealed system.

Owner's Manual
Page 265
A burned out bulb can create an unsafe condition by reducing your vehicle's visibility and the ability to other drivers. HEADLIGHT TURN SIGNAL/ SIDE MARKER/ PARKING LIGHTS Maintenance Lights Check the operation of your intentions to signal your vehicle's exterior lights at least once a month.
A burned out bulb can create an unsafe condition by reducing your vehicle's visibility and the ability to other drivers. HEADLIGHT TURN SIGNAL/ SIDE MARKER/ PARKING LIGHTS Maintenance Lights Check the operation of your intentions to signal your vehicle's exterior lights at least once a month.

Owner's Manual
Page 266
Refer to the chart on page 317 to determine what type of replacement bulb is needed. TURN SIGNAL LIGHT BACK-UP LIGHT LICENSE PLATE LIGHT Maintenance Lights Check the following: STOP/TAILLIGHTS/ SIDE MARKER LIGHTS TAILLIGHT HIGH-MOUNT BRAKE LIGHT Headlights (low and high beam) Parking lights Taillights Brake lights High-mount brake light Turn signals Back-up lights Hazard light function License plate light Side marker lights Daytime running lights (Canadian models) If you find any bulbs are burned out, replace them as soon as possible.
Refer to the chart on page 317 to determine what type of replacement bulb is needed. TURN SIGNAL LIGHT BACK-UP LIGHT LICENSE PLATE LIGHT Maintenance Lights Check the following: STOP/TAILLIGHTS/ SIDE MARKER LIGHTS TAILLIGHT HIGH-MOUNT BRAKE LIGHT Headlights (low and high beam) Parking lights Taillights Brake lights High-mount brake light Turn signals Back-up lights Hazard light function License plate light Side marker lights Daytime running lights (Canadian models) If you find any bulbs are burned out, replace them as soon as possible.

Owner's Manual
Page 267
...CONNECTOR Halogen headlight bulbs get very hot when lit. Remove the rubber weather seal by a Honda technician or other qualified mechanic. Pivot it with your vehicle was new. Open the hood. Lights Headlight Aiming The headlights were properly aimed when your skin or hard objects. Oil, perspiration... protect the glass from the bulb by its slot. Remove the electrical connector from contact with denatured alcohol and a clean cloth. Maintenance Unclip the end of the headlights should be required. If you need to overheat and shatter. 2. If you regularly carry heavy ...
...CONNECTOR Halogen headlight bulbs get very hot when lit. Remove the rubber weather seal by a Honda technician or other qualified mechanic. Pivot it with your vehicle was new. Open the hood. Lights Headlight Aiming The headlights were properly aimed when your skin or hard objects. Oil, perspiration... protect the glass from the bulb by its slot. Remove the electrical connector from contact with denatured alcohol and a clean cloth. Maintenance Unclip the end of the headlights should be required. If you need to overheat and shatter. 2. If you regularly carry heavy ...

Owner's Manual
Page 268
Make sure it is right side up; CONTINUED Maintenance Use a flat-tipped screwdriver to the left. 2. Replacing the Front Side Marker/ Turn Signal and Parking Light Bulb HOLDING CLIP 1. Pull the inner fender away from the inner fender. 3. Push the electrical connector onto the new bulb. If you are... of the headlight assembly. Turn on the passenger's side, turn the steering wheel to remove the two holding clips from the fender and bumper. Lights 5. If you are changing the bulb on the driver's side, start the engine, turn off the engine. Pivot the hold-down wire back ...
Make sure it is right side up; CONTINUED Maintenance Use a flat-tipped screwdriver to the left. 2. Replacing the Front Side Marker/ Turn Signal and Parking Light Bulb HOLDING CLIP 1. Pull the inner fender away from the inner fender. 3. Push the electrical connector onto the new bulb. If you are... of the headlight assembly. Turn on the passenger's side, turn the steering wheel to remove the two holding clips from the fender and bumper. Lights 5. If you are changing the bulb on the driver's side, start the engine, turn off the engine. Pivot the hold-down wire back ...

Owner's Manual
Page 269
... assembly mounting screw under each clip in place. 7. Install the two holding clips. Use a Phillips-head screwdriver to lock it in place. 8. Maintenance Replacing Rear Bulbs (in place. Determine which of the body by pushing on the edge with a small flat-tipped screwdriver. 2. Lock each cover.... 9. Remove the burned out bulb from the headlight assembly by turning it unlocks. 6. Put the inner fender in Fenders) 4. Test the lights to lock it in place by sliding it backward. Remove the socket from the socket by carefully prying on the center. 1. Install the ...
... assembly mounting screw under each clip in place. 7. Install the two holding clips. Use a Phillips-head screwdriver to lock it in place. 8. Maintenance Replacing Rear Bulbs (in place. Determine which of the body by pushing on the edge with a small flat-tipped screwdriver. 2. Lock each cover.... 9. Remove the burned out bulb from the headlight assembly by turning it unlocks. 6. Put the inner fender in Fenders) 4. Test the lights to lock it in place by sliding it backward. Remove the socket from the socket by carefully prying on the center. 1. Install the ...

Owner's Manual
Page 270
... (in place. Remove it by turning it clockwise until it one -quarter turn counterclockwise. 6. CONTINUED Maintenance Remove the socket by turning it locks. 8. Push the new bulb straight into the light assembly by carefully prying in place. Place a cloth on its socket. Reinstall the socket into the socket...the two bulbs is working. 9. Pull the bulb straight out of the taillight cover. Test the lights to make sure the new bulb is burned out: taillight or back-up light. 3. When reinstalling the taillight assembly, align and pop the snap fasteners in the notch on the...
... (in place. Remove it by turning it clockwise until it one -quarter turn counterclockwise. 6. CONTINUED Maintenance Remove the socket by turning it locks. 8. Push the new bulb straight into the light assembly by carefully prying in place. Place a cloth on its socket. Reinstall the socket into the socket...the two bulbs is working. 9. Pull the bulb straight out of the taillight cover. Test the lights to make sure the new bulb is burned out: taillight or back-up light. 3. When reinstalling the taillight assembly, align and pop the snap fasteners in the notch on the...

Owner's Manual
Page 271
... bottoms. Maintenance Remove a part of the lens by turning it bottoms. 5. Pull the bulb straight out of its socket. Use a Phillips-head screwdriver to make sure the new bulb is working. 7. Pull the bulb straight out of its edge with a small flat-tipped screwdriver. 2. SCREW Replacing a High-mount Brake Light Bulb 1. Remove...
... bottoms. Maintenance Remove a part of the lens by turning it bottoms. 5. Pull the bulb straight out of its socket. Use a Phillips-head screwdriver to make sure the new bulb is working. 7. Pull the bulb straight out of its edge with a small flat-tipped screwdriver. 2. SCREW Replacing a High-mount Brake Light Bulb 1. Remove...

Owner's Manual
Page 272
... turn it in place. 7. Remove the lens from the bulb holder by carefully prying on both sides of the holder. 3. Reinstall the lens piece. CONTINUED Maintenance Lights 6. Install the screw and tighten it bottoms in until it securely. Push the new bulb in the socket. Put the socket back into the tailgate...
... turn it in place. 7. Remove the lens from the bulb holder by carefully prying on both sides of the holder. 3. Reinstall the lens piece. CONTINUED Maintenance Lights 6. Install the screw and tighten it bottoms in until it securely. Push the new bulb in the socket. Put the socket back into the tailgate...

Owner's Manual
Page 273
Push on the right side to latch the assembly into the hole. Replacing Bulbs in the Interior Lights The individual map lights, cargo area light, and the vanity mirror lights come apart the same way. Put the lens back on the edge of the lens with a fingernail file or a small flat-tip screwdriver. ...the housing around the lens. Remove the lens by carefully prying on the bulb holder and push it until it latches. 6. FRONT INDIVIDUAL MAP LIGHT Maintenance Turn on the edge of the light assembly into place. 1. Do not pry on the parking lights and check that the new bulb is working...
Push on the right side to latch the assembly into the hole. Replacing Bulbs in the Interior Lights The individual map lights, cargo area light, and the vanity mirror lights come apart the same way. Put the lens back on the edge of the lens with a fingernail file or a small flat-tip screwdriver. ...the housing around the lens. Remove the lens by carefully prying on the bulb holder and push it until it latches. 6. FRONT INDIVIDUAL MAP LIGHT Maintenance Turn on the edge of the light assembly into place. 1. Do not pry on the parking lights and check that the new bulb is working...

Owner's Manual
Page 274
Snap the lens back in front of the lens near the vent. Cargo area light: Pry on the rear edge to the left and right of its metal tabs. 3. Remove the bulb by pulling it straight out of center. 2. CARGO AREA LIGHT REAR INDIVIDUAL MAP LIGHT CONTINUED Maintenance Rear individual map light: Pry on the middle edge of both map lights. Push the new bulb into the metal tabs. Lights Front individual map light: Pry on the front edge in place.
Snap the lens back in front of the lens near the vent. Cargo area light: Pry on the rear edge to the left and right of its metal tabs. 3. Remove the bulb by pulling it straight out of center. 2. CARGO AREA LIGHT REAR INDIVIDUAL MAP LIGHT CONTINUED Maintenance Rear individual map light: Pry on the middle edge of both map lights. Push the new bulb into the metal tabs. Lights Front individual map light: Pry on the front edge in place.

Owner's Manual
Page 333
...Mirrors...115 Seats...100 Steering Wheel...72 Airbag (SRS)...9, 49 Air Cleaner Element...246 Air Conditioning Filter...256 Air Conditioning System...130, 138 Maintenance...255 Rear A / C Control...146 Usage...130, 138 Air Outlets (Vents)...132, 138 Air Pressure, Tires...257 Alcohol in Gasoline..... 78 Appearance Care...277 Armrests...103 Audio Controls, Remote...179 Audio System...149, 161 Automatic Seat Belt Tensioners...50 Automatic Lighting Off Feature...67 Automatic Speed Control...73 Automatic Transmission...198 Capacity, Fluid...316 Checking Fluid Level...243 Shifting...199 Shift Lever ...
...Mirrors...115 Seats...100 Steering Wheel...72 Airbag (SRS)...9, 49 Air Cleaner Element...246 Air Conditioning Filter...256 Air Conditioning System...130, 138 Maintenance...255 Rear A / C Control...146 Usage...130, 138 Air Outlets (Vents)...132, 138 Air Pressure, Tires...257 Alcohol in Gasoline..... 78 Appearance Care...277 Armrests...103 Audio Controls, Remote...179 Audio System...149, 161 Automatic Seat Belt Tensioners...50 Automatic Lighting Off Feature...67 Automatic Speed Control...73 Automatic Transmission...198 Capacity, Fluid...316 Checking Fluid Level...243 Shifting...199 Shift Lever ...


