Owner's Manual
Page 4
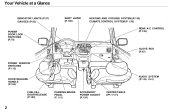
Your Vehicle at a Glance INDICATOR LIGHTS (P.57) GAUGES (P.62) SHIFT LEVER (P.199) HEATING AND COOLING SYSTEM (P.130) CLIMATE CONTROL SYSTEM (P. 138) REAR A/C CONTROL (P.146) POWER DOOR LOCK SWITCHES (P.79) GLOVE BOX (P.87) POWER WINDOW SWITCHES (P.113) HOOD RELEASE HANDLE (P.184) CENTER TABLE (P:117) AUDIO SYSTEM (P.149, l161) FUEL FILL DOOR RELEASE (P.183) PARKING BRAKE PEDAL (P. 116) ACCESSORY POWER SOCKET (P.124)
Your Vehicle at a Glance INDICATOR LIGHTS (P.57) GAUGES (P.62) SHIFT LEVER (P.199) HEATING AND COOLING SYSTEM (P.130) CLIMATE CONTROL SYSTEM (P. 138) REAR A/C CONTROL (P.146) POWER DOOR LOCK SWITCHES (P.79) GLOVE BOX (P.87) POWER WINDOW SWITCHES (P.113) HOOD RELEASE HANDLE (P.184) CENTER TABLE (P:117) AUDIO SYSTEM (P.149, l161) FUEL FILL DOOR RELEASE (P.183) PARKING BRAKE PEDAL (P. 116) ACCESSORY POWER SOCKET (P.124)

Owner's Manual
Page 55
If a label comes off or becomes hard to read, contact your Honda dealer for a replacement. HOOD DASH BOARD U.S. models only SUN VISOR U.S. They warn you of potential hazards that could cause serious injury. models Canadian models RADIATOR CAP Driver and Passenger Safety Read these labels carefully. Safety Labels These labels are in the locations shown.
If a label comes off or becomes hard to read, contact your Honda dealer for a replacement. HOOD DASH BOARD U.S. models only SUN VISOR U.S. They warn you of potential hazards that could cause serious injury. models Canadian models RADIATOR CAP Driver and Passenger Safety Read these labels carefully. Safety Labels These labels are in the locations shown.

Owner's Manual
Page 57
Control Locations POWER SLIDING DOOR SWITCHES (P.90) MIRROR CONTROLS (P.115) DIGITAL CLOCK (P.117) HEATING/COOLING CONTROLS (P.130) CLIMATE CONTROL SYSTEM (P.138) DOOR LOCK SWITCHES (P.79) REAR A/C UNIT CONTROL (P.146) POWER WINDOW SWITCHES (P.113) AUDIO SYSTEM (P.149, 161) FUEL FILL DOOR RELEASE (P.183) HOOD RELEASE HANDLE (P.184) Instruments and Controls
Control Locations POWER SLIDING DOOR SWITCHES (P.90) MIRROR CONTROLS (P.115) DIGITAL CLOCK (P.117) HEATING/COOLING CONTROLS (P.130) CLIMATE CONTROL SYSTEM (P.138) DOOR LOCK SWITCHES (P.79) REAR A/C UNIT CONTROL (P.146) POWER WINDOW SWITCHES (P.113) AUDIO SYSTEM (P.149, 161) FUEL FILL DOOR RELEASE (P.183) HOOD RELEASE HANDLE (P.184) Instruments and Controls

Owner's Manual
Page 182
... this section first. The information in Period...182 Gasoline...182 Service Station Procedures ...183 Filling the Fuel Tank...183 Opening the Hood...184 Oil Check...186 Engine Coolant Check...187 Fuel Economy...188 Vehicle Condition...188 Driving Habits...188 Accessories and Modifications...189 Carrying ...Cargo...191 Before Driving If you plan to add any accessories to your Honda, you should know how to check the levels of important fluids. You also need to know what gasoline to use, and how ...
... this section first. The information in Period...182 Gasoline...182 Service Station Procedures ...183 Filling the Fuel Tank...183 Opening the Hood...184 Oil Check...186 Engine Coolant Check...187 Fuel Economy...188 Vehicle Condition...188 Driving Habits...188 Accessories and Modifications...189 Carrying ...Cargo...191 Before Driving If you plan to add any accessories to your Honda, you should know how to check the levels of important fluids. You also need to know what gasoline to use, and how ...

Owner's Manual
Page 185
...after the fuel pump automatically clicks off " the tank, leave some room for the fuel to Park or Neutral and set the parking brake. The hood will pop up on the fuel fill door. 4. Place the cap in front of the vehicle, put your fingers under the lower left corner of... the hood. Service Station Procedures 3. The hood latch handle is above the " H " logo. LATCH Opening the Hood HOOD RELEASE HANDLE 1. Pull the hood release handle located under the front edge of the dashboard. Standing in the holder on this...
...after the fuel pump automatically clicks off " the tank, leave some room for the fuel to Park or Neutral and set the parking brake. The hood will pop up on the fuel fill door. 4. Place the cap in front of the vehicle, put your fingers under the lower left corner of... the hood. Service Station Procedures 3. The hood latch handle is above the " H " logo. LATCH Opening the Hood HOOD RELEASE HANDLE 1. Pull the hood release handle located under the front edge of the dashboard. Standing in the holder on this...

Owner's Manual
Page 186
...about a foot (30 cm) above the fender, then let it is securely latched. Service Station Procedures If you can open the hood without lifting the hood latch handle, or the hood latch handle moves stiffly or does not spring back as before, the mechanism should be cleaned and lubricated (see page 248 ). ...After closing the hood, make sure it drop. Lower the hood to remove the support rod from the hole. Pull the support rod out of the hood. CONTINUED Before Driving Put the support rod back into the hole on the driver's ...
...about a foot (30 cm) above the fender, then let it is securely latched. Service Station Procedures If you can open the hood without lifting the hood latch handle, or the hood latch handle moves stiffly or does not spring back as before, the mechanism should be cleaned and lubricated (see page 248 ). ...After closing the hood, make sure it drop. Lower the hood to remove the support rod from the hole. Pull the support rod out of the hood. CONTINUED Before Driving Put the support rod back into the hole on the driver's ...
Owner's Manual
Page 197
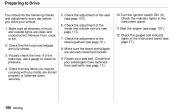
... all windows, mirrors, and outside mirrors (see page 100). 6. Check that any items you may be carrying with you drive your vehicle. 1. Check that the hood and tailgate are clean and unobstructed. Make sure the doors and tailgate are stored properly or fastened down securely. 5. Driving
... all windows, mirrors, and outside mirrors (see page 100). 6. Check that any items you may be carrying with you drive your vehicle. 1. Check that the hood and tailgate are clean and unobstructed. Make sure the doors and tailgate are stored properly or fastened down securely. 5. Driving

Owner's Manual
Page 220
......239 Windshield Washers...242 Automatic Transmission Fluid...243 Brake Fluid...244 Brake System...244 Power Steering...245 Air Cleaner Element...246 Hood Latch...248 Spark Plugs...248 Replacement...248 Specifications...250 Battery...251 Wiper Blades...253 Air Conditioning System...255 Air Conditioning Filter......you may want to purchase the Service Manual. Maintenance This section explains why it is important to keep your Honda dealer. This section also includes Maintenance Schedules for normal driving and severe driving conditions, a Maintenance Record, and instructions for information on...
......239 Windshield Washers...242 Automatic Transmission Fluid...243 Brake Fluid...244 Brake System...244 Power Steering...245 Air Cleaner Element...246 Hood Latch...248 Spark Plugs...248 Replacement...248 Specifications...250 Battery...251 Wiper Blades...253 Air Conditioning System...255 Air Conditioning Filter......you may want to purchase the Service Manual. Maintenance This section explains why it is important to keep your Honda dealer. This section also includes Maintenance Schedules for normal driving and severe driving conditions, a Maintenance Record, and instructions for information on...
Owner's Manual
Page 236
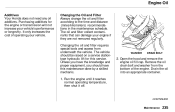
Engine Oil Additives Your Honda does not need any oil additives. Changing the oil and filter requires special tools and access from the bottom of operating your engine if they ... increase your vehicle's performance or longevity. CONTINUED Maintenance Purchasing additives for this maintenance done by a skilled mechanic. 1. The vehicle should have this service. Open the hood and remove the engine oil fill cap. Changing the Oil and Filter Always change the oil and filter according to the time and distance (miles...
Engine Oil Additives Your Honda does not need any oil additives. Changing the oil and filter requires special tools and access from the bottom of operating your engine if they ... increase your vehicle's performance or longevity. CONTINUED Maintenance Purchasing additives for this maintenance done by a skilled mechanic. 1. The vehicle should have this service. Open the hood and remove the engine oil fill cap. Changing the Oil and Filter Always change the oil and filter according to the time and distance (miles...

Owner's Manual
Page 240
... in the maintenance schedule. Loosen the drain plug on the bottom of the vehicle. Open the hood. Cooling System Replacing Engine Coolant The cooling system should have this maintenance done by a skilled mechanic. Only use Genuine Honda Antifreeze/Coolant. Turn the heater temperature control dial fully clockwise. The coolant will drain through...
... in the maintenance schedule. Loosen the drain plug on the bottom of the vehicle. Open the hood. Cooling System Replacing Engine Coolant The cooling system should have this maintenance done by a skilled mechanic. Only use Genuine Honda Antifreeze/Coolant. Turn the heater temperature control dial fully clockwise. The coolant will drain through...

Owner's Manual
Page 249
Follow the time and distance recommendations in the Maintenance Schedule. Replacement HOLDING CLIP Clean the hood latch assembly with a mild cleaner, then lubricate it straight up any dirt and oil that have collected around the ignition coils. Loosen the two holding ... . 2. Remove the cover on the front cylinder bank by pulling it with a flat-tipped screwdriver. If you are a special platinum-tipped design for longer life. Hood Latch, Spark Plugs Hood Latch LATCH ASSEMBLY Spark Plugs The spark plugs in your...
Follow the time and distance recommendations in the Maintenance Schedule. Replacement HOLDING CLIP Clean the hood latch assembly with a mild cleaner, then lubricate it straight up any dirt and oil that have collected around the ignition coils. Loosen the two holding ... . 2. Remove the cover on the front cylinder bank by pulling it with a flat-tipped screwdriver. If you are a special platinum-tipped design for longer life. Hood Latch, Spark Plugs Hood Latch LATCH ASSEMBLY Spark Plugs The spark plugs in your...

Owner's Manual
Page 267
... the glass can cause the bulb to change the headlight bulb on the driver's side, remove the air intake cover (see page 246). Open the hood. Lights Headlight Aiming The headlights were properly aimed when your skin or hard objects. If you touch the glass, clean it by... a Honda technician or other qualified mechanic. Remove the electrical connector from contact with denatured alcohol and a clean cloth. If you regularly carry heavy items in the ...
... the glass can cause the bulb to change the headlight bulb on the driver's side, remove the air intake cover (see page 246). Open the hood. Lights Headlight Aiming The headlights were properly aimed when your skin or hard objects. If you touch the glass, clean it by... a Honda technician or other qualified mechanic. Remove the electrical connector from contact with denatured alcohol and a clean cloth. If you regularly carry heavy items in the ...

Owner's Manual
Page 296
... may be working, so you may not be an electrical problem, such as no power to start a Honda by using a booster battery. Although this seems like ice, do not follow these directions closely: 1. Open the hood and check the physical condition of the battery (see page 77). If it . A key that is...
... may be working, so you may not be an electrical problem, such as no power to start a Honda by using a booster battery. Although this seems like ice, do not follow these directions closely: 1. Open the hood and check the physical condition of the battery (see page 77). If it . A key that is...

Owner's Manual
Page 298
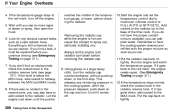
... almost immediately. The only indication may see steam or spray coming out. Turn off the engine. 3. If the high heat is coming from under the hood. Taking Care of the road. Safely pull to the midpoint then continue driving. If you are driving up a long steep hill on a hot day... a long, steep hill on a very hot day. Put the transmission in the midrange under the hood, turn off the heating and cooling/ climate control system and all other accessories. Do not open the hood if steam is due to the red mark, you should determine the reason. If Your Engine Overheats...
... almost immediately. The only indication may see steam or spray coming out. Turn off the engine. 3. If the high heat is coming from under the hood. Taking Care of the road. Safely pull to the midpoint then continue driving. If you are driving up a long steep hill on a hot day... a long, steep hill on a very hot day. Put the transmission in the midrange under the hood, turn off the heating and cooling/ climate control system and all other accessories. Do not open the hood if steam is due to the red mark, you should determine the reason. If Your Engine Overheats...
Owner's Manual
Page 299
... Towing on page 311). 7. If the temperature gauge stays at 90°F/32°C). Remember to the base of steam or spray, then open the hood. 6. Add coolant to the radiator up to have to add coolant to halfway between the M I N and MAX marks. 8. Wait until it goes back to spray...
... Towing on page 311). 7. If the temperature gauge stays at 90°F/32°C). Remember to the base of steam or spray, then open the hood. 6. Add coolant to the radiator up to have to add coolant to halfway between the M I N and MAX marks. 8. Wait until it goes back to spray...

Owner's Manual
Page 300
... Unexpected Start the engine and watch the oil pressure indicator. In either case, you can lose pressure during cornering and other driving maneuvers. 3. Open the hood and check the oil level (see page 233). Turn on the dipstick (see page 186). If it starts flashing, it shows that the oil pressure...
... Unexpected Start the engine and watch the oil pressure indicator. In either case, you can lose pressure during cornering and other driving maneuvers. 3. Open the hood and check the oil level (see page 233). Turn on the dipstick (see page 186). If it starts flashing, it shows that the oil pressure...

Owner's Manual
Page 305
...), which fuse or fuses control that a blown fuse is not the cause. Replace any blown fuses and check the component's operation. 1. Fuses UNDER-HOOD UNDER-HOOD The primary under-hood fuse box is located in the engine compartment next to LOCK (0). Determine from the fuse box. Checking and Replacing Fuses If something electrical...
...), which fuse or fuses control that a blown fuse is not the cause. Replace any blown fuses and check the component's operation. 1. Fuses UNDER-HOOD UNDER-HOOD The primary under-hood fuse box is located in the engine compartment next to LOCK (0). Determine from the fuse box. Checking and Replacing Fuses If something electrical...

Owner's Manual
Page 306
Check each fuse with one of the spare fuses of the Unexpected Removing these fuses requires a Phillips-head screwdriver. 4. CONTINUED Taking Care of the same rating or lower. Fuses BLOWN BLOWN FUSE PULLER 3. Check the smaller fuses in the under -hood fuse box. 5. If it is burned, replace it with the fuse puller provided in the primary under-hood fuse box by pulling out each of the large fuses in the primary under -hood fuse box and all the fuses in the interior fuse boxes by looking through the top at the wire inside the fuse. Look for a burned wire inside .
Check each fuse with one of the spare fuses of the Unexpected Removing these fuses requires a Phillips-head screwdriver. 4. CONTINUED Taking Care of the same rating or lower. Fuses BLOWN BLOWN FUSE PULLER 3. Check the smaller fuses in the under -hood fuse box. 5. If it is burned, replace it with the fuse puller provided in the primary under-hood fuse box by pulling out each of the large fuses in the primary under -hood fuse box and all the fuses in the interior fuse boxes by looking through the top at the wire inside the fuse. Look for a burned wire inside .

Owner's Manual
Page 308
Fuses PRIMARY UNDER-HOOD FUSE BOX * SECONDARY UNDER-HOOD FUSE BOX : EX model * : EX model CONTINUED Taking Care of the Unexpected
Fuses PRIMARY UNDER-HOOD FUSE BOX * SECONDARY UNDER-HOOD FUSE BOX : EX model * : EX model CONTINUED Taking Care of the Unexpected
Owner's Manual
Page 337
... GVWR (Gross Vehicle Weight Rating) ...213 Heating and Cooling...130 High Altitude, Starting at...197 High-Low Beam Switch ...66 HomeLink Universal Transmitter...95 Hood Latch...248 Hood, Opening the ...184 Horn...65 Hot Coolant, Warning about...237 Hydroplaning...211 Inflation, Proper Tire ...257 Inside Mirror...115 Inspection,Tire...259 Instrument Panel...
... GVWR (Gross Vehicle Weight Rating) ...213 Heating and Cooling...130 High Altitude, Starting at...197 High-Low Beam Switch ...66 HomeLink Universal Transmitter...95 Hood Latch...248 Hood, Opening the ...184 Horn...65 Hot Coolant, Warning about...237 Hydroplaning...211 Inflation, Proper Tire ...257 Inside Mirror...115 Inspection,Tire...259 Instrument Panel...


