Owner's Manual
Page 4
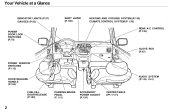
Your Vehicle at a Glance INDICATOR LIGHTS (P.57) GAUGES (P.62) SHIFT LEVER (P.199) HEATING AND COOLING SYSTEM (P.130) CLIMATE CONTROL SYSTEM (P. 138) REAR A/C CONTROL (P.146) POWER DOOR LOCK SWITCHES (P.79) GLOVE BOX (P.87) POWER WINDOW SWITCHES (P.113) HOOD RELEASE HANDLE (P.184) CENTER TABLE (P:117) AUDIO SYSTEM (P.149, l161) FUEL FILL DOOR RELEASE (P.183) PARKING BRAKE PEDAL (P. 116) ACCESSORY POWER SOCKET (P.124)
Your Vehicle at a Glance INDICATOR LIGHTS (P.57) GAUGES (P.62) SHIFT LEVER (P.199) HEATING AND COOLING SYSTEM (P.130) CLIMATE CONTROL SYSTEM (P. 138) REAR A/C CONTROL (P.146) POWER DOOR LOCK SWITCHES (P.79) GLOVE BOX (P.87) POWER WINDOW SWITCHES (P.113) HOOD RELEASE HANDLE (P.184) CENTER TABLE (P:117) AUDIO SYSTEM (P.149, l161) FUEL FILL DOOR RELEASE (P.183) PARKING BRAKE PEDAL (P. 116) ACCESSORY POWER SOCKET (P.124)
Owner's Manual
Page 56
...108 Removing the Bench Seat in the Second Row...109 Folding the Third Seat...110 Power Windows...113 Mirrors...115 Parking Brake...116 Digital Clock...117 Center Table...117 Beverage Holder...118 Sunglasses Holder...120 Sun Visor...121 Vanity Mirror...121 Rear ...Lights...67 Instrument Panel Brightness...67 Turn Signals...68 Windshield Wipers...68 Windshield Washers...70 Rear Window Wiper and Washer...70 All the essential controls are within easy reach. Instruments and Controls This section gives information about the controls and displays that contribute to the daily operation of your Honda...
...108 Removing the Bench Seat in the Second Row...109 Folding the Third Seat...110 Power Windows...113 Mirrors...115 Parking Brake...116 Digital Clock...117 Center Table...117 Beverage Holder...118 Sunglasses Holder...120 Sun Visor...121 Vanity Mirror...121 Rear ...Lights...67 Instrument Panel Brightness...67 Turn Signals...68 Windshield Wipers...68 Windshield Washers...70 Rear Window Wiper and Washer...70 All the essential controls are within easy reach. Instruments and Controls This section gives information about the controls and displays that contribute to the daily operation of your Honda...

Owner's Manual
Page 58
... PRESSURE INDICATOR CHARGING SYSTEM INDICATOR MALFUNCTION INDICATOR LAMP LOW FUEL INDICATOR SEAT BELT REMINDER LIGHT DOOR AND BRAKE LAMP MONITOR * The U.S. instrument panel is a reminder to protect yourselves by fastening the seat belts. Seat Belt Reminder Light This indicator lights when you do not fasten your seat belt, the beeper will stop after a few...
... PRESSURE INDICATOR CHARGING SYSTEM INDICATOR MALFUNCTION INDICATOR LAMP LOW FUEL INDICATOR SEAT BELT REMINDER LIGHT DOOR AND BRAKE LAMP MONITOR * The U.S. instrument panel is a reminder to protect yourselves by fastening the seat belts. Seat Belt Reminder Light This indicator lights when you do not fasten your seat belt, the beeper will stop after a few...

Owner's Manual
Page 59
...you turn the ignition switch ON (II) as a reminder to check the parking brake. Supplemental Restraint System Indicator This indicator lights when you release the parking brake with the parking brake applied can indicate a problem in the supplemental restraint system. Instruments and Controls Low... goes off after you turn the ignition switch ON (II). Canada SRS Parking Brake and Brake System Indicator This light has two functions: BRAKE 1. If the parking brake is not set , it can damage the brakes and tires. 2. Driving with the engine running , the battery is set ,...
...you turn the ignition switch ON (II) as a reminder to check the parking brake. Supplemental Restraint System Indicator This indicator lights when you release the parking brake with the parking brake applied can indicate a problem in the supplemental restraint system. Instruments and Controls Low... goes off after you turn the ignition switch ON (II). Canada SRS Parking Brake and Brake System Indicator This light has two functions: BRAKE 1. If the parking brake is not set , it can damage the brakes and tires. 2. Driving with the engine running , the battery is set ,...

Owner's Manual
Page 60
...the ignition ON (II) and goes off the Traction Control System. 2. If this happens, take the vehicle to your vehicle still has normal braking ability but no anti-lock. If it comes on and stays on when the Traction Control System is regulating wheelspin. 3. Canada TCS Traction ...Control System (TCS) Indicator On EX model Anti-lock Brake System (ABS) Indicator This light normally comes on for more information on , your dealer to have turned off after the engine starts. It flashes when the TCS...
...the ignition ON (II) and goes off the Traction Control System. 2. If this happens, take the vehicle to your vehicle still has normal braking ability but no anti-lock. If it comes on and stays on when the Traction Control System is regulating wheelspin. 3. Canada TCS Traction ...Control System (TCS) Indicator On EX model Anti-lock Brake System (ABS) Indicator This light normally comes on for more information on , your dealer to have turned off after the engine starts. It flashes when the TCS...
Owner's Manual
Page 61
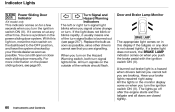
..., move the main switch on the dashboard to the OFF position, and have the system checked by your brake lights repaired right away. All the lights in the power sliding door system. The lights go off after the engine starts and the tailgate and all doors are closed tightly. All turn signals on... Have your Honda dealer as soon as possible, since other time, there is burned out (see page 267). If the light does not blink or blinks rapidly, it comes on at any door is a hazard when drivers behind you cannot tell you turn the ignition switch ON (II). If a brake light does not ...
..., move the main switch on the dashboard to the OFF position, and have the system checked by your brake lights repaired right away. All the lights in the power sliding door system. The lights go off after the engine starts and the tailgate and all doors are closed tightly. All turn signals on... Have your Honda dealer as soon as possible, since other time, there is burned out (see page 267). If the light does not blink or blinks rapidly, it comes on at any door is a hazard when drivers behind you cannot tell you turn the ignition switch ON (II). If a brake light does not ...

Owner's Manual
Page 62
... reduced brightness when the Daytime Running Lights (DRL) are on with the high beam headlights. On Canadian models, this light come on the headlight controls. Low Fuel Indicator This light comes on the headlights or release the parking brake. Indicator Lights "Daytime Running Lights" Indicator Canadian models only This indicator lights when you set . It should go...
... reduced brightness when the Daytime Running Lights (DRL) are on with the high beam headlights. On Canadian models, this light come on the headlight controls. Low Fuel Indicator This light comes on the headlights or release the parking brake. Indicator Lights "Daytime Running Lights" Indicator Canadian models only This indicator lights when you set . It should go...

Owner's Manual
Page 68
... the parking brake. Instruments and Controls Controls Near the Steering Wheel Automatic Lighting Off Feature On EX model The Automatic Lighting Off feature turns off the headlights, parking lights, taillights, side marker lights, license plate lights and instrument panel lights within 15 seconds, the lights will go off. Daytime Running Lights (Canadian Models... turn off , even if you unlock the door, but do not open it within 15 seconds of the instrument panel lights. This feature activates if you leave the headlight switch in the or position, remove the key, and open the door and get...
... the parking brake. Instruments and Controls Controls Near the Steering Wheel Automatic Lighting Off Feature On EX model The Automatic Lighting Off feature turns off the headlights, parking lights, taillights, side marker lights, license plate lights and instrument panel lights within 15 seconds, the lights will go off. Daytime Running Lights (Canadian Models... turn off , even if you unlock the door, but do not open it within 15 seconds of the instrument panel lights. This feature activates if you leave the headlight switch in the or position, remove the key, and open the door and get...

Owner's Manual
Page 75
...Accelerate to the desired speed, press the SET/decel button. Each time you do this , your vehicle will slow down hills. Tap the brake pedal lightly with your vehicle will speed up and down about 1 mph (1.6 km/h). Instruments and Controls To increase your speed increases going up about ...desired cruising speed, release the button. If your speed in very small amounts, tap the SET/decel button repeatedly. The CRUISE CONTROL light on the instrument panel will decelerate. When climbing a steep hill, the automatic transmission may not hold the set speed when you ...
...Accelerate to the desired speed, press the SET/decel button. Each time you do this , your vehicle will slow down hills. Tap the brake pedal lightly with your vehicle will speed up and down about 1 mph (1.6 km/h). Instruments and Controls To increase your speed increases going up about ...desired cruising speed, release the button. If your speed in very small amounts, tap the SET/decel button repeatedly. The CRUISE CONTROL light on the instrument panel will decelerate. When climbing a steep hill, the automatic transmission may not hold the set speed when you ...

Owner's Manual
Page 76
.... To return to that speed, accelerate to above 25 mph (40 km/h) and then press the RESUME/accel button until the CRUISE CONTROL light comes on the brake pedal will begin to speed up for passing. Resting your foot off and erases the previous cruising speed from memory. You can use the... will accelerate to the set cruising speed. Steering Wheel Controls Even with the cruise control turned on, you push the CANCEL button, or tap the brake pedal, the CRUISE CONTROL light on the steering wheel. After completing the pass, take your foot on .
.... To return to that speed, accelerate to above 25 mph (40 km/h) and then press the RESUME/accel button until the CRUISE CONTROL light comes on the brake pedal will begin to speed up for passing. Resting your foot off and erases the previous cruising speed from memory. You can use the... will accelerate to the set cruising speed. Steering Wheel Controls Even with the cruise control turned on, you push the CANCEL button, or tap the brake pedal, the CRUISE CONTROL light on the steering wheel. After completing the pass, take your foot on .

Owner's Manual
Page 117
...the rearbrakes and axles. Mirrors, Parking Brake Parking Brake NOTICE Driving the vehicle with your foot. To release the parking brake, push on the heaters by pressing the button. With the ignition switch ON (II), turn the heaters off. The light in the button comes on the ...instrument panel should go out when the parking brake is fully released with the engine running, (see page 58.) Instruments and Controls The parking brake light on as a reminder. HEATED MIRROR BUTTON PARKING BRAKE PEDAL Canadian Models The ...
...the rearbrakes and axles. Mirrors, Parking Brake Parking Brake NOTICE Driving the vehicle with your foot. To release the parking brake, push on the heaters by pressing the button. With the ignition switch ON (II), turn the heaters off. The light in the button comes on the ...instrument panel should go out when the parking brake is fully released with the engine running, (see page 58.) Instruments and Controls The parking brake light on as a reminder. HEATED MIRROR BUTTON PARKING BRAKE PEDAL Canadian Models The ...

Owner's Manual
Page 190
Accessories Your dealer has Genuine Honda accessories that allow you can affect your vehicle's handling,... before installing any accessories, be hurt or killed. Have the installer contact your Honda dealer for universal applications. Non-Honda accessories are covered by warranty. Although aftermarket accessories may fit on your vehicle, ...Modifying your vehicle, or installing some non-Honda accessories, can interfere with the Before Driving Before installing any accessory: Make sure the accessory does not obscure any lights, or interfere with your vehicle's computer-controlled...
Accessories Your dealer has Genuine Honda accessories that allow you can affect your vehicle's handling,... before installing any accessories, be hurt or killed. Have the installer contact your Honda dealer for universal applications. Non-Honda accessories are covered by warranty. Although aftermarket accessories may fit on your vehicle, ...Modifying your vehicle, or installing some non-Honda accessories, can interfere with the Before Driving Before installing any accessory: Make sure the accessory does not obscure any lights, or interfere with your vehicle's computer-controlled...

Owner's Manual
Page 204
...leaves, tall grass, or other flammable materials. This keeps the vehicle from moving and putting pressure on the instrument panel shows that the parking brake is fully released before you want to move the shift lever out of Park when you put the transmission in Park. If the vehicle is... driving away. making it does not indicate that the parking brake is facing uphill, turn the front wheels toward the curb. Make sure the parking brake is firmly set can overheat or damage the rear brakes. Turn off the lights. it easier to drive away. Parking Tips Make sure the windows are closed....
...leaves, tall grass, or other flammable materials. This keeps the vehicle from moving and putting pressure on the instrument panel shows that the parking brake is fully released before you want to move the shift lever out of Park when you put the transmission in Park. If the vehicle is... driving away. making it does not indicate that the parking brake is facing uphill, turn the front wheels toward the curb. Make sure the parking brake is firmly set can overheat or damage the rear brakes. Turn off the lights. it easier to drive away. Parking Tips Make sure the windows are closed....

Owner's Manual
Page 205
...It also keeps your brake lights on all vehicles have the brake pads replaced, they will hear a distinctive metallic "screeching" sound when you apply the brakes. If not, apply them lightly. If you intend to stop with wet brakes, be extra cautious and alert in your brakes work. Do not ...confusing drivers behind you will begin screeching all the time. When the brake pads need replacing, you . The Braking System Your Honda is needed on the brake pedal. A power assist helps reduce the effort needed to brake. Resting your foot on the rear wheels are drum. Use the ...
...It also keeps your brake lights on all vehicles have the brake pads replaced, they will hear a distinctive metallic "screeching" sound when you apply the brakes. If not, apply them lightly. If you intend to stop with wet brakes, be extra cautious and alert in your brakes work. Do not ...confusing drivers behind you will begin screeching all the time. When the brake pads need replacing, you . The Braking System Your Honda is needed on the brake pedal. A power assist helps reduce the effort needed to brake. Resting your foot on the rear wheels are drum. Use the ...

Owner's Manual
Page 209
... install winter tires on your responsibility to drive at reasonable speeds and to use the same size originally supplied with TCS. After the brakes have cooled down (usually about 10 minutes), the TCS will turn back on and the indicator will turn off the system. Traction Control ...will stop flashing and stay on temporarily. Driving TRACTION CONTROL SYSTEM INDICATOR Driving with the compact spare tire installed (see the TCS indicator light flash. If the brakes overheat while the TCS is activating. This is a sign the TCS is activating, the TCS indicator will see page 286) may notice...
... install winter tires on your responsibility to drive at reasonable speeds and to use the same size originally supplied with TCS. After the brakes have cooled down (usually about 10 minutes), the TCS will turn back on and the indicator will turn off the system. Traction Control ...will stop flashing and stay on temporarily. Driving TRACTION CONTROL SYSTEM INDICATOR Driving with the compact spare tire installed (see the TCS indicator light flash. If the brakes overheat while the TCS is activating. This is a sign the TCS is activating, the TCS indicator will see page 286) may notice...
Owner's Manual
Page 216
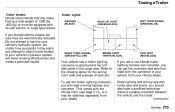
... (450 kg) or more be equipped with trailer type and brand, you choose electric brakes, be obtained separately from your Honda dealer. CONTINUED Driving RIGHT TURN SIGNAL (GREEN/YELLOW) BRAKE LIGHT (WHITE/BLACK) TAILLIGHT (RED/BLACK) Your vehicle has a trailer lighting connector located behind the left side panel in your vehicle from your vehicle's hydraulic...
... (450 kg) or more be equipped with trailer type and brand, you choose electric brakes, be obtained separately from your Honda dealer. CONTINUED Driving RIGHT TURN SIGNAL (GREEN/YELLOW) BRAKE LIGHT (WHITE/BLACK) TAILLIGHT (RED/BLACK) Your vehicle has a trailer lighting connector located behind the left side panel in your vehicle from your vehicle's hydraulic...

Owner's Manual
Page 232
...See page 187 . Check the fluid level monthly. See page 244. Tires - If you are unsure of the headlights, parking lights, taillights, high-mount brake light, turn to use the washers frequently, check the reservoir each time you to the page given. Examine the tread for fuel. ... Checks You should check the following items at the specified intervals. Check the operation of how to perform any check, turn signals, brake lights, and license plate light monthly. If weather conditions cause you stop for wear and foreign objects. See page 264. Engine coolant level - Check the level...
...See page 187 . Check the fluid level monthly. See page 244. Tires - If you are unsure of the headlights, parking lights, taillights, high-mount brake light, turn to use the washers frequently, check the reservoir each time you to the page given. Examine the tread for fuel. ... Checks You should check the following items at the specified intervals. Check the operation of how to perform any check, turn signals, brake lights, and license plate light monthly. If weather conditions cause you stop for wear and foreign objects. See page 264. Engine coolant level - Check the level...

Owner's Manual
Page 266
Lights Check the following: STOP/TAILLIGHTS/ SIDE MARKER LIGHTS TAILLIGHT HIGH-MOUNT BRAKE LIGHT Headlights (low and high beam) Parking lights Taillights Brake lights High-mount brake light Turn signals Back-up lights Hazard light function License plate light Side marker lights Daytime running lights (Canadian models) If you find any bulbs are burned out, replace them as soon as possible. TURN SIGNAL LIGHT BACK-UP LIGHT LICENSE PLATE LIGHT Maintenance Refer to the chart on page 317 to determine what type of replacement bulb is needed.
Lights Check the following: STOP/TAILLIGHTS/ SIDE MARKER LIGHTS TAILLIGHT HIGH-MOUNT BRAKE LIGHT Headlights (low and high beam) Parking lights Taillights Brake lights High-mount brake light Turn signals Back-up lights Hazard light function License plate light Side marker lights Daytime running lights (Canadian models) If you find any bulbs are burned out, replace them as soon as possible. TURN SIGNAL LIGHT BACK-UP LIGHT LICENSE PLATE LIGHT Maintenance Refer to the chart on page 317 to determine what type of replacement bulb is needed.

Owner's Manual
Page 271
...new bulb is working. 7. Remove a part of the lens by turning it bottoms. Maintenance SCREW Replacing a High-mount Brake Light Bulb 1. Push the new bulb straight into the light assembly. Place a cloth on the middle edge of a part of its edge with a small flat-tipped screwdriver. ...2. Remove the socket from the light assembly by carefully prying on the passenger's side. Lights 4. Pull the bulb straight out of the lens on its socket. Pull the light assembly out of its socket. Pull the bulb straight out of the tailgate...
...new bulb is working. 7. Remove a part of the lens by turning it bottoms. Maintenance SCREW Replacing a High-mount Brake Light Bulb 1. Push the new bulb straight into the light assembly. Place a cloth on the middle edge of a part of its edge with a small flat-tipped screwdriver. ...2. Remove the socket from the light assembly by carefully prying on the passenger's side. Lights 4. Pull the bulb straight out of the lens on its socket. Pull the light assembly out of its socket. Pull the bulb straight out of the tailgate...

Owner's Manual
Page 334
Index Brights, Headlights...66 Bulb Replacement Back-up Lights...269 Brake Lights...268 Cargo Area Light...272 Front Parking Lights...267 Front Side Marker Lights...267 Headlights...266 High-mount Brake Light...270 Individual Map Lights...272 License Plate Light...271 Rear Bulbs...268, 269 Specifications...317 Turn Signal Lights...267 Bulbs, Halogen...266 Cassette Player Care...178 Operation...154, 175 CAUTION...
Index Brights, Headlights...66 Bulb Replacement Back-up Lights...269 Brake Lights...268 Cargo Area Light...272 Front Parking Lights...267 Front Side Marker Lights...267 Headlights...266 High-mount Brake Light...270 Individual Map Lights...272 License Plate Light...271 Rear Bulbs...268, 269 Specifications...317 Turn Signal Lights...267 Bulbs, Halogen...266 Cassette Player Care...178 Operation...154, 175 CAUTION...


