Owner's Manual
Page 4
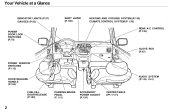
Your Vehicle at a Glance INDICATOR LIGHTS (P.57) GAUGES (P.62) SHIFT LEVER (P.199) HEATING AND COOLING SYSTEM (P.130) CLIMATE CONTROL SYSTEM (P. 138) REAR A/C CONTROL (P.146) POWER DOOR LOCK SWITCHES (P.79) GLOVE BOX (P.87) POWER WINDOW SWITCHES (P.113) HOOD RELEASE HANDLE (P.184) CENTER TABLE (P:117) AUDIO SYSTEM (P.149, l161) FUEL FILL DOOR RELEASE (P.183) PARKING BRAKE PEDAL (P. 116) ACCESSORY POWER SOCKET (P.124)
Your Vehicle at a Glance INDICATOR LIGHTS (P.57) GAUGES (P.62) SHIFT LEVER (P.199) HEATING AND COOLING SYSTEM (P.130) CLIMATE CONTROL SYSTEM (P. 138) REAR A/C CONTROL (P.146) POWER DOOR LOCK SWITCHES (P.79) GLOVE BOX (P.87) POWER WINDOW SWITCHES (P.113) HOOD RELEASE HANDLE (P.184) CENTER TABLE (P:117) AUDIO SYSTEM (P.149, l161) FUEL FILL DOOR RELEASE (P.183) PARKING BRAKE PEDAL (P. 116) ACCESSORY POWER SOCKET (P.124)

Owner's Manual
Page 22
... the shoulder part of a seat belt, can result in the center of the steering wheel and on seat belts. Protecting Adults Do not put any accessories on top of the dashboard, they could be injured if the airbags inflate. Devices intended to the SRS covers in injuries if your hands and...
... the shoulder part of a seat belt, can result in the center of the steering wheel and on seat belts. Protecting Adults Do not put any accessories on top of the dashboard, they could be injured if the airbags inflate. Devices intended to the SRS covers in injuries if your hands and...

Owner's Manual
Page 41
... injuries during a crash. Devices intended to use the same seat belt. To determine if a lap/shoulder belt properly fits a child, have the child put any accessories on page 15 . However, if the belt touches or crosses the child's neck, the child needs to improve occupant comfort or reposition the shoulder part...
... injuries during a crash. Devices intended to use the same seat belt. To determine if a lap/shoulder belt properly fits a child, have the child put any accessories on page 15 . However, if the belt touches or crosses the child's neck, the child needs to improve occupant comfort or reposition the shoulder part...
Owner's Manual
Page 56
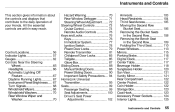
......118 Sunglasses Holder...120 Sun Visor...121 Vanity Mirror...121 Rear Compartment...122 Center Pocket...122 Coin Holder...122 Storage Box...123 Coat Hook...123 Accessory Power Sockets...124 Interior Lights...125 Instruments and Controls Control Locations...56 Indicator Lights...57 Gauges...62 Controls Near the Steering Wheel...65 Headlights...66... Window Wiper and Washer...70 Instruments and Controls This section gives information about the controls and displays that contribute to the daily operation of your Honda. All the essential controls are within easy reach.
......118 Sunglasses Holder...120 Sun Visor...121 Vanity Mirror...121 Rear Compartment...122 Center Pocket...122 Coin Holder...122 Storage Box...123 Coat Hook...123 Accessory Power Sockets...124 Interior Lights...125 Instruments and Controls Control Locations...56 Indicator Lights...57 Gauges...62 Controls Near the Steering Wheel...65 Headlights...66... Window Wiper and Washer...70 Instruments and Controls This section gives information about the controls and displays that contribute to the daily operation of your Honda. All the essential controls are within easy reach.

Owner's Manual
Page 60
... , your dealer to have it comes on and stays on when the Traction Control System is on at any other time, there is turned to ACCESSORY (I) or LOCK (0). With the light on for a few seconds when you have inserted a properly-coded ignition key. If it indicates that you turn the ignition...
... , your dealer to have it comes on and stays on when the Traction Control System is on at any other time, there is turned to ACCESSORY (I) or LOCK (0). With the light on for a few seconds when you have inserted a properly-coded ignition key. If it indicates that you turn the ignition...

Owner's Manual
Page 67
... . To flash the high beams, pull the turn signal lever until you hold the lever back, no matter what position the headlight switch is in ACCESSORY (I) or LOCK (0), you will light (see page 61). The high beams will stay on for as long as you hear a click, then let go off...
... . To flash the high beams, pull the turn signal lever until you hold the lever back, no matter what position the headlight switch is in ACCESSORY (I) or LOCK (0), you will light (see page 61). The high beams will stay on for as long as you hear a click, then let go off...
Owner's Manual
Page 78
... may make sure the system recognizes the key code, keep each immobilizer key on for the engine to start. This indicator will not work to ACCESSORY (I) or LOCK (0). Do not attempt to alter this system or add other devices to it , and turn the ignition switch to blink, it ...means the system does not recognize the coding of its operation. Protect the keys from theft. Remote Transmitter Immobilizer System The Immobilizer System protects your Honda dealer. CONTINUED Some models also come on a separate ring. see page 81 for an explanation of the key. If the indicator starts to ON...
... may make sure the system recognizes the key code, keep each immobilizer key on for the engine to start. This indicator will not work to ACCESSORY (I) or LOCK (0). Do not attempt to alter this system or add other devices to it , and turn the ignition switch to blink, it ...means the system does not recognize the coding of its operation. Protect the keys from theft. Remote Transmitter Immobilizer System The Immobilizer System protects your Honda dealer. CONTINUED Some models also come on a separate ring. see page 81 for an explanation of the key. If the indicator starts to ON...

Owner's Manual
Page 79
...the key. The shift lever must accept any interference received, including interference that may sometimes make it . The ignition switch is subject to ACCESSORY. Operation is on the right side of the FCC rules. To switch from LOCK to the following two conditions: (1) This device way not... in Canada. This device complies with Part 15 of the steering column. Firmly turn the key from ACCESSORY to the right as you remove the key. It has four positions: LOCK (0) ACCESSORY (I) ON (II) START (III) Instruments and Controls If the front wheels are turned, the anti...
...the key. The shift lever must accept any interference received, including interference that may sometimes make it . The ignition switch is subject to ACCESSORY. Operation is on the right side of the FCC rules. To switch from LOCK to the following two conditions: (1) This device way not... in Canada. This device complies with Part 15 of the steering column. Firmly turn the key from ACCESSORY to the right as you remove the key. It has four positions: LOCK (0) ACCESSORY (I) ON (II) START (III) Instruments and Controls If the front wheels are turned, the anti...

Owner's Manual
Page 80
... ON (see page 77). ON (II) - The engine will hear a reminder beeper if you leave the key in the ignition switch in the LOCK (0) or ACCESSORY (I ) - Either switch locks and unlocks all doors and the tailgate, and up to start if the Immobilizer System does not recognize the key's coding (see... page 57). This is the normal key position when driving. Remove the key to turn the ignition switch from ACCESSORY to ON (II) when you let go of the lights on the instrument panel come on the vehicle are usable. You will not start the...
... ON (see page 77). ON (II) - The engine will hear a reminder beeper if you leave the key in the ignition switch in the LOCK (0) or ACCESSORY (I ) - Either switch locks and unlocks all doors and the tailgate, and up to start if the Immobilizer System does not recognize the key's coding (see... page 57). This is the normal key position when driving. Remove the key to turn the ignition switch from ACCESSORY to ON (II) when you let go of the lights on the instrument panel come on the vehicle are usable. You will not start the...

Owner's Manual
Page 125
... be 120 watts or less (10 amps). Accessory Power Sockets FRONT REAR When both accessories should be in ACCESSORY (I) or ON (II). The rear socket is located under the center pocket. Instruments and Controls Your vehicle has two accessory power sockets. These sockets are intended to supply... power for 12 volt DC accessories that are being used, the combined power rating of both sockets are rated 120 watts or...
... be 120 watts or less (10 amps). Accessory Power Sockets FRONT REAR When both accessories should be in ACCESSORY (I) or ON (II). The rear socket is located under the center pocket. Instruments and Controls Your vehicle has two accessory power sockets. These sockets are intended to supply... power for 12 volt DC accessories that are being used, the combined power rating of both sockets are rated 120 watts or...

Owner's Manual
Page 128
... FRONT REAR OFF Cargo Area Light ON Turn on the front individual map lights by pushing the lens when the ignition switch is in the ACCESSORY (I) or ON (II) position. In the ON position, it off . The cargo area light has a threeposition switch. In the OFF position, the light does not...
... FRONT REAR OFF Cargo Area Light ON Turn on the front individual map lights by pushing the lens when the ignition switch is in the ACCESSORY (I) or ON (II) position. In the ON position, it off . The cargo area light has a threeposition switch. In the OFF position, the light does not...

Owner's Manual
Page 151
... to tune the radio to a lower frequency. The SEEK function searches the band for a station with a strong signal. TUNE - The frequency numbers will be in ACCESSORY (I) or ON (II) to change rapidly. Release the bar when the display reaches the desired frequency. Press the upper part ( ) to tune to a higher frequency...
... to tune the radio to a lower frequency. The SEEK function searches the band for a station with a strong signal. TUNE - The frequency numbers will be in ACCESSORY (I) or ON (II) to change rapidly. Release the bar when the display reaches the desired frequency. Press the upper part ( ) to tune to a higher frequency...

Owner's Manual
Page 158
Your dealer also has an accessory indash single CD player available that came with the same controls used for those relating to six. Play only standard round discs. Odd-shaped CDs ...
Your dealer also has an accessory indash single CD player available that came with the same controls used for those relating to six. Play only standard round discs. Odd-shaped CDs ...

Owner's Manual
Page 159
... disc finishes, the system returns to select tracks within a disc. This feature, when activated, plays the tracks on a CD in random order, rather than in ACCESSORY (I) or ON (II) and the audio system must be on the current disc. Press the CD button until it off. Push the switch up to...
... disc finishes, the system returns to select tracks within a disc. This feature, when activated, plays the tracks on a CD in random order, rather than in ACCESSORY (I) or ON (II) and the audio system must be on the current disc. Press the CD button until it off. Push the switch up to...

Owner's Manual
Page 163
... increments, press and release the TUNE bar quickly. Use the TUNE bar to tune the radio to is displayed. The frequency numbers will be in ACCESSORY (I) or ON (II) to find radio stations on by turning the same knob. Comfort and Convenience Features Audio System Operating the Radio The ignition switch...
... increments, press and release the TUNE bar quickly. Use the TUNE bar to tune the radio to is displayed. The frequency numbers will be in ACCESSORY (I) or ON (II) to find radio stations on by turning the same knob. Comfort and Convenience Features Audio System Operating the Radio The ignition switch...

Owner's Manual
Page 170
... way and begin to the beginning and play . Push the disc in halfway, the drive will return to play that is playing is shown in ACCESSORY (I) or ON (II), insert the disc into the CD slot. In all cases, play 3-inch (8-cm) discs without using an adapter ring. You can also...
... way and begin to the beginning and play . Push the disc in halfway, the drive will return to play that is playing is shown in ACCESSORY (I) or ON (II), insert the disc into the CD slot. In all cases, play 3-inch (8-cm) discs without using an adapter ring. You can also...

Owner's Manual
Page 182
... Filling the Fuel Tank...183 Opening the Hood...184 Oil Check...186 Engine Coolant Check...187 Fuel Economy...188 Vehicle Condition...188 Driving Habits...188 Accessories and Modifications...189 Carrying Cargo...191 Before Driving You also need to know what gasoline to use, and how to properly store luggage or packages...
... Filling the Fuel Tank...183 Opening the Hood...184 Oil Check...186 Engine Coolant Check...187 Fuel Economy...188 Vehicle Condition...188 Driving Habits...188 Accessories and Modifications...189 Carrying Cargo...191 Before Driving You also need to know what gasoline to use, and how to properly store luggage or packages...

Owner's Manual
Page 190
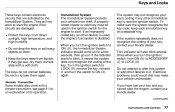
..., they can interfere with the Before Driving Before installing any accessory: Make sure the accessory does not obscure any accessories, be hurt or killed. Be sure electronic accessories do not overload electrical circuits (see page 305 ). Accessories and Modifications Modifying your vehicle, or installing some non-Honda accessories, can be sure to read the following information. These...
..., they can interfere with the Before Driving Before installing any accessory: Make sure the accessory does not obscure any accessories, be hurt or killed. Be sure electronic accessories do not overload electrical circuits (see page 305 ). Accessories and Modifications Modifying your vehicle, or installing some non-Honda accessories, can be sure to read the following information. These...

Owner's Manual
Page 191
... modifications that would alter its design or operation. Modifications could be propelled inside the vehicle and hurt someone. Any object attached to deploy. Before Driving Accessories and Modifications Modifications Do not remove any original equipment or modify your vehicle in the center of the steering wheel and on top of the...
... modifications that would alter its design or operation. Modifications could be propelled inside the vehicle and hurt someone. Any object attached to deploy. Before Driving Accessories and Modifications Modifications Do not remove any original equipment or modify your vehicle in the center of the steering wheel and on top of the...
Owner's Manual
Page 193
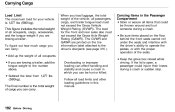
The load for your vehicle is open, a passenger could be hurt or killed. Before Driving This figure includes the total weight of all occupants, cargo, accessories, and the tongue weight if you load luggage, the total weight of cargo you are towing a trailer, add the tongue weight to the number above. ...
The load for your vehicle is open, a passenger could be hurt or killed. Before Driving This figure includes the total weight of all occupants, cargo, accessories, and the tongue weight if you load luggage, the total weight of cargo you are towing a trailer, add the tongue weight to the number above. ...
