Owner's Manual
Page 31
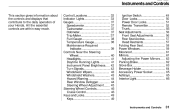
Instruments and Controls This section gives information about the controls and displays that contribute to the daily operation of your Honda. All the essential controls are within easy reach. Control Locations...32 Indicator Lights...33 Gauges...37 Speedometer...37 Tachometer...37... Odometer...37 Trip Meter...37 Fuel Gauge...38 Temperature Gauge...38 Maintenance Required Indicator...39 Controls Near the Steering Wheel...40 Headlights...41 Daytime Running Lights...41 Instrument Panel Brightness...42 Turn Signals...42 Windshield Wipers...43 Windshield Washers...43 Hazard Warning...44 Rear ...
Instruments and Controls This section gives information about the controls and displays that contribute to the daily operation of your Honda. All the essential controls are within easy reach. Control Locations...32 Indicator Lights...33 Gauges...37 Speedometer...37 Tachometer...37... Odometer...37 Trip Meter...37 Fuel Gauge...38 Temperature Gauge...38 Maintenance Required Indicator...39 Controls Near the Steering Wheel...40 Headlights...41 Daytime Running Lights...41 Instrument Panel Brightness...42 Turn Signals...42 Windshield Wipers...43 Windshield Washers...43 Hazard Warning...44 Rear ...

Owner's Manual
Page 35
... brightness when the Daytime Running Lights (DRL) are on (see page 114) 1. On Canadian models, this indicator comes on with the high beam headlights. Reset the system by restarting the engine. For complete information, see page 191. For complete information, see page 192. With the light on, ...41 for a few seconds when you release the parking brake or comes on while driving. This light normally comes on for information on the headlight controls. If this happens, stop the car in the ABS. Watch the ABS light. Indicator Lights Charging System Indicator If this light comes...
... brightness when the Daytime Running Lights (DRL) are on (see page 114) 1. On Canadian models, this indicator comes on with the high beam headlights. Reset the system by restarting the engine. For complete information, see page 191. For complete information, see page 192. With the light on, ...41 for a few seconds when you release the parking brake or comes on while driving. This light normally comes on for information on the headlight controls. If this happens, stop the car in the ABS. Watch the ABS light. Indicator Lights Charging System Indicator If this light comes...
Owner's Manual
Page 40
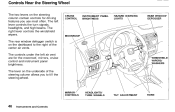
... brightness. The rear window defogger switch is on the underside of the center air vents. The controls under the left lever controls the turn signals, headlights, and high beams. The right lever controls the windshield wipers. The left air vent are for driving features you to the right of the steering... on the dashboard to till the steering wheel. CRUISE CONTROL INSTRUMENT PANEL BRIGHTNESS HAZARD WARNING LIGHTS REAR WINDOW DEFOGGER MOONROOF WINDSHIELD WIPERS/ WASHERS MIRROR CONTROLS HEADLIGHTS/ TURN SIGNALS TILT ADJUSTMENT HORN Instruments and Controls
... brightness. The rear window defogger switch is on the underside of the center air vents. The controls under the left lever controls the turn signals, headlights, and high beams. The right lever controls the windshield wipers. The left air vent are for driving features you to the right of the steering... on the dashboard to till the steering wheel. CRUISE CONTROL INSTRUMENT PANEL BRIGHTNESS HAZARD WARNING LIGHTS REAR WINDOW DEFOGGER MOONROOF WINDSHIELD WIPERS/ WASHERS MIRROR CONTROLS HEADLIGHTS/ TURN SIGNALS TILT ADJUSTMENT HORN Instruments and Controls

Owner's Manual
Page 41
...II) and release the parking brake. Instruments and Controls To flash the high beams, pull back and hold the lever, no matter what position the headlight switch is in ACCESSORY (I) or LOCK (0), you will stay on until you hear a click, then let go off , even if you set... The blue high beam indicator will go . Controls Near the Steering Wheel Headlights If you leave the lights on with the switch. Daytime Running Lights (Canadian Models) With the headlight switch off, the high beam headlights come on with reduced brightness when you turn signal lever until you turn ...
...II) and release the parking brake. Instruments and Controls To flash the high beams, pull back and hold the lever, no matter what position the headlight switch is in ACCESSORY (I) or LOCK (0), you will stay on until you hear a click, then let go off , even if you set... The blue high beam indicator will go . Controls Near the Steering Wheel Headlights If you leave the lights on with the switch. Daytime Running Lights (Canadian Models) With the headlight switch off, the high beam headlights come on with reduced brightness when you turn signal lever until you turn ...

Owner's Manual
Page 61
.... Make sure passengers are clear of the moonroof for best visibility. To slide the moonroof back, push the switch. The night position reduces glare from headlights behind you start driving. The ignition must be ON (II). To lift the rear of the moonroof before you . On EX model in the U.S., and...
.... Make sure passengers are clear of the moonroof for best visibility. To slide the moonroof back, push the switch. The night position reduces glare from headlights behind you start driving. The ignition must be ON (II). To lift the rear of the moonroof before you . On EX model in the U.S., and...

Owner's Manual
Page 116
... techniques during daylight hours, turn on the inside (see clearly in all directions and being visible to react, even in all the controls. Keep your headlights. Exercise extra caution when driving in these conditions. Being able to see page 73). Inspect your car longer to other drivers are important in conditions...
... techniques during daylight hours, turn on the inside (see clearly in all directions and being visible to react, even in all the controls. Keep your headlights. Exercise extra caution when driving in these conditions. Being able to see page 73). Inspect your car longer to other drivers are important in conditions...
Owner's Manual
Page 118
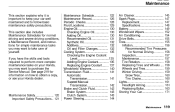
Maintenance This section explains why it is important to keep your Honda dealer. See page 219 for information on your Honda, you may want to obtain a copy, or see your car well maintained and to take care of yourself. If you may want to follow basic ... Maintenance...157 Tire Rotation...158 Replacing Tires and Wheels ...158 Wheels and Tires...159 Winter Driving...159 Snow Tires...160 Tire Chains...160 Lights...161 Headlight Aiming...161 Replacing Bulbs...163 Storing Your Car...171 Maintenance Safety...120 Important Safety Precautions.. 121 Maintenance
Maintenance This section explains why it is important to keep your Honda dealer. See page 219 for information on your Honda, you may want to obtain a copy, or see your car well maintained and to take care of yourself. If you may want to follow basic ... Maintenance...157 Tire Rotation...158 Replacing Tires and Wheels ...158 Wheels and Tires...159 Winter Driving...159 Snow Tires...160 Tire Chains...160 Lights...161 Headlight Aiming...161 Replacing Bulbs...163 Storing Your Car...171 Maintenance Safety...120 Important Safety Precautions.. 121 Maintenance

Owner's Manual
Page 127
... tire pressure monthly. Check its operation weekly. Periodic Checks You should check the following items at the specified intervals. If you are unsure of the headlights, parking lights, taillights, high-mount brake light, turn to the page given. Automatic transmission (including CVT) - Brakes, clutch and power steering - See page 142. See...
... tire pressure monthly. Check its operation weekly. Periodic Checks You should check the following items at the specified intervals. If you are unsure of the headlights, parking lights, taillights, high-mount brake light, turn to the page given. Automatic transmission (including CVT) - Brakes, clutch and power steering - See page 142. See...

Owner's Manual
Page 134
... Maintenance Adding Engine Coolant If the reserve tank is hot can corrode if an improper antifreeze is at the radiator reserve tank near the right headlight. Make sure the engine and radiator are cool. Never add straight antifreeze or plain water. The cooling system contains many aluminum components that can cause... of 50% antifreeze and 50% water. If the coolant level in the radiator. Cooling System Checking the Engine Coolant Level RESERVE TANK Always use Genuine Honda Antifreeze/Coolant.
... Maintenance Adding Engine Coolant If the reserve tank is hot can corrode if an improper antifreeze is at the radiator reserve tank near the right headlight. Make sure the engine and radiator are cool. Never add straight antifreeze or plain water. The cooling system contains many aluminum components that can cause... of 50% antifreeze and 50% water. If the coolant level in the radiator. Cooling System Checking the Engine Coolant Level RESERVE TANK Always use Genuine Honda Antifreeze/Coolant.
Owner's Manual
Page 139
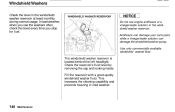
... the reservoir with a good-quality windshield washer fluid. Maintenance Use only commercially-available windshield washer fluid. The windshield washer reservoir is located behind the left headlight. In bad weather, when you stop for fuel. WINDSHIELD WASHER RESERVOIR NOTICE Do not use the washers often, check the level every time you use...
... the reservoir with a good-quality windshield washer fluid. Maintenance Use only commercially-available windshield washer fluid. The windshield washer reservoir is located behind the left headlight. In bad weather, when you stop for fuel. WINDSHIELD WASHER RESERVOIR NOTICE Do not use the washers often, check the level every time you use...

Owner's Manual
Page 160
...other drivers. Park the car on page 205 to determine what type of your car's exterior lights at the factory. Check the following: Headlights (low and high beam) Parking lights Taillights Brake lights High-mount brake light Turn signals Back-up lights Hazard light function License plate ...marker lights Daytime running lights (Canadian cars) If you regularly carry heavy items in the driver's seat for all checks and adjustments. Headlight Aiming The headlights were properly aimed when your intentions to their aim if you find any bulbs are aimed at least once a month. You should be...
...other drivers. Park the car on page 205 to determine what type of your car's exterior lights at the factory. Check the following: Headlights (low and high beam) Parking lights Taillights Brake lights High-mount brake light Turn signals Back-up lights Hazard light function License plate ...marker lights Daytime running lights (Canadian cars) If you regularly carry heavy items in the driver's seat for all checks and adjustments. Headlight Aiming The headlights were properly aimed when your intentions to their aim if you find any bulbs are aimed at least once a month. You should be...

Owner's Manual
Page 162
... it by pulling it with your Honda dealer inspect the car for body damage or suspension problems. Halogen headlight bulbs get an indicator to overheat and shatter. 1. If you cannot get very hot when lit. CONTINUED Maintenance If you need to change the headlight bulb on the driver's side, ...remove the power steering reservoir tank by its holder. Lights VERTICAL ADJUSTMENT Replacing a Headlight Bulb Your car has halogen headlight bulbs, one on the glass can cause the bulb to align, have your skin or hard objects. Open the hood. Oil, perspiration...
... it by pulling it with your Honda dealer inspect the car for body damage or suspension problems. Halogen headlight bulbs get an indicator to overheat and shatter. 1. If you cannot get very hot when lit. CONTINUED Maintenance If you need to change the headlight bulb on the driver's side, ...remove the power steering reservoir tank by its holder. Lights VERTICAL ADJUSTMENT Replacing a Headlight Bulb Your car has halogen headlight bulbs, one on the glass can cause the bulb to align, have your skin or hard objects. Open the hood. Oil, perspiration...

Owner's Manual
Page 163
... end of the new bulb. Install the rubber seal over the back of the way and remove the bulb. 5. Make sure it out of the headlight assembly. Insert the new bulb into the slot. 6. WEATHER SEAL BULB CONNECTOR HOLD-DOWN WIRE 2. Pivot it locks in their slots. Pivot the hold -down... -down wire from the bulb by pulling on both sides to test the new bulb. 8. (Driver's side) Reinstall the power steering reservoir. Turn on the headlights to unlock the tab.
... end of the new bulb. Install the rubber seal over the back of the way and remove the bulb. 5. Make sure it out of the headlight assembly. Insert the new bulb into the slot. 6. WEATHER SEAL BULB CONNECTOR HOLD-DOWN WIRE 2. Pivot it locks in their slots. Pivot the hold -down... -down wire from the bulb by pulling on both sides to test the new bulb. 8. (Driver's side) Reinstall the power steering reservoir. Turn on the headlights to unlock the tab.

Owner's Manual
Page 164
Install the new bulb in place. Pull the inner fender cover off the engine. Install the holding clip from the headlight assembly by pushing it in and turning counterclockwise until it in place. 7. Turn it clockwise to lock it securely. Turn it clockwise to ...the left. 2. Use a flat-tipped screwdriver to lock it unlocks. 6. Maintenance Remove the socket from the inner fender. 3. Insert the socket back into the headlight assembly. If you are changing the bulb on the driver's side, start the engine, turn the steering wheel all the way to the right, and...
Install the new bulb in place. Pull the inner fender cover off the engine. Install the holding clip from the headlight assembly by pushing it in and turning counterclockwise until it in place. 7. Turn it clockwise to lock it securely. Turn it clockwise to ...the left. 2. Use a flat-tipped screwdriver to lock it unlocks. 6. Maintenance Remove the socket from the inner fender. 3. Insert the socket back into the headlight assembly. If you are changing the bulb on the driver's side, start the engine, turn the steering wheel all the way to the right, and...

Owner's Manual
Page 184
... an automatic transmission, it must be in Park or Neutral. You can then try to determine the problem. (See Towing on page 200.) If the headlights dim noticeably or go out when you have a manual transmission, the clutch pedal must be pushed all , or operates very slowly. Check these things: Check... does not start the engine, either the battery is probably something wrong with the electrical circuit for the ignition switch or starter motor. If the headlights do not hear the normal noise of the fuses. You may hear a clicking sound or series of the Unexpected If the fuses are OK, ...
... an automatic transmission, it must be in Park or Neutral. You can then try to determine the problem. (See Towing on page 200.) If the headlights dim noticeably or go out when you have a manual transmission, the clutch pedal must be pushed all , or operates very slowly. Check these things: Check... does not start the engine, either the battery is probably something wrong with the electrical circuit for the ignition switch or starter motor. If the headlights do not hear the normal noise of the fuses. You may hear a clicking sound or series of the Unexpected If the fuses are OK, ...

Owner's Manual
Page 194
... ignition switch to LOCK (0). ABS FUSE BOX FUSE BLOWN Cars equipped with ABS have a third fuse box for is not the cause. Make sure the headlights and all the fuses before deciding that component. Check each of the Unexpected Fuses Checking and Replacing Fuses If something electrical in the under-hood...
... ignition switch to LOCK (0). ABS FUSE BOX FUSE BLOWN Cars equipped with ABS have a third fuse box for is not the cause. Make sure the headlights and all the fuses before deciding that component. Check each of the Unexpected Fuses Checking and Replacing Fuses If something electrical in the under-hood...

Owner's Manual
Page 215
......18 Door Locks...19 Driving with Pets...19 Head Restraint Position...18 Seat-back Position...18 Storing Cargo Safely...19 Additives, Engine Oil...132 Adjustments Headlights...161 Battery Charging System Indicator...35, 194 Jump Starting...187 Maintenance...149 Specifications...205 Before Driving...89 Belts, Seat...5 Beverage Holder...64 Body Repair...178...
......18 Door Locks...19 Driving with Pets...19 Head Restraint Position...18 Seat-back Position...18 Storing Cargo Safely...19 Additives, Engine Oil...132 Adjustments Headlights...161 Battery Charging System Indicator...35, 194 Jump Starting...187 Maintenance...149 Specifications...205 Before Driving...89 Belts, Seat...5 Beverage Holder...64 Body Repair...178...
Owner's Manual
Page 216
...Indicators...109 Brakes, ABS Description...206 Operation...114 System Indicator...35, 115 Braking System...113 Break-in, New Car...90 Brightness Control, Instruments...42 Brights, Headlights...41 Bulb Replacement Back-up Lights...167 Brake Lights...166 Front Parking Lights...165 Front Side Marker Lights...165... Headlights...163 High-mount Brake Light...168 Interior Light...169 License Plate Lights...169 Rear Side Marker Lights...166 Specifications...205 Trunk Light...170 Turn Signal...
...Indicators...109 Brakes, ABS Description...206 Operation...114 System Indicator...35, 115 Braking System...113 Break-in, New Car...90 Brightness Control, Instruments...42 Brights, Headlights...41 Bulb Replacement Back-up Lights...167 Brake Lights...166 Front Parking Lights...165 Front Side Marker Lights...165... Headlights...163 High-mount Brake Light...168 Interior Light...169 License Plate Lights...169 Rear Side Marker Lights...166 Specifications...205 Trunk Light...170 Turn Signal...
Owner's Manual
Page 217
......177 Crankcase Emission Control System...210 Cruise Control Operation...46 Customer Relations Office...215 DEXRON® II Automatic Transmission Fluid...141 Dimensions...204 Dimming the Headlights ...41 Dipstick Automatic Transmission...141 Engine Oil...130 Directional Signals...42 Disabled, Towing Your Car If...200 Disc Brake Wear Indicators...113 Disposal of Used...
......177 Crankcase Emission Control System...210 Cruise Control Operation...46 Customer Relations Office...215 DEXRON® II Automatic Transmission Fluid...141 Dimensions...204 Dimming the Headlights ...41 Dipstick Automatic Transmission...141 Engine Oil...130 Directional Signals...42 Disabled, Towing Your Car If...200 Disc Brake Wear Indicators...113 Disposal of Used...
Owner's Manual
Page 218
... Gasohol...91 Gasoline...90 Fuel Reserve Indicator...36 Gauge...38 Octane Requirement...90 Tank, Filling the...92 Gas Station Procedures...92 Halogen Headlight Bulbs...163 Hazard Warning Flashers...44 Headlights Aiming...161 Daytime Running Lights...41 High Beam Indicator...35 High Beams, Turning on...41 Low Beams, Turning on ...41 Reminder Beeper...
... Gasohol...91 Gasoline...90 Fuel Reserve Indicator...36 Gauge...38 Octane Requirement...90 Tank, Filling the...92 Gas Station Procedures...92 Halogen Headlight Bulbs...163 Hazard Warning Flashers...44 Headlights Aiming...161 Daytime Running Lights...41 High Beam Indicator...35 High Beams, Turning on...41 Low Beams, Turning on ...41 Reminder Beeper...


