Owner's Manual
Page 19
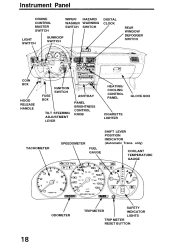
only) COOLANT TEMPERATURE GAUGE TRIP METER ODOMETER SAFETY INDICATOR LIGHTS TRIP METER RESET BUTTON Instrument Panel CRUISE CONTROL MASTER SWITCH LIGHT SWITCH SUNROOF SWITCH WIPER/ HAZARD WASHER WARNING SWITCH SWITCH DIGITAL CLOCK REAR WINDOW DEFOGGER SWITCH COIN BOX IGNITION SWITCH HOOD RELEASE HANDLE FUSE BOX ASHTRAY PANEL BRIGHTNESS CONTROL KNOB HEATING/ COOLING CONTROL PANEL GLOVE BOX TILT STEERING ADJUSTMENT LEVER CIGARETTE LIGHTER SPEEDOMETER TACHOMETER FUEL GAUGE SHIFT LEVER POSITION INDICATOR (Automatic Trans.
only) COOLANT TEMPERATURE GAUGE TRIP METER ODOMETER SAFETY INDICATOR LIGHTS TRIP METER RESET BUTTON Instrument Panel CRUISE CONTROL MASTER SWITCH LIGHT SWITCH SUNROOF SWITCH WIPER/ HAZARD WASHER WARNING SWITCH SWITCH DIGITAL CLOCK REAR WINDOW DEFOGGER SWITCH COIN BOX IGNITION SWITCH HOOD RELEASE HANDLE FUSE BOX ASHTRAY PANEL BRIGHTNESS CONTROL KNOB HEATING/ COOLING CONTROL PANEL GLOVE BOX TILT STEERING ADJUSTMENT LEVER CIGARETTE LIGHTER SPEEDOMETER TACHOMETER FUEL GAUGE SHIFT LEVER POSITION INDICATOR (Automatic Trans.

Owner's Manual
Page 20
..., stop the engine and check the coolant level in the reserve tank on . Do not remove the radiator cap when the engine is under the hood. The trip meter can be returned to the new fuel level when the ignition is switched on the passenger side of the radiator under pressure...
..., stop the engine and check the coolant level in the reserve tank on . Do not remove the radiator cap when the engine is under the hood. The trip meter can be returned to the new fuel level when the ignition is switched on the passenger side of the radiator under pressure...
Owner's Manual
Page 34
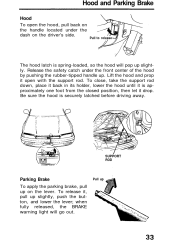
... it is approximately one foot from the closed position, then let it open the hood, pull back on the handle located under the front center of the hood by pushing the rubber-tipped handle up Release the safety catch under the dash on the lever. when fully released, the BRAKE ...warning light will pop up slightly. Be sure the hood is spring-loaded, so the hood will go out. Pull up . Pull to release The hood latch is securely latched before driving away. Lift the hood and prop it drop. Hood and Parking Brake Hood To open with the support rod. SUPPORT ROD Parking ...
... it is approximately one foot from the closed position, then let it open the hood, pull back on the handle located under the front center of the hood by pushing the rubber-tipped handle up Release the safety catch under the dash on the lever. when fully released, the BRAKE ...warning light will pop up slightly. Be sure the hood is spring-loaded, so the hood will go out. Pull up . Pull to release The hood latch is securely latched before driving away. Lift the hood and prop it drop. Hood and Parking Brake Hood To open with the support rod. SUPPORT ROD Parking ...
Owner's Manual
Page 121
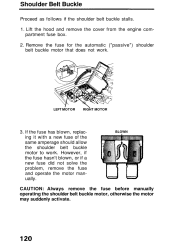
... the motor manually. BLOWN CAUTION: Always remove the fuse before manually operating the shoulder belt buckle motor, otherwise the motor may suddenly activate. Lift the hood and remove the cover from the engine compartment fuse box. 2. Remove the fuse for the automatic ("passive") shoulder belt buckle motor that does not work...
... the motor manually. BLOWN CAUTION: Always remove the fuse before manually operating the shoulder belt buckle motor, otherwise the motor may suddenly activate. Lift the hood and remove the cover from the engine compartment fuse box. 2. Remove the fuse for the automatic ("passive") shoulder belt buckle motor that does not work...

Owner's Manual
Page 125
... body, directly behind the engine. It also appears on the Certification label attached to the top left rear door jamb, as well as under the hood on top of the dashboard. NOTE: The V.I .N.) is stamped on the Certification label.
... body, directly behind the engine. It also appears on the Certification label attached to the top left rear door jamb, as well as under the hood on top of the dashboard. NOTE: The V.I .N.) is stamped on the Certification label.
Owner's Manual
Page 135
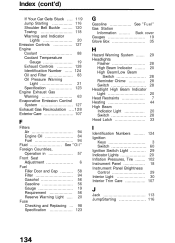
... Flasher ...High Beam Indicator ...High Beam/Low Beam Switch ...Reminder Chime ...Switch ...Headlight High Beam Indicator Light ...Head Restraints ...Heating ...High Beam Indicator Light ...Switch ...Hood Latch ... 29 28 20 28 28 28 20 7 44 20 28 33 Filters Air ...94 Engine Oil ...84 Fuel ...94 Fluid ...See " O i l " Foreign Countries, Operation...
... Flasher ...High Beam Indicator ...High Beam/Low Beam Switch ...Reminder Chime ...Switch ...Headlight High Beam Indicator Light ...Head Restraints ...Heating ...High Beam Indicator Light ...Switch ...Hood Latch ... 29 28 20 28 28 28 20 7 44 20 28 33 Filters Air ...94 Engine Oil ...84 Fuel ...94 Fluid ...See " O i l " Foreign Countries, Operation...
Owner's Manual
Page 140
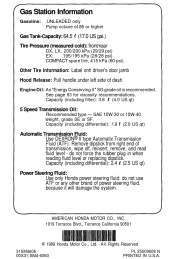
... Fluid: Use DEXRON® II type Automatic Transmission Fluid (ATF). Capacity (including differential): 2.4 (2.5 US qt) Power Steering Fluid: Use only Honda power steering fluid: do not force the rubber plug in when reading fluid level or replacing dipstick. Capacity (including filter): 3.8 (4.0 US qt)... 5 Speed Transmission Oil: Recommended type - Other Tire Information: Label onh driver's door jamb Hood Release: Pull handle under left side of transmission, wipe off, reinsert, remove, and read fluid level - Engine Oil: An "Energy Conserving...
... Fluid: Use DEXRON® II type Automatic Transmission Fluid (ATF). Capacity (including differential): 2.4 (2.5 US qt) Power Steering Fluid: Use only Honda power steering fluid: do not force the rubber plug in when reading fluid level or replacing dipstick. Capacity (including filter): 3.8 (4.0 US qt)... 5 Speed Transmission Oil: Recommended type - Other Tire Information: Label onh driver's door jamb Hood Release: Pull handle under left side of transmission, wipe off, reinsert, remove, and read fluid level - Engine Oil: An "Energy Conserving...
