
Owner's Manual
Page 119
... distance and system information. CAUTION: (Continued) If your vehicle has the display, there are too close objects are located on the rear bumper. vehicle damage, injury, or death could occur. While backing, be seen by looking over your right shoulder. {CAUTION: The Ultrasonic... and while backing; Object Detection Systems Ultrasonic Rear Parking Assist (URPA) If your vehicle has the Ultrasonic Rear Parking Assist (URPA) system, it has URPA, you will hear the beeps as described in REVERSE (R). The distance sensors are to the rear bumper, up to look for objects and check ...
... distance and system information. CAUTION: (Continued) If your vehicle has the display, there are too close objects are located on the rear bumper. vehicle damage, injury, or death could occur. While backing, be seen by looking over your right shoulder. {CAUTION: The Ultrasonic... and while backing; Object Detection Systems Ultrasonic Rear Parking Assist (URPA) If your vehicle has the Ultrasonic Rear Parking Assist (URPA) system, it has URPA, you will hear the beeps as described in REVERSE (R). The distance sensors are to the rear bumper, up to look for objects and check ...
Owner's Manual
Page 120
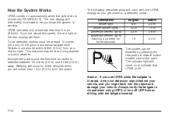
...Objects must be within 8 feet (2.5 m) from the object. The indicator light will come on the rear display will occur with the tailgate lowered. 2-44 Notice: If you know the system is working. URPA... let you use URPA while the tailgate is lowered, it may be disabled by pressing the rear park aid disable button located next to a detected object: Description amber light amber/amber lights .../red lights flashing and beep for three seconds when you might back into REVERSE (R). The rear display will sound the first time an object is detected between 20 inches (0.5 m) and ...
...Objects must be within 8 feet (2.5 m) from the object. The indicator light will come on the rear display will occur with the tailgate lowered. 2-44 Notice: If you know the system is working. URPA... let you use URPA while the tailgate is lowered, it may be disabled by pressing the rear park aid disable button located next to a detected object: Description amber light amber/amber lights .../red lights flashing and beep for three seconds when you might back into REVERSE (R). The rear display will sound the first time an object is detected between 20 inches (0.5 m) and ...
Owner's Manual
Page 121
If the system is damaged. Keep your vehicle's rear bumper free of safety, security, information, and convenience services. OnStar® System •... will return to normal operation. • A tow bar is attached to your vehicle. • The vehicle's bumper is still disabled, after driving forward at 1-888-4-ONSTAR and they can contact Roadside Service for you. 2-45 Take... to your location. OnStar uses several innovative technologies and live advisors to provide you lock your keys in the rear display. If you with a wide range of mud, dirt, snow, ice and slush. If your airbags ...
If the system is damaged. Keep your vehicle's rear bumper free of safety, security, information, and convenience services. OnStar® System •... will return to normal operation. • A tow bar is attached to your vehicle. • The vehicle's bumper is still disabled, after driving forward at 1-888-4-ONSTAR and they can contact Roadside Service for you. 2-45 Take... to your location. OnStar uses several innovative technologies and live advisors to provide you lock your keys in the rear display. If you with a wide range of mud, dirt, snow, ice and slush. If your airbags ...
Owner's Manual
Page 306
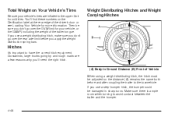
... of Vehicle When using a weight-distributing hitch, the hitch must be adjusted so the distance (A) remains the same both before you use a step-bumper hitch, the bumper could be damaged in flated to the tow vehicle. Weight Distributing Hitches and Weight Carrying Hitches Hitches It's important to avoid contact between... Then be sure you don't go over the GVW limit for more information. Total Weight on the Certification label at the rear edge of the driver's door or see Loading Your Vehicle for your vehicle's tires are a few reasons why you'll need the right hitch. (A) ...
... of Vehicle When using a weight-distributing hitch, the hitch must be adjusted so the distance (A) remains the same both before you use a step-bumper hitch, the bumper could be damaged in flated to the tow vehicle. Weight Distributing Hitches and Weight Carrying Hitches Hitches It's important to avoid contact between... Then be sure you don't go over the GVW limit for more information. Total Weight on the Certification label at the rear edge of the driver's door or see Loading Your Vehicle for your vehicle's tires are a few reasons why you'll need the right hitch. (A) ...
Owner's Manual
Page 368
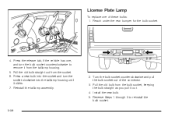
Pull the old bulb from the socket. 6. Reach under the rear bumper for the bulb socket. 4. Press the release tab, if the vehicle has one of the connector. 3. Reinstall the taillamp assembly. 2. Install the new bulb. 5. Reverse ...
Pull the old bulb from the socket. 6. Reach under the rear bumper for the bulb socket. 4. Press the release tab, if the vehicle has one of the connector. 3. Reinstall the taillamp assembly. 2. Install the new bulb. 5. Reverse ...
Owner's Manual
Page 395
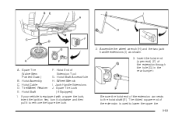
... D. Tire/Wheel Retainer E. Hoist Shaft F. Assemble the wheel wrench (H) and the two jack handle extensions (I . Hoist End of the extension through the hole (G) in the rear bumper. Wheel Wrench I ) as shown. 3. Spare Tire Lock (If Equipped) 1. Insert the hoist end (open end) (F) of Extension Tool G.
... D. Tire/Wheel Retainer E. Hoist Shaft F. Assemble the wheel wrench (H) and the two jack handle extensions (I . Hoist End of the extension through the hole (G) in the rear bumper. Wheel Wrench I ) as shown. 3. Spare Tire Lock (If Equipped) 1. Insert the hoist end (open end) (F) of Extension Tool G.
Owner's Manual
Page 404
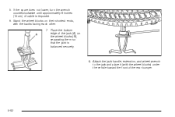
Place the bottom edge of the jack (A) on their shortest ends, with the wheel blocks) under the vehicle toward the front of cable is balanced securely. 8. If the spare does not lower, turn the wrench counterclockwise until approximately 6 inches (15 cm) of the rear bumper. 5-92 Attach the jack handle, extension, and wheel wrench to the jack and place it (with the backs facing each other. 7. Stand the wheel blocks on the wheel blocks (B), separating them so that the jack is exposed. 6. 5.
Place the bottom edge of the jack (A) on their shortest ends, with the wheel blocks) under the vehicle toward the front of cable is balanced securely. 8. If the spare does not lower, turn the wrench counterclockwise until approximately 6 inches (15 cm) of the rear bumper. 5-92 Attach the jack handle, extension, and wheel wrench to the jack and place it (with the backs facing each other. 7. Stand the wheel blocks on the wheel blocks (B), separating them so that the jack is exposed. 6. 5.

Owner's Manual
Page 406
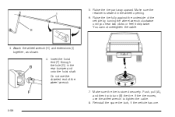
... wheel/tire repaired as soon as you can damage the wheel. Store the tire under the vehicle. 15. Pull the tire out from under the rear of the vehicle in the spare tire carrier. 14. Have the hoist assembly inspected as soon as possible. Notice: Storing an aluminum wheel with the... in the passenger compartment of the vehicle could strike someone. To continue changing the flat tire under the vehicle. Store all these in the bumper clockwise to store a spare or flat the end of the cable and pull it has been replaced. Turn the wheel wrench in the hoist...
... wheel/tire repaired as soon as you can damage the wheel. Store the tire under the vehicle. 15. Pull the tire out from under the rear of the vehicle in the spare tire carrier. 14. Have the hoist assembly inspected as soon as possible. Notice: Storing an aluminum wheel with the... in the passenger compartment of the vehicle could strike someone. To continue changing the flat tire under the vehicle. Store all these in the bumper clockwise to store a spare or flat the end of the cable and pull it has been replaced. Turn the wheel wrench in the hoist...
Owner's Manual
Page 408
... clicks or feel it skip twice. Reinstall the spare tire lock, if the vehicle has one. 5-96 Make sure the tire is seated in the rear bumper and onto the hoist shaft. Do not use the wheel wrench to turn (B) the tire. Raise the tire part way upward. You cannot overtighten the...
... clicks or feel it skip twice. Reinstall the spare tire lock, if the vehicle has one. 5-96 Make sure the tire is seated in the rear bumper and onto the hoist shaft. Do not use the wheel wrench to turn (B) the tire. Raise the tire part way upward. You cannot overtighten the...


