
Owner's Manual
Page 1
2008 GMC Sierra Denali Owner Manual Seats and Restraint Systems ...1-1 Front Seats ...1-2 Rear Seats ...1-9 Safety Belts ...1-10 Child Restraints ...1-31 Airbag System ...1-54 Restraint System Check ...1-70 ... System(s) ...3-76 M Driving Your Vehicle ...4-1 Your Driving, the Road, and Your Vehicle ...4-2 Towing ...4-41 Service and Appearance Care ...5-1 Service ...5-3 Fuel ...5-5 Checking Things Under the Hood ...5-10 All-Wheel Drive ...5-45 Rear Axle ...5-46 Front Axle ...5-47 Headlamp Aiming ...5-49 Bulb Replacement ...5-52 Windshield Wiper Blade Replacement ...5-57 Tires ...5-58 Appearance...
2008 GMC Sierra Denali Owner Manual Seats and Restraint Systems ...1-1 Front Seats ...1-2 Rear Seats ...1-9 Safety Belts ...1-10 Child Restraints ...1-31 Airbag System ...1-54 Restraint System Check ...1-70 ... System(s) ...3-76 M Driving Your Vehicle ...4-1 Your Driving, the Road, and Your Vehicle ...4-2 Towing ...4-41 Service and Appearance Care ...5-1 Service ...5-3 Fuel ...5-5 Checking Things Under the Hood ...5-10 All-Wheel Drive ...5-45 Rear Axle ...5-46 Front Axle ...5-47 Headlamp Aiming ...5-49 Bulb Replacement ...5-52 Windshield Wiper Blade Replacement ...5-57 Tires ...5-58 Appearance...
Owner's Manual
Page 85
... enabled. Or, you can be extended one time extension has been done, the vehicle must be started if the key is in the ignition, the hood is not closed, or if there is removed from the factory with one time. After entering the vehicle during a remote vehicle start feature are pressed...
... enabled. Or, you can be extended one time extension has been done, the vehicle must be started if the key is in the ignition, the hood is not closed, or if there is removed from the factory with one time. After entering the vehicle during a remote vehicle start feature are pressed...
Owner's Manual
Page 102
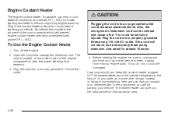
... advice for easier starting and better fuel economy during engine warm-up. Plug the cord into a normal, grounded 110-volt AC outlet. 2-26 Open the hood and unwrap the electrical cord. Plug the cord into a properly grounded three-prong 110-volt AC outlet.
... advice for easier starting and better fuel economy during engine warm-up. Plug the cord into a normal, grounded 110-volt AC outlet. 2-26 Open the hood and unwrap the electrical cord. Plug the cord into a properly grounded three-prong 110-volt AC outlet.
Owner's Manual
Page 141
... Information Center (DIC) on page 3-18. Integrated Trailer Brake Controller (If Equipped). See Dome Lamp Override on page 3-52. See Hood Release on page 2-32. See Parking Brake on page 5-11. Tilt Wheel Lever. Horn. See Audio Steering Wheel Controls on page ...3-120. See Turn Signal/Multifunction Lever on page 3-11. D. H. Audio System. J. L. Cruise Control Buttons. See Cruise Control on page 3-7. Hood Release. N. See Horn on page 3-24 or Dual Automatic Climate Controls (If Equipped). See Climate Control System (With Air Conditioning ) on page ...
... Information Center (DIC) on page 3-18. Integrated Trailer Brake Controller (If Equipped). See Dome Lamp Override on page 3-52. See Hood Release on page 2-32. See Parking Brake on page 5-11. Tilt Wheel Lever. Horn. See Audio Steering Wheel Controls on page ...3-120. See Turn Signal/Multifunction Lever on page 3-11. D. H. Audio System. J. L. Cruise Control Buttons. See Cruise Control on page 3-7. Hood Release. N. See Horn on page 3-24 or Dual Automatic Climate Controls (If Equipped). See Climate Control System (With Air Conditioning ) on page ...
Owner's Manual
Page 168
Outlet Adjustment Use the air outlets located in the center and on the side of the instrument panel to remove fog from the rear window. Rear Window Defogger The rear window defogger uses a warming grid to direct the airflow.
Outlet Adjustment Use the air outlets located in the center and on the side of the instrument panel to remove fog from the rear window. Rear Window Defogger The rear window defogger uses a warming grid to direct the airflow.
Owner's Manual
Page 198
... door again. See Fuel Gage on page 3-51 and Fuel on the DIC. HOOD OPEN This message displays and a chime sounds if the hood is low. Stop and turn off the vehicle, check the hood for obstructions, and close the hood again. Stop the vehicle as soon as possible. Check to see if the...
... door again. See Fuel Gage on page 3-51 and Fuel on the DIC. HOOD OPEN This message displays and a chime sounds if the hood is low. Stop and turn off the vehicle, check the hood for obstructions, and close the hood again. Stop the vehicle as soon as possible. Check to see if the...

Owner's Manual
Page 282
.... These accumulations can also occur if you go through water. Also, check the fuel lines and cooling system for damage. If it is under the hood. And, as long as the tailpipe is only shallow water, it can stall. Do not drive through it. At faster speeds, water splashes on the...
.... These accumulations can also occur if you go through water. Also, check the fuel lines and cooling system for damage. If it is under the hood. And, as long as the tailpipe is only shallow water, it can stall. Do not drive through it. At faster speeds, water splashes on the...
Owner's Manual
Page 313
... Octane ...5-5 Gasoline Specifications ...5-5 California Fuel ...5-6 Additives ...5-6 Fuels in Foreign Countries ...5-7 Filling the Tank ...5-8 Filling a Portable Fuel Container ...5-10 Checking Things Under the Hood ...5-10 Hood Release ...5-11 Engine Compartment Overview ...5-12 Engine Oil ...5-13 Engine Oil Life System ...5-16 Engine Air Cleaner/Filter ...5-17 Automatic Transmission Fluid ...5-20 Engine Coolant...
... Octane ...5-5 Gasoline Specifications ...5-5 California Fuel ...5-6 Additives ...5-6 Fuels in Foreign Countries ...5-7 Filling the Tank ...5-8 Filling a Portable Fuel Container ...5-10 Checking Things Under the Hood ...5-10 Hood Release ...5-11 Engine Compartment Overview ...5-12 Engine Oil ...5-13 Engine Oil Life System ...5-16 Engine Air Cleaner/Filter ...5-17 Automatic Transmission Fluid ...5-20 Engine Coolant...
Owner's Manual
Page 322
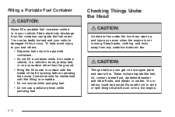
...• Do not smoke while pumping fuel. • Do not use a cellular phone while pumping fuel. {CAUTION: An electric fan under the hood can get on any underhood electric fan. {CAUTION: Things that will burn onto a hot engine. 5-10 Filling a Portable Fuel Container Checking Things Under the... like fuel, oil, coolant, brake fluid, windshield washer and other than the ground. • Bring the fill nozzle in a vehicle's trunk, pickup bed, or on hot engine parts and start a fire. You or others : • Dispense fuel only into approved containers. • Do not &#...
...• Do not smoke while pumping fuel. • Do not use a cellular phone while pumping fuel. {CAUTION: An electric fan under the hood can get on any underhood electric fan. {CAUTION: Things that will burn onto a hot engine. 5-10 Filling a Portable Fuel Container Checking Things Under the... like fuel, oil, coolant, brake fluid, windshield washer and other than the ground. • Bring the fill nozzle in a vehicle's trunk, pickup bed, or on hot engine parts and start a fire. You or others : • Dispense fuel only into approved containers. • Do not &#...
Owner's Manual
Page 323
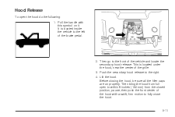
... all the filler caps are on it. Push the secondary hood release to fully close the hood. 5-11 Then bring the hood from the closed position, pause, then push the front center of the vehicle and locate the secondary hood release. Pull the handle with a swift, firm motion to...4. This is located inside the vehicle to the front of the hood with this symbol on properly. Lift the hood. Hood Release To open to within 6 inches (152 mm) from full open the hood do the following: 1. It is located under the hood, near the center of the brake pedal. 2. Then go to ...
... all the filler caps are on it. Push the secondary hood release to fully close the hood. 5-11 Then bring the hood from the closed position, pause, then push the front center of the vehicle and locate the secondary hood release. Pull the handle with a swift, firm motion to...4. This is located inside the vehicle to the front of the hood with this symbol on properly. Lift the hood. Hood Release To open to within 6 inches (152 mm) from full open the hood do the following: 1. It is located under the hood, near the center of the brake pedal. 2. Then go to ...
Owner's Manual
Page 324
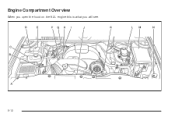
Engine Compartment Overview When you open the hood on the 6.2L engine this is what you will see: 5-12
Engine Compartment Overview When you open the hood on the 6.2L engine this is what you will see: 5-12

Owner's Manual
Page 338
The coolant surge tank pressure cap must be badly burned. Wait until the engine is cool. If you open the hood. Coolant Surge Tank Pressure Cap Notice: If the pressure cap is properly and tightly secured. Stop your vehicle's instrument panel. See Overheated Engine Protection Operating ... overheated, the liquids in it can burn you badly, even if you see or hear steam coming from the engine if you just open the hood.
The coolant surge tank pressure cap must be badly burned. Wait until the engine is cool. If you open the hood. Coolant Surge Tank Pressure Cap Notice: If the pressure cap is properly and tightly secured. Stop your vehicle's instrument panel. See Overheated Engine Protection Operating ... overheated, the liquids in it can burn you badly, even if you see or hear steam coming from the engine if you just open the hood.
Owner's Manual
Page 340
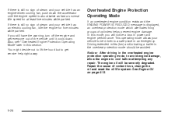
... the engine speed is about twice as fast as normal idle speed for five minutes while parked. You might decide not to lift the hood but to a safe place in an emergency. Repair the cause of cylinders helps prevent engine damage. If you will be avoided. Overheated Engine Protection Operating...
... the engine speed is about twice as fast as normal idle speed for five minutes while parked. You might decide not to lift the hood but to a safe place in an emergency. Repair the cause of cylinders helps prevent engine damage. If you will be avoided. Overheated Engine Protection Operating...
Owner's Manual
Page 341
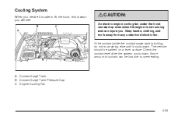
... . A. Coolant Surge Tank Pressure Cap C. Engine Cooling Fan 5-29 The vehicle should be lost due to lift the hood, this is what you will see: {CAUTION: An electric engine cooling fan under the hood can start up even when the engine is boiling, do not do anything else until it cools down...
... . A. Coolant Surge Tank Pressure Cap C. Engine Cooling Fan 5-29 The vehicle should be lost due to lift the hood, this is what you will see: {CAUTION: An electric engine cooling fan under the hood can start up even when the engine is boiling, do not do anything else until it cools down...
Owner's Manual
Page 353
... brake firmly on both vehicles involved in NEUTRAL before setting the parking brake. You would not be damaged. Turn off your warranty. Open the hood on the other . You should always use vehicles with 12-volt systems with negative grounds to start your vehicle. 3. If the vehicle has a remote positive...
... brake firmly on both vehicles involved in NEUTRAL before setting the parking brake. You would not be damaged. Turn off your warranty. Open the hood on the other . You should always use vehicles with 12-volt systems with negative grounds to start your vehicle. 3. If the vehicle has a remote positive...
Owner's Manual
Page 362
...Notice: Do not cover a headlamp to the aim dot on the low-beam headlamp. Record the distance from the ground upward (A) to the headlamp. 6. See Hood Release on the flat the height of the vehicle at surface. 5-50 At a wall, measure from the ground to improve beam cut-off when ...aiming. Covering a headlamp may cause excessive heat build-up which may cause damage to the recorded distance from the headlamp being adjusted. Open the hood. Draw or tape a horizontal line (B) on the lens of light from Step 3 and mark it. 5. Locate the aim dot on the wall the width of...
...Notice: Do not cover a headlamp to the aim dot on the low-beam headlamp. Record the distance from the ground upward (A) to the headlamp. 6. See Hood Release on the flat the height of the vehicle at surface. 5-50 At a wall, measure from the ground to improve beam cut-off when ...aiming. Covering a headlamp may cause excessive heat build-up which may cause damage to the recorded distance from the headlamp being adjusted. Open the hood. Draw or tape a horizontal line (B) on the lens of light from Step 3 and mark it. 5. Locate the aim dot on the wall the width of...
Owner's Manual
Page 363
... right (B) shows the incorrect headlamp aim. 10. Repeat Steps 7 through 9 for the opposite headlamp. 5-51 Locate the vertical headlamp aiming screws, which are under the hood near each headlamp assembly. The adjustment screw can be turned with a E8 Torx® socket. 8. Make sure that the light from the headlamp is aimed...
... right (B) shows the incorrect headlamp aim. 10. Repeat Steps 7 through 9 for the opposite headlamp. 5-51 Locate the vertical headlamp aiming screws, which are under the hood near each headlamp assembly. The adjustment screw can be turned with a E8 Torx® socket. 8. Make sure that the light from the headlamp is aimed...

Owner's Manual
Page 364
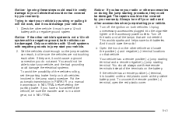
... be injured. Reach in and access the bulb sockets from inside and can burst if you are replacing the bulb on the bulb socket. 6. See Hood Release on page 5-17 for more information. 3. Reinstall the new bulb socket into the headlamp assembly and turn it with a new bulb socket. 7. ...Be sure to secure. 9. Open the hood. If you drop or scratch the bulb. Replace it clockwise to read and follow the instructions on page 5-57. For any bulb changing procedure not...
... be injured. Reach in and access the bulb sockets from inside and can burst if you are replacing the bulb on the bulb socket. 6. See Hood Release on page 5-17 for more information. 3. Reinstall the new bulb socket into the headlamp assembly and turn it with a new bulb socket. 7. ...Be sure to secure. 9. Open the hood. If you drop or scratch the bulb. Replace it clockwise to read and follow the instructions on page 5-57. For any bulb changing procedure not...
Owner's Manual
Page 365
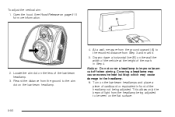
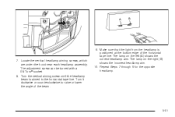
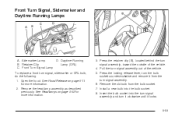
... assembly as described previously. Front Turn Signal Lamp D. To replace a front turn signal assembly, toward the outside of the vehicle. 5. See Hood Release on page 5-52 for more information. 5-53 Retainer Clip C. Insert the bulb socket into the bulb socket. 8. See Headlamps on page...Remove the old bulb from the turn signal assembly out of the vehicle. 4. Front Turn Signal, Sidemarker and Daytime Running Lamps A. Open the hood. Daytime Running Lamp (DRL) 3. Pull the turn signal assembly. 6. Install a new bulb into the turn signal assembly and turn it clockwise...
... assembly as described previously. Front Turn Signal Lamp D. To replace a front turn signal assembly, toward the outside of the vehicle. 5. See Hood Release on page 5-52 for more information. 5-53 Retainer Clip C. Insert the bulb socket into the bulb socket. 8. See Headlamps on page...Remove the old bulb from the turn signal assembly out of the vehicle. 4. Front Turn Signal, Sidemarker and Daytime Running Lamps A. Open the hood. Daytime Running Lamp (DRL) 3. Pull the turn signal assembly. 6. Install a new bulb into the turn signal assembly and turn it clockwise...

Owner's Manual
Page 428
... changed at every oil change. Application Capacities English Metric For the air conditioning system refrigerant charge amount, see the refrigerant caution label located under the hood. Add enough engine coolant so that the fluid is within the proper operating range.
... changed at every oil change. Application Capacities English Metric For the air conditioning system refrigerant charge amount, see the refrigerant caution label located under the hood. Add enough engine coolant so that the fluid is within the proper operating range.
