
Owner's Manual
Page 1
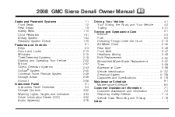
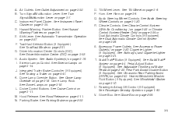
2008 GMC Sierra Denali Owner Manual Seats and Restraint Systems ...1-1 Front Seats ...1-2 Rear Seats ...1-9 Safety Belts ...1-10 Child Restraints ...1-31 Airbag System ...1-54 Restraint System Check ...1-70 ... System(s) ...3-76 M Driving Your Vehicle ...4-1 Your Driving, the Road, and Your Vehicle ...4-2 Towing ...4-41 Service and Appearance Care ...5-1 Service ...5-3 Fuel ...5-5 Checking Things Under the Hood ...5-10 All-Wheel Drive ...5-45 Rear Axle ...5-46 Front Axle ...5-47 Headlamp Aiming ...5-49 Bulb Replacement ...5-52 Windshield Wiper Blade Replacement ...5-57 Tires ...5-58 Appearance...
2008 GMC Sierra Denali Owner Manual Seats and Restraint Systems ...1-1 Front Seats ...1-2 Rear Seats ...1-9 Safety Belts ...1-10 Child Restraints ...1-31 Airbag System ...1-54 Restraint System Check ...1-70 ... System(s) ...3-76 M Driving Your Vehicle ...4-1 Your Driving, the Road, and Your Vehicle ...4-2 Towing ...4-41 Service and Appearance Care ...5-1 Service ...5-3 Fuel ...5-5 Checking Things Under the Hood ...5-10 All-Wheel Drive ...5-45 Rear Axle ...5-46 Front Axle ...5-47 Headlamp Aiming ...5-49 Bulb Replacement ...5-52 Windshield Wiper Blade Replacement ...5-57 Tires ...5-58 Appearance...
Owner's Manual
Page 85
..., 10 minutes are added, allowing the engine to run for 15 minutes. Or, you can be started if the key is in the ignition, the hood is not closed, or if there is an emission control system malfunction and the check engine light comes on. After entering the vehicle during a remote...
..., 10 minutes are added, allowing the engine to run for 15 minutes. Or, you can be started if the key is in the ignition, the hood is not closed, or if there is an emission control system malfunction and the check engine light comes on. After entering the vehicle during a remote...
Owner's Manual
Page 102
.... The dealer/retailer can help in the coolant heater at least four hours before to list everything here, we ask that particular area. Open the hood and unwrap the electrical cord. The answer depends on the driver's side of extension cord could cause an electrical shock. Plug the cord into a properly...
.... The dealer/retailer can help in the coolant heater at least four hours before to list everything here, we ask that particular area. Open the hood and unwrap the electrical cord. The answer depends on the driver's side of extension cord could cause an electrical shock. Plug the cord into a properly...
Owner's Manual
Page 141
...14. See Glove Box on page 3-6. See Hazard Warning Flashers on page 2-56. 3-5 Shift Lever. F. Tow/Haul Selector Button (If Equipped). Hood Release. See Dual Automatic Climate Control System on page 3-6. S. Pedal Adjust Button (If Equipped). Air Outlets. L. See Tilt Wheel on page ...3-26. Heated Windshield Washer Fluid Button (If Equipped). B. See Instrument Panel Cluster on page 5-11. See Hood Release on page 3-34. O. See Audio Steering Wheel Controls on page 3-10. See Windshield Washer on page 3-120. V. D. T. See Cruise...
...14. See Glove Box on page 3-6. See Hazard Warning Flashers on page 2-56. 3-5 Shift Lever. F. Tow/Haul Selector Button (If Equipped). Hood Release. See Dual Automatic Climate Control System on page 3-6. S. Pedal Adjust Button (If Equipped). Air Outlets. L. See Tilt Wheel on page ...3-26. Heated Windshield Washer Fluid Button (If Equipped). B. See Instrument Panel Cluster on page 5-11. See Hood Release on page 3-34. O. See Audio Steering Wheel Controls on page 3-10. See Windshield Washer on page 3-120. V. D. T. See Cruise...
Owner's Manual
Page 168
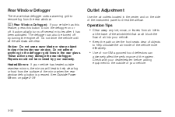
Rear Window Defogger The rear window defogger uses a warming grid to direct the airflow. Outlet Adjustment Use the air outlets located in the center and on the side of the instrument panel to remove fog from the rear window.
Rear Window Defogger The rear window defogger uses a warming grid to direct the airflow. Outlet Adjustment Use the air outlets located in the center and on the side of the instrument panel to remove fog from the rear window.
Owner's Manual
Page 198
Stop and turn off the vehicle, check the hood for obstructions, and close the hood again. Check to see Ultrasonic Rear Parking Assist (URPA) on page 2-43. 3-62 Do not drive the vehicle until the cause of the low oil ... and do not operate it from the DIC display. See Fuel Gage on page 3-51 and Fuel on page 5-13. HOOD OPEN This message displays and a chime sounds if the hood is not fully closed and the vehicle is low, severe engine damage may occur. LEFT REAR DOOR OPEN This message displays...
Stop and turn off the vehicle, check the hood for obstructions, and close the hood again. Check to see Ultrasonic Rear Parking Assist (URPA) on page 2-43. 3-62 Do not drive the vehicle until the cause of the low oil ... and do not operate it from the DIC display. See Fuel Gage on page 3-51 and Fuel on page 5-13. HOOD OPEN This message displays and a chime sounds if the hood is not fully closed and the vehicle is low, severe engine damage may occur. LEFT REAR DOOR OPEN This message displays...

Owner's Manual
Page 282
... brakes get through. Driving in Water {CAUTION: Driving through rushing water can be a fire hazard. Find out how deep the water is under the hood. Your vehicle will not get wet, it may take you drive through it . These accumulations can be dangerous. Also, check the fuel lines and cooling...
... brakes get through. Driving in Water {CAUTION: Driving through rushing water can be a fire hazard. Find out how deep the water is under the hood. Your vehicle will not get wet, it may take you drive through it . These accumulations can be dangerous. Also, check the fuel lines and cooling...
Owner's Manual
Page 313
... Octane ...5-5 Gasoline Specifications ...5-5 California Fuel ...5-6 Additives ...5-6 Fuels in Foreign Countries ...5-7 Filling the Tank ...5-8 Filling a Portable Fuel Container ...5-10 Checking Things Under the Hood ...5-10 Hood Release ...5-11 Engine Compartment Overview ...5-12 Engine Oil ...5-13 Engine Oil Life System ...5-16 Engine Air Cleaner/Filter ...5-17 Automatic Transmission Fluid ...5-20 Engine Coolant...
... Octane ...5-5 Gasoline Specifications ...5-5 California Fuel ...5-6 Additives ...5-6 Fuels in Foreign Countries ...5-7 Filling the Tank ...5-8 Filling a Portable Fuel Container ...5-10 Checking Things Under the Hood ...5-10 Hood Release ...5-11 Engine Compartment Overview ...5-12 Engine Oil ...5-13 Engine Oil Life System ...5-16 Engine Air Cleaner/Filter ...5-17 Automatic Transmission Fluid ...5-20 Engine Coolant...
Owner's Manual
Page 322
...complete. • Do not smoke while pumping fuel. • Do not use a cellular phone while pumping fuel. {CAUTION: An electric fan under the hood can be burned. Be careful not to you even when the engine is not running. To help avoid injury to drop or spill things that... or rubber. You can start a fire. Filling a Portable Fuel Container Checking Things Under the Hood {CAUTION: Never fill a portable fuel container while it is inside a vehicle, in a vehicle's trunk, pickup bed, or on hot engine parts and start up and injure you and others could be badly burned...
...complete. • Do not smoke while pumping fuel. • Do not use a cellular phone while pumping fuel. {CAUTION: An electric fan under the hood can be burned. Be careful not to you even when the engine is not running. To help avoid injury to drop or spill things that... or rubber. You can start a fire. Filling a Portable Fuel Container Checking Things Under the Hood {CAUTION: Never fill a portable fuel container while it is inside a vehicle, in a vehicle's trunk, pickup bed, or on hot engine parts and start up and injure you and others could be badly burned...
Owner's Manual
Page 323
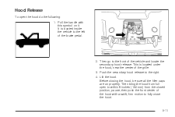
... of the grille. 3. Lift the hood. Push the secondary hood release to the right. 4. Pull the handle with a swift, firm motion to fully close the hood. 5-11 Then go to the front of the hood with this symbol on properly. Then bring the hood from the closed position, pause, then... push the front center of the vehicle and locate the secondary hood release. Hood Release To open to within 6 inches (...
... of the grille. 3. Lift the hood. Push the secondary hood release to the right. 4. Pull the handle with a swift, firm motion to fully close the hood. 5-11 Then go to the front of the hood with this symbol on properly. Then bring the hood from the closed position, pause, then... push the front center of the vehicle and locate the secondary hood release. Hood Release To open to within 6 inches (...
Owner's Manual
Page 324
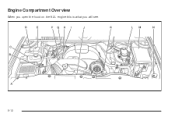
Engine Compartment Overview When you open the hood on the 6.2L engine this is what you will see: 5-12
Engine Compartment Overview When you open the hood on the 6.2L engine this is what you will see: 5-12

Owner's Manual
Page 338
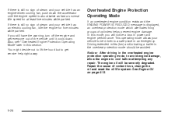
... if it overheats, and get everyone away from the vehicle until it off and get out of steam or coolant before you just open the hood. The coolant surge tank pressure cap must be badly burned. See Overheated Engine Protection Operating Mode on page 5-28 for more information on page 3-59... engine can catch fire. If Steam Is Coming From Your Engine {CAUTION: Steam from it can burn you badly, even if you open the hood. In addition, ENGINE OVERHEATED STOP ENGINE, ENGINE OVERHEATED IDLE ENGINE, and a ENGINE POWER IS REDUCED message comes on the instrument panel.
... if it overheats, and get everyone away from the vehicle until it off and get out of steam or coolant before you just open the hood. The coolant surge tank pressure cap must be badly burned. See Overheated Engine Protection Operating Mode on page 5-28 for more information on page 3-59... engine can catch fire. If Steam Is Coming From Your Engine {CAUTION: Steam from it can burn you badly, even if you open the hood. In addition, ENGINE OVERHEATED STOP ENGINE, ENGINE OVERHEATED IDLE ENGINE, and a ENGINE POWER IS REDUCED message comes on the instrument panel.
Owner's Manual
Page 340
... which alternates firing groups of steam and your vehicle has an engine-driven cooling fan, push down . You might decide not to lift the hood but to get everyone out of coolant loss, change the oil and reset the oil life system. Driving extended miles (km) and/or towing a trailer...
... which alternates firing groups of steam and your vehicle has an engine-driven cooling fan, push down . You might decide not to lift the hood but to get everyone out of coolant loss, change the oil and reset the oil life system. Driving extended miles (km) and/or towing a trailer...
Owner's Manual
Page 341
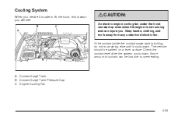
... B. If the coolant inside the coolant surge tank is not running and can injure you will see: {CAUTION: An electric engine cooling fan under the hood can be parked on a level surface. Check the coolant level after the system cools down . Coolant Surge Tank Pressure Cap C. Engine Cooling Fan 5-29 Some...
... B. If the coolant inside the coolant surge tank is not running and can injure you will see: {CAUTION: An electric engine cooling fan under the hood can be parked on a level surface. Check the coolant level after the system cools down . Coolant Surge Tank Pressure Cap C. Engine Cooling Fan 5-29 Some...
Owner's Manual
Page 353
... want. Always turn off your radio and other vehicle and locate the positive (+) and negative (−) terminal locations on that are not needed. Open the hood on the other accessories when jump starting your vehicle. 1. Check the other accessories on during the jump starting terminal. If they could be sure the...
... want. Always turn off your radio and other vehicle and locate the positive (+) and negative (−) terminal locations on that are not needed. Open the hood on the other accessories when jump starting your vehicle. 1. Check the other accessories on during the jump starting terminal. If they could be sure the...
Owner's Manual
Page 362
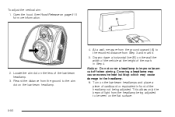
... the mark in Step 4. 2. Covering a headlamp may cause excessive heat build-up which may cause damage to improve beam cut-off when aiming. Open the hood. Record the distance from Step 3 and mark it. 5. Turn on the flat surface. 5-50 See...
... the mark in Step 4. 2. Covering a headlamp may cause excessive heat build-up which may cause damage to improve beam cut-off when aiming. Open the hood. Record the distance from Step 3 and mark it. 5. Turn on the flat surface. 5-50 See...
Owner's Manual
Page 363
... aiming screw until the headlamp beam is positioned at the bottom edge of the beam. 9. Locate the vertical headlamp aiming screws, which are under the hood near each headlamp assembly. Make sure that the light from the headlamp is aimed to raise or lower the angle of the horizontal tape line...
... aiming screw until the headlamp beam is positioned at the bottom edge of the beam. 9. Locate the vertical headlamp aiming screws, which are under the hood near each headlamp assembly. Make sure that the light from the headlamp is aimed to raise or lower the angle of the horizontal tape line...

Owner's Manual
Page 364
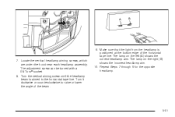
...into the headlamp assembly and turn it with a new bulb socket. 7. Be sure to secure. 9. Close the hood. You or others could be injured. Open the hood. See Engine Air Cleaner/Filter on the passenger side remove the Engine Air Cleaner cover. Halogen Bulbs {CAUTION: Halogen... bulbs have pressurized gas inside the engine compartment. 5-52 4. See Hood Release on page 5-57. Bulb Replacement For the proper type of these bulbs: 1. Unplug the electrical connector from the headlamp assembly and ...
...into the headlamp assembly and turn it with a new bulb socket. 7. Be sure to secure. 9. Close the hood. You or others could be injured. Open the hood. See Engine Air Cleaner/Filter on the passenger side remove the Engine Air Cleaner cover. Halogen Bulbs {CAUTION: Halogen... bulbs have pressurized gas inside the engine compartment. 5-52 4. See Hood Release on page 5-57. Bulb Replacement For the proper type of these bulbs: 1. Unplug the electrical connector from the headlamp assembly and ...
Owner's Manual
Page 365
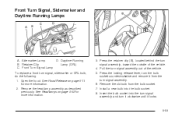
Front Turn Signal Lamp D. Press the retainer clip (B), located behind the turn signal assembly out of the vehicle. 4. See Hood Release on page 5-52 for more information. 5-53 Remove the headlamp assembly as described previously. See Headlamps on page 5-11 for more information. 2. Remove the ... the bulb socket into the bulb socket. 8. Press the locking release lever, turn signal, sidemarker or DRL bulb, do the following: 1. Retainer Clip C. Open the hood.
Front Turn Signal Lamp D. Press the retainer clip (B), located behind the turn signal assembly out of the vehicle. 4. See Hood Release on page 5-52 for more information. 5-53 Remove the headlamp assembly as described previously. See Headlamps on page 5-11 for more information. 2. Remove the ... the bulb socket into the bulb socket. 8. Press the locking release lever, turn signal, sidemarker or DRL bulb, do the following: 1. Retainer Clip C. Open the hood.

Owner's Manual
Page 428
Application Capacities English Metric For the air conditioning system refrigerant charge amount, see the refrigerant caution label located under the hood. After refill, the level must be changed at every oil change. Capacities and Specifications The following approximate capacities are given in (1....
Application Capacities English Metric For the air conditioning system refrigerant charge amount, see the refrigerant caution label located under the hood. After refill, the level must be changed at every oil change. Capacities and Specifications The following approximate capacities are given in (1....
