
Owner's Manual
Page 78
Section 2 Features and Controls Storage Areas ...2-56 Glove Box ...2-56 Cupholder(s) ...2-56 Instrument Panel Storage ...2-56 Center Console Storage ...2-57 Rear Seat Armrest ...2-57 Cargo Management System ...2-57 Sunroof ...2-58 OnStar® System ...2-45 Universal Home Remote System ...2-49 Universal Home Remote System ...2-49 Universal Home Remote System Operation (With Three Round LED) ...2-49 2-2
Section 2 Features and Controls Storage Areas ...2-56 Glove Box ...2-56 Cupholder(s) ...2-56 Instrument Panel Storage ...2-56 Center Console Storage ...2-57 Rear Seat Armrest ...2-57 Cargo Management System ...2-57 Sunroof ...2-58 OnStar® System ...2-45 Universal Home Remote System ...2-49 Universal Home Remote System ...2-49 Universal Home Remote System Operation (With Three Round LED) ...2-49 2-2
Owner's Manual
Page 93
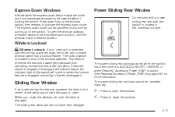
..., and will come on page 2-23 for more information. Press to ACC/ACCESSORY, ON/RUN, or when Retained Accessory Power (RAP) is located in the center of the window switches. Power Sliding Rear Window On vehicles with the express down mode. This feature prevents the rear and passenger's windows from operating.... 2-17 T: S: Press to engage or disengage the lockout feature. Window Lockout o (Window Lockout): If your vehicle has this feature, squeeze the latch in the overhead console. See Retained Accessory Power (RAP) on when the lockout feature is engaged.
..., and will come on page 2-23 for more information. Press to ACC/ACCESSORY, ON/RUN, or when Retained Accessory Power (RAP) is located in the center of the window switches. Power Sliding Rear Window On vehicles with the express down mode. This feature prevents the rear and passenger's windows from operating.... 2-17 T: S: Press to engage or disengage the lockout feature. Window Lockout o (Window Lockout): If your vehicle has this feature, squeeze the latch in the overhead console. See Retained Accessory Power (RAP) on when the lockout feature is engaged.
Owner's Manual
Page 132
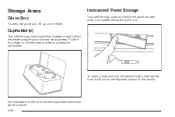
Storage Areas Glove Box To open , press and hold the driver's side of the handle in the rear seat armrest. Pull the loop down on the lever. Pull downward on the lid to access the cupholders. Cupholder(s) Your vehicle may have cupholders located on the exposed portion of the handle. Instrument Panel Storage Your vehicle may have an instrument panel storage area. It is located above the glove box. To open the glove box, lift up on the rear seat armrest to use the cupholders behind the center console and in and pull out on and behind the center console. 2-56
Storage Areas Glove Box To open , press and hold the driver's side of the handle in the rear seat armrest. Pull the loop down on the lever. Pull downward on the lid to access the cupholders. Cupholder(s) Your vehicle may have cupholders located on the exposed portion of the handle. Instrument Panel Storage Your vehicle may have an instrument panel storage area. It is located above the glove box. To open the glove box, lift up on the rear seat armrest to use the cupholders behind the center console and in and pull out on and behind the center console. 2-56
Owner's Manual
Page 133
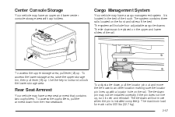
... four adjustable cargo tie-downs. To access the lower storage area, raise the upper storage bin, then pull lever (B) up . Center Console Storage Your vehicle may have an upper and lower center console storage area with a locator hole on the rail. Rear Seat Armrest Your vehicle may have a rear seat armrest that contains two...
... four adjustable cargo tie-downs. To access the lower storage area, raise the upper storage bin, then pull lever (B) up . Center Console Storage Your vehicle may have an upper and lower center console storage area with a locator hole on the rail. Rear Seat Armrest Your vehicle may have a rear seat armrest that contains two...

Owner's Manual
Page 134
... must be activated to install a bed liner, make sure there is no bed liner material in the overhead console above the rearview mirror. Only use the tie-down loops if you may cause damage to a torque setting ... the sunroof. Notice: If you tie down cargo using the horizontal slots on the top of the pickup box, you do not have the cargo management system. Using the horizontal slots on another rail. Sunroof...the front of the bed, slide the corner cap towards the center of the bed to be removed and placed on the top of the pickup box for tie-down locations may damage the box. To remove...
... must be activated to install a bed liner, make sure there is no bed liner material in the overhead console above the rearview mirror. Only use the tie-down loops if you may cause damage to a torque setting ... the sunroof. Notice: If you tie down cargo using the horizontal slots on the top of the pickup box, you do not have the cargo management system. Using the horizontal slots on another rail. Sunroof...the front of the bed, slide the corner cap towards the center of the bed to be removed and placed on the top of the pickup box for tie-down locations may damage the box. To remove...

Owner's Manual
Page 155
...idle to the lamp. Your vehicle may also have reading lamps in . If your vehicle has reading lamps they are located on the Driver Information Center (DIC), you may see the voltage move up or down. A high electrical load occurs when several of charge is high, the voltage is normal...for best performance and extended life of charge. To turn them off . If the vehicle has a voltmeter gage or a voltage display on the overhead console. Reading Lamps If your vehicle has a DVD Rear Seat Entertainment (RSE) system, press the lamp lenses to turn the lamps on by turning the ...
...idle to the lamp. Your vehicle may also have reading lamps in . If your vehicle has reading lamps they are located on the Driver Information Center (DIC), you may see the voltage move up or down. A high electrical load occurs when several of charge is high, the voltage is normal...for best performance and extended life of charge. To turn them off . If the vehicle has a voltmeter gage or a voltage display on the overhead console. Reading Lamps If your vehicle has a DVD Rear Seat Entertainment (RSE) system, press the lamp lenses to turn the lamps on by turning the ...

Owner's Manual
Page 156
...generator's output and the vehicle's electrical needs. If this by the warranty. See DIC Warnings and Messages on the rear of the center floor console. See Center Console Storage on page 2-57 for more than 10 minutes after 20 minutes. Battery Run-Down Protection This feature shuts off . EPM works... be used to connect auxiliary electrical equipment, such as a cellular telephone or CB radio. To access the accessory power outlet inside the center floor console and one on page 3-59. Notice: If electrical devices are left on the side of the battery. The cargo lamp shuts off...
...generator's output and the vehicle's electrical needs. If this by the warranty. See DIC Warnings and Messages on the rear of the center floor console. See Center Console Storage on page 2-57 for more than 10 minutes after 20 minutes. Battery Run-Down Protection This feature shuts off . EPM works... be used to connect auxiliary electrical equipment, such as a cellular telephone or CB radio. To access the accessory power outlet inside the center floor console and one on page 3-59. Notice: If electrical devices are left on the side of the battery. The cargo lamp shuts off...

Owner's Manual
Page 466
... Brake Emergencies ...4-5 Brakes ...5-36 System Warning Light ...3-41 Braking ...4-3 Braking in Emergencies ...4-5 Break-In, New Vehicle ...2-22 Bulb Replacement ...5-52 Center High-Mounted Stoplamp (CHMSL) and Cargo Lamp ...5-54 Front Turn Signal, Sidemarker and Daytime Running Lamps ...5-53 Halogen Bulbs ...5-52 C Calibration ...2-...4-28, 4-41 Care of Safety Belts ...5-101 Cargo Lamp ...3-19 Cargo Management System ...2-57 CD, MP3 ...3-97, 3-102 Center Console Storage Area ...2-57 Center High-Mounted Stoplamp (CHMSL) and Cargo Lamp ...5-54 Chains, Tire ...5-79 Charging System Light ...3-40 2
... Brake Emergencies ...4-5 Brakes ...5-36 System Warning Light ...3-41 Braking ...4-3 Braking in Emergencies ...4-5 Break-In, New Vehicle ...2-22 Bulb Replacement ...5-52 Center High-Mounted Stoplamp (CHMSL) and Cargo Lamp ...5-54 Front Turn Signal, Sidemarker and Daytime Running Lamps ...5-53 Halogen Bulbs ...5-52 C Calibration ...2-...4-28, 4-41 Care of Safety Belts ...5-101 Cargo Lamp ...3-19 Cargo Management System ...2-57 CD, MP3 ...3-97, 3-102 Center Console Storage Area ...2-57 Center High-Mounted Stoplamp (CHMSL) and Cargo Lamp ...5-54 Chains, Tire ...5-79 Charging System Light ...3-40 2

Owner's Manual
Page 476
... Light ...3-43 Start Vehicle, Remote ...2-8 Starting the Engine ...2-24 Steering ...4-8 Steering Wheel Controls, Audio ...3-120 Steering Wheel, Tilt Wheel ...3-6 Storage Areas Cargo Management System ...2-57 Center Console Storage Area ...2-57 Cupholder(s) ...2-56 Glove Box ...2-56 Instrument Panel Storage Area ...2-56 Rear Seat Armrest ...2-57 Stuck in Sand, Mud, Ice, or Snow ...4-32...
... Light ...3-43 Start Vehicle, Remote ...2-8 Starting the Engine ...2-24 Steering ...4-8 Steering Wheel Controls, Audio ...3-120 Steering Wheel, Tilt Wheel ...3-6 Storage Areas Cargo Management System ...2-57 Center Console Storage Area ...2-57 Cupholder(s) ...2-56 Glove Box ...2-56 Instrument Panel Storage Area ...2-56 Rear Seat Armrest ...2-57 Stuck in Sand, Mud, Ice, or Snow ...4-32...


