
Owner's Manual
Page 9
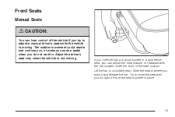
.... The sudden movement could startle and confuse you, or make you push a pedal when you try to be sure the seat is locked in place. 1-3 Lift the bar to move the seat with your vehicle has a manual bucket or a split bench seat, you can lose control of the seat cushion. If...
.... The sudden movement could startle and confuse you, or make you push a pedal when you try to be sure the seat is locked in place. 1-3 Lift the bar to move the seat with your vehicle has a manual bucket or a split bench seat, you can lose control of the seat cushion. If...

Owner's Manual
Page 12
...That could move forward in the desired position. Reclining Seatbacks {CAUTION: If the seatback is not locked, it is locked. To adjust the seatback, lift the manual lever located on the seatback to be sure it could cause injury to lock the seatback in a sudden stop or crash. Release the ...with a power recliner, see Power Seats on page 1-4 for further information on the seatback and the seatback will go to operate the reclining seatback feature. 1-6 Lift the lever again without pushing on how to an upright position. Always push and pull on the outboard side of the seat.
...That could move forward in the desired position. Reclining Seatbacks {CAUTION: If the seatback is not locked, it is locked. To adjust the seatback, lift the manual lever located on the seatback to be sure it could cause injury to lock the seatback in a sudden stop or crash. Release the ...with a power recliner, see Power Seats on page 1-4 for further information on the seatback and the seatback will go to operate the reclining seatback feature. 1-6 Lift the lever again without pushing on how to an upright position. Always push and pull on the outboard side of the seat.

Owner's Manual
Page 14
... returning the seatback to its upright position, push and pull on the seatback to be folded up until it latches. To fold the seatback forward, lift the lever located on it is locked. That could move forward in the extended cab can be sure it latches with the seatback. 3. After latching...
... returning the seatback to its upright position, push and pull on the seatback to be folded up until it latches. To fold the seatback forward, lift the lever located on it is locked. That could move forward in the extended cab can be sure it latches with the seatback. 3. After latching...

Owner's Manual
Page 16
... stop or crash. Push and pull on the cushion to make sure it rearward all the way. {CAUTION: A safety belt that is locked into place. 3. Lift the seatback up on the seatback to make sure it latches into place. 1-10 Pull up and push it is locked. 2. Make sure that the...
... stop or crash. Push and pull on the cushion to make sure it rearward all the way. {CAUTION: A safety belt that is locked into place. 3. Lift the seatback up on the seatback to make sure it latches into place. 1-10 Pull up and push it is locked. 2. Make sure that the...

Owner's Manual
Page 59
... the seatback to be sure it is not locked, it could cause injury to your child restraint manufacturer instructions and the instructions in this manual. 2.1. Lift the seatback up and push it is secure. 1-53 Remove the trim cover to the lower anchors. Push and pull the child restraint in a sudden...
... the seatback to be sure it is not locked, it could cause injury to your child restraint manufacturer instructions and the instructions in this manual. 2.1. Lift the seatback up and push it is secure. 1-53 Remove the trim cover to the lower anchors. Push and pull the child restraint in a sudden...

Owner's Manual
Page 108
... is a crew cab, you can open it. To open a rear access door from the inside of the rear access door to open the tailgate by lifting up , pull it latches securely. 2-14 After you put the tailgate back up on the inside or outside , first open it latches. See Rear...
... is a crew cab, you can open it. To open a rear access door from the inside of the rear access door to open the tailgate by lifting up , pull it latches securely. 2-14 After you put the tailgate back up on the inside or outside , first open it latches. See Rear...

Owner's Manual
Page 109
... the tailgate at the right edge and then move the tailgate to the right to release the left edge. To release the retaining cable clips, lift the cable so it points straight out and push the cable clip forward. 2. Make sure the tailgate is secure. 2-15 To remove the tailgate, do...
... the tailgate at the right edge and then move the tailgate to the right to release the left edge. To release the retaining cable clips, lift the cable so it points straight out and push the cable clip forward. 2. Make sure the tailgate is secure. 2-15 To remove the tailgate, do...
Owner's Manual
Page 198
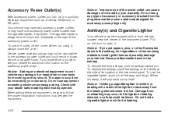
... or CB radio. When not using it or keep other smoking materials could ignite them and possibly damage your vehicle. Do not use the outlet, lift the cover. Notice: If you can cause damage not covered by your warranty. Your vehicle may have one accessory power outlet located near the center...
... or CB radio. When not using it or keep other smoking materials could ignite them and possibly damage your vehicle. Do not use the outlet, lift the cover. Notice: If you can cause damage not covered by your warranty. Your vehicle may have one accessory power outlet located near the center...

Owner's Manual
Page 425
Pull the handle with this symbol on it firmly. 5-13 Then go to the lower left of the grille. 3. Lift the hood. Then pull down the hood and close it . It is located inside the vehicle to the front of the vehicle and pull up on properly. Before closing the hood, be sure all the filler caps are on the secondary hood release located near the center of the steering wheel. 2. Hood Release To open the hood do the following: 1.
Pull the handle with this symbol on it firmly. 5-13 Then go to the lower left of the grille. 3. Lift the hood. Then pull down the hood and close it . It is located inside the vehicle to the front of the vehicle and pull up on properly. Before closing the hood, be sure all the filler caps are on the secondary hood release located near the center of the steering wheel. 2. Hood Release To open the hood do the following: 1.

Owner's Manual
Page 438
... in the red/orange "change" zone, replace the filter and reset the indicator. Loosen the screws on the passenger's side of the housing and lift up the cover. 5-26 Replacing the Engine Air Cleaner/Filter and Resetting the Air Filter Restriction Indicator Vehicles Without an Air Filter Restriction Indicator To...
... in the red/orange "change" zone, replace the filter and reset the indicator. Loosen the screws on the passenger's side of the housing and lift up the cover. 5-26 Replacing the Engine Air Cleaner/Filter and Resetting the Air Filter Restriction Indicator Vehicles Without an Air Filter Restriction Indicator To...

Owner's Manual
Page 451
... and your vehicle to be severely degraded. Also, see "Overheated Engine Protection Operating Mode" later in power and engine performance. You may decide not to lift the hood but to NEUTRAL (N); Turn on , turn off . 2. Overheated Engine Protection Operating Mode (V8 Engines Only) If an overheated engine condition exists and the...
... and your vehicle to be severely degraded. Also, see "Overheated Engine Protection Operating Mode" later in power and engine performance. You may decide not to lift the hood but to NEUTRAL (N); Turn on , turn off . 2. Overheated Engine Protection Operating Mode (V8 Engines Only) If an overheated engine condition exists and the...

Owner's Manual
Page 452
Engine Cooling Fan 8.1L V8 Engines A. Engine Cooling Fan {CAUTION: An electric fan under the hood can start up and injure you even when the engine is what you decide it is safe to lift the hood, here is not running. Coolant Surge Tank Pressure Cap C. Coolant Surge Tank Pressure Cap C. Coolant Surge Tank B. Cooling System When you will see: All Other Engines A. Coolant Surge Tank B. Keep hands, clothing and tools away from any underhood electric fan. 5-40
Engine Cooling Fan 8.1L V8 Engines A. Engine Cooling Fan {CAUTION: An electric fan under the hood can start up and injure you even when the engine is what you decide it is safe to lift the hood, here is not running. Coolant Surge Tank Pressure Cap C. Coolant Surge Tank Pressure Cap C. Coolant Surge Tank B. Cooling System When you will see: All Other Engines A. Coolant Surge Tank B. Keep hands, clothing and tools away from any underhood electric fan. 5-40

Owner's Manual
Page 478
Remove the six screws from the socket. 3. Reinstall the lens and tighten the screws. 3. To replace a center roof marker lamp bulb, do the following : 2. Reinstall the lens and tighten the screws. 5-66 Remove the two screws and lift off the lens. Install a new bulb into the socket and turn clockwise until it from the center roof marker lamp assembly. 2. Turn the old bulb counterclockwise to remove it locks into place. 1. Roof Marker Lamps To replace a roof marker lamp bulb, do the following : 1.
Remove the six screws from the socket. 3. Reinstall the lens and tighten the screws. 3. To replace a center roof marker lamp bulb, do the following : 2. Reinstall the lens and tighten the screws. 5-66 Remove the two screws and lift off the lens. Install a new bulb into the socket and turn clockwise until it from the center roof marker lamp assembly. 2. Turn the old bulb counterclockwise to remove it locks into place. 1. Roof Marker Lamps To replace a roof marker lamp bulb, do the following : 1.

Owner's Manual
Page 479
Center High-Mounted Stoplamp Bulb 1. Remove the CHMSL bulb by pulling the bulb straight out from the assembly by turning the socket counterclockwise and pulling the bulb straight out. 5-67 Remove a cargo bulb by pressing the release tabs. 3. Remove the screws and lift off the lamp assembly. 2. Remove the back plate from the holder back plate. Cargo Lamp B. Center High-Mounted Stoplamp (CHMSL) and Cargo Lamp To replace one of these bulbs, do the following: A.
Center High-Mounted Stoplamp Bulb 1. Remove the CHMSL bulb by pulling the bulb straight out from the assembly by turning the socket counterclockwise and pulling the bulb straight out. 5-67 Remove a cargo bulb by pressing the release tabs. 3. Remove the screws and lift off the lamp assembly. 2. Remove the back plate from the holder back plate. Cargo Lamp B. Center High-Mounted Stoplamp (CHMSL) and Cargo Lamp To replace one of these bulbs, do the following: A.

Owner's Manual
Page 482
... and Stoplamp* Rear Turn Signal Lamp Rear Turn Signal Lamp* Stoplamp and Taillamp* * Chassis Cab Models For replacement bulbs not listed here, contact your hands. 2. Lift the lens off the lamp assembly. 3. Peel the rubber seal away from the socket. 4. Pull the old bulb straight out from the lens using your...
... and Stoplamp* Rear Turn Signal Lamp Rear Turn Signal Lamp* Stoplamp and Taillamp* * Chassis Cab Models For replacement bulbs not listed here, contact your hands. 2. Lift the lens off the lamp assembly. 3. Peel the rubber seal away from the socket. 4. Pull the old bulb straight out from the lens using your...

Owner's Manual
Page 483
... Engines) on the wiper arm until you hear the release lever click into place. See Scheduled Maintenance (Gasoline Engine) on page 6-4 for wear and cracking. Lift the wiper arm away from the windshield. 5-71 Windshield Wiper Blade Replacement Windshield wiper blades should be inspected for more information. Push the release lever...
... Engines) on the wiper arm until you hear the release lever click into place. See Scheduled Maintenance (Gasoline Engine) on page 6-4 for wear and cracking. Lift the wiper arm away from the windshield. 5-71 Windshield Wiper Blade Replacement Windshield wiper blades should be inspected for more information. Push the release lever...

Owner's Manual
Page 502
Steer to maintain lane position, and then gently brake to a stop , well off the road if possible. {CAUTION: Lifting a vehicle and getting under control by steering the way you can still steer. A rear blowout, particularly on a curve, acts much more likely to leak out ...
Steer to maintain lane position, and then gently brake to a stop , well off the road if possible. {CAUTION: Lifting a vehicle and getting under control by steering the way you can still steer. A rear blowout, particularly on a curve, acts much more likely to leak out ...

Owner's Manual
Page 511
... injury and vehicle damage, be badly injured or killed. Front Position - 2WD 1500 Series 5-99 Never get under a vehicle when it is dangerous. If the vehicle slips off the jack you have added a snow plow to fit the jack lift head into the proper location before raising the vehicle. {CAUTION: Getting under...
... injury and vehicle damage, be badly injured or killed. Front Position - 2WD 1500 Series 5-99 Never get under a vehicle when it is dangerous. If the vehicle slips off the jack you have added a snow plow to fit the jack lift head into the proper location before raising the vehicle. {CAUTION: Getting under...

Owner's Manual
Page 519
...the cable. 14. Turn the wheel wrench clockwise to lower the spare the rest of the spare tire. 10. Keep lowering the jack until it lifts the end fitting. 11. Disconnect the jack handle from underneath the vehicle. 9. Lower the jack by the jack. Carefully remove the jack ...from the jack. {CAUTION: Someone standing too close during the procedure could be injured by turning the wheel wrench counterclockwise. Position the center lift point of you as you pull the jack out from the cable, insert the hoist handle, extension and wheel wrench into the hoist shaft hole...
...the cable. 14. Turn the wheel wrench clockwise to lower the spare the rest of the spare tire. 10. Keep lowering the jack until it lifts the end fitting. 11. Disconnect the jack handle from underneath the vehicle. 9. Lower the jack by the jack. Carefully remove the jack ...from the jack. {CAUTION: Someone standing too close during the procedure could be injured by turning the wheel wrench counterclockwise. Position the center lift point of you as you pull the jack out from the cable, insert the hoist handle, extension and wheel wrench into the hoist shaft hole...

Owner's Manual
Page 539
See Engine Compartment Overview on page 5-14 for access to the fuse/relay block. Lift the cover for more information on the driver's side of the fuse between your thumb and index finger and pull straight out. To remove ...
See Engine Compartment Overview on page 5-14 for access to the fuse/relay block. Lift the cover for more information on the driver's side of the fuse between your thumb and index finger and pull straight out. To remove ...
