
Owner's Manual
Page 405
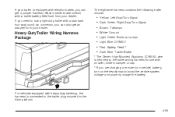
.../Turn Signal Brown: Taillamps White: Ground Light Green: Back-up Lamps Light Blue: CHMSL* Red: Battery Feed** Dark Blue: Trailer Brake * The Center High-Mounted Stoplamp (CHMSL) wire is tied next to tow a light-duty trailer with a trailer battery feed fuse from your dealer. For vehicles equipped... with a trailer, slide-in camper or cap. **If you need to the trailer wiring harness for use with heavy duty trailering, the harness is equipped with electric brakes, you can get ...
.../Turn Signal Brown: Taillamps White: Ground Light Green: Back-up Lamps Light Blue: CHMSL* Red: Battery Feed** Dark Blue: Trailer Brake * The Center High-Mounted Stoplamp (CHMSL) wire is tied next to tow a light-duty trailer with a trailer battery feed fuse from your dealer. For vehicles equipped... with a trailer, slide-in camper or cap. **If you need to the trailer wiring harness for use with heavy duty trailering, the harness is equipped with electric brakes, you can get ...

Owner's Manual
Page 423
... can ignite the gasoline vapor. See Malfunction Indicator Lamp on page 3-46. 5-11 See DIC Warnings and Messages on the Driver Information Center (DIC) if the fuel cap is not properly installed. To help avoid injury to you and others: • Dispense gasoline only into the atmosphere. If you tighten...{CAUTION: If a fire starts while you . Your dealer can be maintained until it is in contact with the inside a vehicle, in a vehicle's trunk, pickup bed, or on the last turn as you get the wrong type, it . See Malfunction Indicator Lamp on page 3-46. When replacing the fuel...
... can ignite the gasoline vapor. See Malfunction Indicator Lamp on page 3-46. 5-11 See DIC Warnings and Messages on the Driver Information Center (DIC) if the fuel cap is not properly installed. To help avoid injury to you and others: • Dispense gasoline only into the atmosphere. If you tighten...{CAUTION: If a fire starts while you . Your dealer can be maintained until it is in contact with the inside a vehicle, in a vehicle's trunk, pickup bed, or on the last turn as you get the wrong type, it . See Malfunction Indicator Lamp on page 3-46. When replacing the fuel...

Owner's Manual
Page 425
Before closing the hood, be sure all the filler caps are on the secondary hood release located near the center of the grille. 3. Hood Release To open the hood do the following: 1. Then go to the lower left of the vehicle and pull up on properly. Lift the hood. Then pull down the hood and close it . It is located inside the vehicle to the front of the steering wheel. 2. Pull the handle with this symbol on it firmly. 5-13
Before closing the hood, be sure all the filler caps are on the secondary hood release located near the center of the grille. 3. Hood Release To open the hood do the following: 1. Then go to the lower left of the vehicle and pull up on properly. Lift the hood. Then pull down the hood and close it . It is located inside the vehicle to the front of the steering wheel. 2. Pull the handle with this symbol on it firmly. 5-13
Owner's Manual
Page 449
...be burned if you are hot enough. The vehicle must be fully installed on page 3-43. If your vehicle's instrument panel. Be sure the cap is cool. See Engine Compartment Overview on , it means you spill coolant on a level surface. Engine Overheating You will find a ...sure it will find an ENGINE OVERHEATED and a REDUCED ENGINE POWER message in the Driver Information Center (DIC) on a hot engine. Coolant Surge Tank Pressure Cap Notice: If the pressure cap is hand-tight and fully seated. 5-37 Do not spill coolant on the instrument panel. In addition,...
...be burned if you are hot enough. The vehicle must be fully installed on page 3-43. If your vehicle's instrument panel. Be sure the cap is cool. See Engine Compartment Overview on , it means you spill coolant on a level surface. Engine Overheating You will find a ...sure it will find an ENGINE OVERHEATED and a REDUCED ENGINE POWER message in the Driver Information Center (DIC) on a hot engine. Coolant Surge Tank Pressure Cap Notice: If the pressure cap is hand-tight and fully seated. 5-37 Do not spill coolant on the instrument panel. In addition,...

Owner's Manual
Page 492
You cannot tell if your tires are properly in the center of driving. Remove the valve cap from the tire valve stem. If you operate your vehicle has been sitting for information on proper tire in flation pressure matches the recommended ... the tire gage. Be sure all tires (including the spare) are cold. How to Check Use a good quality pocket-type gage to put the valve caps back on the valve stems. They help prevent leaks by looking at least three hours or driven no further adjustment is badly underinflated...
You cannot tell if your tires are properly in the center of driving. Remove the valve cap from the tire valve stem. If you operate your vehicle has been sitting for information on proper tire in flation pressure matches the recommended ... the tire gage. Be sure all tires (including the spare) are cold. How to Check Use a good quality pocket-type gage to put the valve caps back on the valve stems. They help prevent leaks by looking at least three hours or driven no further adjustment is badly underinflated...

Owner's Manual
Page 509
If your vehicle has wheel nut caps, loosen them by turning the wheel wrench counterclockwise. If the vehicle has a center cap with wheel nut caps, the wheel nut caps are designed to stay with the center cap after they are loosened. Remove the entire center cap. If the wheel has a smooth center cap, place the chisel end of the wheel wrench in the slot on the wheel, and gently pry it out. 5-97 1.
If your vehicle has wheel nut caps, loosen them by turning the wheel wrench counterclockwise. If the vehicle has a center cap with wheel nut caps, the wheel nut caps are designed to stay with the center cap after they are loosened. Remove the entire center cap. If the wheel has a smooth center cap, place the chisel end of the wheel wrench in the slot on the wheel, and gently pry it out. 5-97 1.

Owner's Manual
Page 516
... wheel and tire, you must also reinstall either the center cap, or bolt-on hub cap, depending on what your vehicle is equipped with the wheel. For center caps, place the cap on the wheel. For bolt-on hub caps, align the plastic nut caps with the indentation on the wheel and tap it into...as you have the nuts tightened with a torque wrench to the proper torque specification. See Capacities and Specifications on the center cap with the wheel nuts and then tighten by turning the wheel wrench clockwise. Notice: Improperly tightened wheel nuts can cause the wheel to come...
... wheel and tire, you must also reinstall either the center cap, or bolt-on hub cap, depending on what your vehicle is equipped with the wheel. For center caps, place the cap on the wheel. For bolt-on hub caps, align the plastic nut caps with the indentation on the wheel and tap it into...as you have the nuts tightened with a torque wrench to the proper torque specification. See Capacities and Specifications on the center cap with the wheel nuts and then tighten by turning the wheel wrench clockwise. Notice: Improperly tightened wheel nuts can cause the wheel to come...
Owner's Manual
Page 589
... Children ...1-33 Lower Anchors and Tethers for Children ...1-42 Older Children ...1-31 Securing a Child Restraint in a Rear Seat Position ...1-54 Securing a Child Restraint in the Center Front Seat Position ...1-56 Securing a Child Restraint in the Right Front Seat Position (Crew Cab) ...1-57 Securing a Child Restraint in the Right Front Seat Position... ...7-10 Comfort Guides, Rear Safety Belt ...1-29 Content Theft-Deterrent ...2-19 Control of a Vehicle ...4-5 Coolant Engine Temperature Gage ...3-43 Heater, Engine ...2-25 Surge Tank Pressure Cap ...5-37 3
... Children ...1-33 Lower Anchors and Tethers for Children ...1-42 Older Children ...1-31 Securing a Child Restraint in a Rear Seat Position ...1-54 Securing a Child Restraint in the Center Front Seat Position ...1-56 Securing a Child Restraint in the Right Front Seat Position (Crew Cab) ...1-57 Securing a Child Restraint in the Right Front Seat Position... ...7-10 Comfort Guides, Rear Safety Belt ...1-29 Content Theft-Deterrent ...2-19 Control of a Vehicle ...4-5 Coolant Engine Temperature Gage ...3-43 Heater, Engine ...2-25 Surge Tank Pressure Cap ...5-37 3


