

Owner's Manual
Page 86
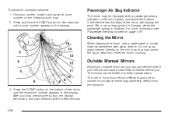
... seatback may want the system to in flate during improper service. See Adding Equipment to follow proper service procedures, and make sure the person performing work for more information about servicing your vehicle. Be sure to Your Airbag-Equipped Vehicle on your vehicle and the airbag system. To purchase a service...
... seatback may want the system to in flate during improper service. See Adding Equipment to follow proper service procedures, and make sure the person performing work for more information about servicing your vehicle. Be sure to Your Airbag-Equipped Vehicle on your vehicle and the airbag system. To purchase a service...

Owner's Manual
Page 101
The following : 1. Once you do the following instructions tell you how to press the door lock switch until the number of chimes that you perform the next step. 2. You will hear either one of the mode that you can exit the program mode any time by turning the ignition to ...
The following : 1. Once you do the following instructions tell you how to press the door lock switch until the number of chimes that you perform the next step. 2. You will hear either one of the mode that you can exit the program mode any time by turning the ignition to ...

Owner's Manual
Page 102
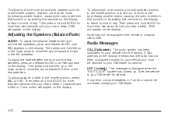
... any time by turning the ignition to re-enter the programming mode. Press the door unlock switch once. The number of the mode that you perform the next step. 2. The doors will automatically lock and unlock and the horn will chirp twice to change the automatic door unlock mode (automatic transmission...
... any time by turning the ignition to re-enter the programming mode. Press the door unlock switch once. The number of the mode that you perform the next step. 2. The doors will automatically lock and unlock and the horn will chirp twice to change the automatic door unlock mode (automatic transmission...

Owner's Manual
Page 111
... is not used or the ignition lock cylinder is tampered with the Passlock® theft-deterrent system. Remember to restart the engine if you will perform better in . Follow this time. See Towing a Trailer on , you turn the engine off. In an emergency, call the GM Roadside Assistance Center. Starting and...
... is not used or the ignition lock cylinder is tampered with the Passlock® theft-deterrent system. Remember to restart the engine if you will perform better in . Follow this time. See Towing a Trailer on , you turn the engine off. In an emergency, call the GM Roadside Assistance Center. Starting and...
Owner's Manual
Page 114
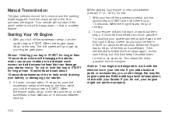
... as you hold the key in START for longer than 15 seconds at a time will not start the engine. Try pushing your engine might not perform properly. With your dealer. If you could be in neutral and the parking brake engaged. Notice: Your engine is a safety feature. Manual Transmission The gear...
... as you hold the key in START for longer than 15 seconds at a time will not start the engine. Try pushing your engine might not perform properly. With your dealer. If you could be in neutral and the parking brake engaged. Notice: Your engine is a safety feature. Manual Transmission The gear...

Owner's Manual
Page 118
... pre-programmed ideal shift conditions. DRIVE (D) can be a hanging shift, however the transmission is also used , providing improved vehicle performance. Adaptive shift controls continually compares key shift parameters to reduce rapid upshifts and downshifts. SECOND (2): This position gives you are: •...35 mph (55 km/h), push your brakes off -road driving. The Allison Transmission® constantly makes adjustments to improve vehicle performance according to use SECOND (2) on . If your speed as the transmission determines optimum settings for off and on hills. ...
... pre-programmed ideal shift conditions. DRIVE (D) can be a hanging shift, however the transmission is also used , providing improved vehicle performance. Adaptive shift controls continually compares key shift parameters to reduce rapid upshifts and downshifts. SECOND (2): This position gives you are: •...35 mph (55 km/h), push your brakes off -road driving. The Allison Transmission® constantly makes adjustments to improve vehicle performance according to use SECOND (2) on . If your speed as the transmission determines optimum settings for off and on hills. ...

Owner's Manual
Page 119
... or hauling a heavy load. The selector button is going slowly enough. Notice: Spinning the tires or holding the vehicle in place. This feature improves heater performance by pressing the button until the vehicle is located on the end of the rear wheels when you are stuck, do not spin the tires...
... or hauling a heavy load. The selector button is going slowly enough. Notice: Spinning the tires or holding the vehicle in place. This feature improves heater performance by pressing the button until the vehicle is located on the end of the rear wheels when you are stuck, do not spin the tires...

Owner's Manual
Page 120
... both Tow/Haul mode and overdrive disable. The dashed red zone indicates where a transmission shift occurs for a short time to reduce shift cycling, providing increased performance, vehicle control, and transmission cooling when towing or hauling heavy loads. Grade braking is a feature on hills in addition to using grade braking, the transmission...
... both Tow/Haul mode and overdrive disable. The dashed red zone indicates where a transmission shift occurs for a short time to reduce shift cycling, providing increased performance, vehicle control, and transmission cooling when towing or hauling heavy loads. Grade braking is a feature on hills in addition to using grade braking, the transmission...
Owner's Manual
Page 150
... Cleaning the Mirror When cleaning the mirror, use of hood-mounted air deflectors and add-on convex mirror attachments may adversely affect mirror performance. 3. Press the COMP button on the following zone map. 2. Find your vehicle and have a clear view of the mirror until a zone number appears in the...
... Cleaning the Mirror When cleaning the mirror, use of hood-mounted air deflectors and add-on convex mirror attachments may adversely affect mirror performance. 3. Press the COMP button on the following zone map. 2. Find your vehicle and have a clear view of the mirror until a zone number appears in the...

Owner's Manual
Page 153
... the vehicle is saved in REVERSE (R). Outside Automatic Dimming Mirror If your vehicle is in memory as the mirrors fold in allowing the driver to perform the curb view assist mirror function. Outside Curb View Assist Mirrors If the vehicle has the memory package, the outside mirror will adjust for more...
... the vehicle is saved in REVERSE (R). Outside Automatic Dimming Mirror If your vehicle is in memory as the mirrors fold in allowing the driver to perform the curb view assist mirror function. Outside Curb View Assist Mirrors If the vehicle has the memory package, the outside mirror will adjust for more...

Owner's Manual
Page 189
... cool the air inside of fog or moisture and warm the passengers. Recirculation cannot be minimized if the climate control system is used in engine performance when the air conditioning compressor shuts off . Defogging and Defrosting Fog on the inside of high humidity (moisture) condensing on the cool window glass. This...
... cool the air inside of fog or moisture and warm the passengers. Recirculation cannot be minimized if the climate control system is used in engine performance when the air conditioning compressor shuts off . Defogging and Defrosting Fog on the inside of high humidity (moisture) condensing on the cool window glass. This...

Owner's Manual
Page 193
...): The switch with the fan symbol allows you know that this button again to allow outside air entering your vehicle and for maximum air conditioning performance in the button will deliver air to the - (Defog): See "Defogging and Defrosting" later in this section. @(Recirculation): Press this button to limit the amount...
...): The switch with the fan symbol allows you know that this button again to allow outside air entering your vehicle and for maximum air conditioning performance in the button will deliver air to the - (Defog): See "Defogging and Defrosting" later in this section. @(Recirculation): Press this button to limit the amount...

Owner's Manual
Page 195
... in AUTO mode, the system will deliver air to the floor and windshield outlets. 0 (Front Defrost): Press the front defrost button to work its performance by using manual operation of the automatic system, use either defog or front defrost to clear fog or frost from AUTO mode. If you select...
... in AUTO mode, the system will deliver air to the floor and windshield outlets. 0 (Front Defrost): Press the front defrost button to work its performance by using manual operation of the automatic system, use either defog or front defrost to clear fog or frost from AUTO mode. If you select...

Owner's Manual
Page 196
The heater and defroster will work far better, reducing the chance of fogging the inside of your vehicle has a sliding rear window, you will not have a rear window defogger, however, you see on the side of ice, snow, or any other obstruction (such as leaves). Operation Tips • Keep the hood and front air inlets free of your instrument panel to direct the airflow. Outlet Adjustment Use the air outlets located in the center and on the rear window warm the glass. If your windows. Rear Window Defogger The lines you will still have a rear window defogger button to ...
The heater and defroster will work far better, reducing the chance of fogging the inside of your vehicle has a sliding rear window, you will not have a rear window defogger, however, you see on the side of ice, snow, or any other obstruction (such as leaves). Operation Tips • Keep the hood and front air inlets free of your instrument panel to direct the airflow. Outlet Adjustment Use the air outlets located in the center and on the rear window warm the glass. If your windows. Rear Window Defogger The lines you will still have a rear window defogger button to ...

Owner's Manual
Page 211
... engine, transmission, exhaust, intake, or fuel system of your vehicle or the replacement of the original tires with other than those of the same Tire Performance Criteria (TPC) can affect your vehicle's emission controls and may cause this light to come on during a malfunction in a failure to pass a required Emission Inspection...
... engine, transmission, exhaust, intake, or fuel system of your vehicle or the replacement of the original tires with other than those of the same Tire Performance Criteria (TPC) can affect your vehicle's emission controls and may cause this light to come on during a malfunction in a failure to pass a required Emission Inspection...

Owner's Manual
Page 237
... for a few seconds, then go to the next or to the previous station and stay there. Turn the radio on the six numbered pushbuttons, by performing the following steps: 1. Whenever that numbered pushbutton is weak or noisy, decrease the treble. Press either SEEK arrow again to stop scanning presets. Tune in...
... for a few seconds, then go to the next or to the previous station and stay there. Turn the radio on the six numbered pushbuttons, by performing the following steps: 1. Whenever that numbered pushbutton is weak or noisy, decrease the treble. Press either SEEK arrow again to stop scanning presets. Tune in...
Owner's Manual
Page 238
... tone controls and both speaker controls to the middle position, first end out of audio mode by pressing another button, causing the radio to perform that function or by waiting five seconds for the display to return to time of day. Then press and hold AUDIO for more than... tone controls and both speaker controls to the middle position, first end out of audio mode by pressing another button, causing the radio to perform that function or by waiting five seconds for the display to return to time of day. Adjusting the Speakers (Balance/Fade) AUDIO: To adjust...
... tone controls and both speaker controls to the middle position, first end out of audio mode by pressing another button, causing the radio to perform that function or by waiting five seconds for the display to return to time of day. Then press and hold AUDIO for more than... tone controls and both speaker controls to the middle position, first end out of audio mode by pressing another button, causing the radio to perform that function or by waiting five seconds for the display to return to time of day. Adjusting the Speakers (Balance/Fade) AUDIO: To adjust...

Owner's Manual
Page 241
... the equalization will only scan stations with a strong signal that preset station. The radio will be programed on . 2. Press BAND to a preset station perform the following steps: 1. To store an equalization setting to select FM1, FM2, AM, or XM1 or XM2. 3. Tune to select the equalization setting... selected band. 3-75 Finding a Station BAND: Press this knob to select radio stations. Turn the radio on the six numbered pushbuttons, by performing the following : 1. Press and hold either the SCAN or the TYPE arrows again to go on the display and you hear a beep. ...
... the equalization will only scan stations with a strong signal that preset station. The radio will be programed on . 2. Press BAND to a preset station perform the following steps: 1. To store an equalization setting to select FM1, FM2, AM, or XM1 or XM2. 3. Tune to select the equalization setting... selected band. 3-75 Finding a Station BAND: Press this knob to select radio stations. Turn the radio on the six numbered pushbuttons, by performing the following : 1. Press and hold either the SCAN or the TYPE arrows again to go on the display and you hear a beep. ...

Owner's Manual
Page 243
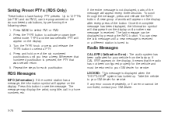
... press and release the TYPE button to select a PTY. 3. Finding a Program Type (PTY) Station (RDS and XM™) To select and find a desired PTY perform the following : 1. To turn alternate frequency off, press and hold either the TYPE or the SCAN arrows to another station within a PTY by...
... press and release the TYPE button to select a PTY. 3. Finding a Program Type (PTY) Station (RDS and XM™) To select and find a desired PTY perform the following : 1. To turn alternate frequency off, press and hold either the TYPE or the SCAN arrows to another station within a PTY by...
Owner's Manual
Page 244
... the display, it means that was set will appear every three seconds. Up to your GM dealer for the vehicle and must be displayed by performing the following steps: 1. Press the TYPE button to select a PTY. 4. Turn the TYPE knob or press and release the TYPE button to activate program type...
... the display, it means that was set will appear every three seconds. Up to your GM dealer for the vehicle and must be displayed by performing the following steps: 1. Press the TYPE button to select a PTY. 4. Turn the TYPE knob or press and release the TYPE button to activate program type...

