Owner's Manual
Page 1
2004 GMC Canyon Owner Manual Seats and Restraint Systems ...1-1 Front Seats ...1-3 Rear Seats ...1-9 Safety Belts ...1-11 Child Restraints ...1-31 Air Bag Systems ...1-60 Restraint System ... System ...2-41 Storage Areas ...2-42 Instrument Panel ...3-1 Instrument Panel Overview ...3-2 Climate Controls ...3-18 Warning Lights, Gages, and Indicators ...3-22 Driver Information Center (DIC) ...3-37 Audio System(s) ...3-42 M Driving Your Vehicle ...4-1 Your Driving, the Road, and Your Vehicle ...4-2 Towing ...4-47 Service and Appearance Care ...5-1 Service ...5-3 Fuel ...5-5 Checking Things Under...
2004 GMC Canyon Owner Manual Seats and Restraint Systems ...1-1 Front Seats ...1-3 Rear Seats ...1-9 Safety Belts ...1-11 Child Restraints ...1-31 Air Bag Systems ...1-60 Restraint System ... System ...2-41 Storage Areas ...2-42 Instrument Panel ...3-1 Instrument Panel Overview ...3-2 Climate Controls ...3-18 Warning Lights, Gages, and Indicators ...3-22 Driver Information Center (DIC) ...3-37 Audio System(s) ...3-42 M Driving Your Vehicle ...4-1 Your Driving, the Road, and Your Vehicle ...4-2 Towing ...4-47 Service and Appearance Care ...5-1 Service ...5-3 Fuel ...5-5 Checking Things Under...
Owner's Manual
Page 4
... Restraint Systems in Section 1 Features and Controls in Section 2 Instrument Panel Overview in Section 3 Climate Controls in Section 3 Warning Lights, Gages and Indicators in Section 3 Audio System(s) in Section 3 Engine Compartment Overview in different words. Many times, this book you will tell you might see warning labels on your vehicle. A notice...
... Restraint Systems in Section 1 Features and Controls in Section 2 Instrument Panel Overview in Section 3 Climate Controls in Section 3 Warning Lights, Gages and Indicators in Section 3 Audio System(s) in Section 3 Engine Compartment Overview in different words. Many times, this book you will tell you might see warning labels on your vehicle. A notice...
Owner's Manual
Page 125
... ...3-35 Daytime Running Lamps Indicator Light ...3-36 Fuel Gage ...3-36 Driver Information Center (DIC) ...3-37 DIC Controls and Displays ...3-37 DIC Warnings and Messages ...3-39 Audio System(s) ...3-42 Setting the Time for Radios without Radio Data Systems (RDS) ...3-43 Setting the Time for Radios with Radio Data Systems (RDS) ...3-43 AM...
... ...3-35 Daytime Running Lamps Indicator Light ...3-36 Fuel Gage ...3-36 Driver Information Center (DIC) ...3-37 DIC Controls and Displays ...3-37 DIC Warnings and Messages ...3-39 Audio System(s) ...3-42 Setting the Time for Radios without Radio Data Systems (RDS) ...3-43 Setting the Time for Radios with Radio Data Systems (RDS) ...3-43 AM...
Owner's Manual
Page 127
... page 3-21. See Outlet Adjustment on page 3-17. See Turn Signal/Multifunction Lever on page 3-42. Hazard Warning Flasher Button. See Audio System(s) on page 3-5. Cigarette Lighter (If Equipped). Air Bag Off Switch (Regular cab and rear seat delete only). Glove Box. See... Parking Brake on page 1-60. Audio System. K. L. Air Outlets. Turn Signal/Multifunction Lever. See Air Bag Systems on page 2-29. Horn. J. H. See Accessory Power Outlets on page...
... page 3-21. See Outlet Adjustment on page 3-17. See Turn Signal/Multifunction Lever on page 3-42. Hazard Warning Flasher Button. See Audio System(s) on page 3-5. Cigarette Lighter (If Equipped). Air Bag Off Switch (Regular cab and rear seat delete only). Glove Box. See... Parking Brake on page 1-60. Audio System. K. L. Air Outlets. Turn Signal/Multifunction Lever. See Air Bag Systems on page 2-29. Horn. J. H. See Accessory Power Outlets on page...
Owner's Manual
Page 166
... get the most out of the advanced engineering that has been added improperly. TURN SIGNAL This message will be sure you can add what your audio system can do it properly. Your vehicle's systems may interfere with the operation of your vehicle's engine, radio or other systems, and even... acknowledge the message and clear it from the display. 3-42 You should have your vehicle serviced as soon as possible and have your vehicle serviced. Audio System(s) Notice: Before you want. SERV VEH (Service Vehicle) This message will be sure you have in your vehicle, find out what...
... get the most out of the advanced engineering that has been added improperly. TURN SIGNAL This message will be sure you can add what your audio system can do it properly. Your vehicle's systems may interfere with the operation of your vehicle's engine, radio or other systems, and even... acknowledge the message and clear it from the display. 3-42 You should have your vehicle serviced as soon as possible and have your vehicle serviced. Audio System(s) Notice: Before you want. SERV VEH (Service Vehicle) This message will be sure you have in your vehicle, find out what...
Owner's Manual
Page 169
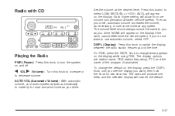
... position, select BAS or TRE. If a station is weak or noisy, you may want to your favorite stations. Then press and hold AUDIO for the display to change to the time display. Setting Preset Stations The six numbered pushbuttons let you return to decrease the treble. Tune ...in the desired station. 4. Then press and hold AUDIO for each pushbutton. Turn the radio on the display. Press AM FM to the middle position, end out of the six numbered pushbuttons until...
... position, select BAS or TRE. If a station is weak or noisy, you may want to your favorite stations. Then press and hold AUDIO for the display to change to the time display. Setting Preset Stations The six numbered pushbuttons let you return to decrease the treble. Tune ...in the desired station. 4. Then press and hold AUDIO for each pushbutton. Turn the radio on the display. Press AM FM to the middle position, end out of the six numbered pushbuttons until...
Owner's Manual
Page 170
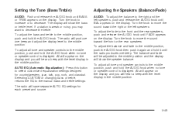
... the down arrow to move the sound toward the front or the rear speakers. Then press and hold AUDIO for more than two seconds until you hear a beep. L and a zero or F and a zero will...may not be returned to move the sound toward the right or the left speakers, press and release AUDIO until BAL appears on the display it means that your radio has not been configured properly...To adjust both tone controls and both speaker controls to the middle position, end out of audio by waiting for service. 3-46 CEN will appear on the display. Then press and hold the up . ...
... the down arrow to move the sound toward the front or the rear speakers. Then press and hold AUDIO for more than two seconds until you hear a beep. L and a zero or F and a zero will...may not be returned to move the sound toward the right or the left speakers, press and release AUDIO until BAL appears on the display it means that your radio has not been configured properly...To adjust both tone controls and both speaker controls to the middle position, end out of audio by waiting for service. 3-46 CEN will appear on the display. Then press and hold the up . ...
Owner's Manual
Page 171
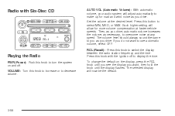
... noise at the desired level. Then as necessary, to decrease volume. Press this knob to increase or AUTO VOL (Automatic Volume): With automatic volume, your audio system adjusts automatically to use automatic volume, select OFF. Radio with CD Set the volume at any speed. DISPL (Display): Press this knob to turn...
... noise at the desired level. Then as necessary, to decrease volume. Press this knob to increase or AUTO VOL (Automatic Volume): With automatic volume, your audio system adjusts automatically to use automatic volume, select OFF. Radio with CD Set the volume at any speed. DISPL (Display): Press this knob to turn...
Owner's Manual
Page 173
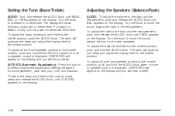
... customized equalization settings designed for each preset and source. To adjust the fade to the front and the rear speakers, push and release the AUDIO knob until BAL appears on the display and you will produce one beep. To adjust all tone and speaker controls to the middle position, ... speakers. All will appear on the display. Turn the knob to move the sound toward the right or the left speakers, push and release the AUDIO knob until FADE appears on the display and you will show the bass or treble level. If a station is displayed. Adjusting the Speakers (Balance...
... customized equalization settings designed for each preset and source. To adjust the fade to the front and the rear speakers, push and release the AUDIO knob until BAL appears on the display and you will produce one beep. To adjust all tone and speaker controls to the middle position, ... speakers. All will appear on the display. Turn the knob to move the sound toward the right or the left speakers, push and release the AUDIO knob until FADE appears on the display and you will show the bass or treble level. If a station is displayed. Adjusting the Speakers (Balance...
Owner's Manual
Page 174
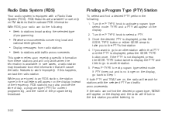
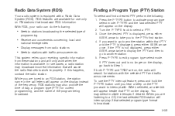
... is not displayed, press the SEEK TYPE button twice to display the PTY and then to go to work improperly. Radio Data System (RDS) Your audio system is displayed, press the SEEK TYPE button once. With RDS, your radio can do the following: Finding a Program Type (PTY) Station To select and...
... is not displayed, press the SEEK TYPE button twice to display the PTY and then to go to work improperly. Radio Data System (RDS) Your audio system is displayed, press the SEEK TYPE button once. With RDS, your radio can do the following: Finding a Program Type (PTY) Station To select and...

Owner's Manual
Page 177
... in this section. Do not play , the track number will appear on the ignition or radio, the CD will pull it was the last selected audio source. 3-53 If CAL ERR appears on the display, it will stay in the player. LOCKED: This message is displayed when the THEFTLOCK® system... , first press the eject button or the DISPL knob. If you want to the dealer for service. Radio Messages CAL ERR (Calibration Error): Your audio system has been calibrated for your vehicle and must return to insert a CD with the ignition off the ignition or radio with an adapter ring...
... in this section. Do not play , the track number will appear on the ignition or radio, the CD will pull it was the last selected audio source. 3-53 If CAL ERR appears on the display, it will stay in the player. LOCKED: This message is displayed when the THEFTLOCK® system... , first press the eject button or the DISPL knob. If you want to the dealer for service. Radio Messages CAL ERR (Calibration Error): Your audio system has been calibrated for your vehicle and must return to insert a CD with the ignition off the ignition or radio with an adapter ring...
Owner's Manual
Page 180
... time. RCL (Recall): Press this button to display the time. Press this knob with Six-Disc CD AUTO VOL (Automatic Volume): With automatic volume, your audio system will allow for road and wind noise as you want to decrease volume. 3-56 To change the default on and off to select MIN...
... time. RCL (Recall): Press this button to display the time. Press this knob with Six-Disc CD AUTO VOL (Automatic Volume): With automatic volume, your audio system will allow for road and wind noise as you want to decrease volume. 3-56 To change the default on and off to select MIN...
Owner's Manual
Page 182
..., and classical. CENTERED will show the bass, midrange, or treble level. Turn the knob to the front and the rear speakers, push and release the AUDIO knob until CUSTOM appears on the display. To adjust the bass, midrange, and treble to decrease the treble. To adjust the fade to move the... sound toward the right or the left speakers, push and release the AUDIO knob until BASS, MID, or TREB appears on the display. To adjust the balance and fade to the middle position, push and hold the...
..., and classical. CENTERED will show the bass, midrange, or treble level. Turn the knob to the front and the rear speakers, push and release the AUDIO knob until CUSTOM appears on the display. To adjust the bass, midrange, and treble to decrease the treble. To adjust the fade to move the... sound toward the right or the left speakers, push and release the AUDIO knob until BASS, MID, or TREB appears on the display. To adjust the balance and fade to the middle position, push and hold the...
Owner's Manual
Page 183
... interrupts if desired. If this happens, contact the radio station. If you want to interrupt with a Radio Data System (RDS). Radio Data System (RDS) Your audio system is displayed, press either SEEK arrow to take you to the PTY's first station. 4. Once the desired PTY is equipped with .
... interrupts if desired. If this happens, contact the radio station. If you want to interrupt with a Radio Data System (RDS). Radio Data System (RDS) Your audio system is displayed, press either SEEK arrow to take you to the PTY's first station. 4. Once the desired PTY is equipped with .
Owner's Manual
Page 306
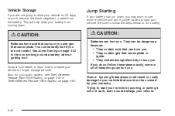
... follow the steps below to do not follow these steps exactly, some jumper cables to start your vehicle by your vehicle. 5-42 Also, for your audio system, see Theft-Deterrent Feature (Non-RDS Radios) on page 3-67 or Theft-Deterrent Feature (RDS Radios) on working around a battery without getting hurt. If...
... follow the steps below to do not follow these steps exactly, some jumper cables to start your vehicle by your vehicle. 5-42 Also, for your audio system, see Theft-Deterrent Feature (Non-RDS Radios) on page 3-67 or Theft-Deterrent Feature (RDS Radios) on working around a battery without getting hurt. If...
Owner's Manual
Page 405
... Finish Damage ...5-100 Sheet Metal Damage ...5-100 Underbody Maintenance ...5-101 Vehicle Care/Appearance Materials ...5-102 Weatherstrips ...5-97 Approaching a Hill ...4-20 Ashtrays ...3-17 Assist Handles ...2-43 Audio System(s) ...3-42 AM-FM Radio ...3-44 Care of Your CD Player ...3-68 Care of Your CDs ...3-68 Chime Level Adjustment ...3-68 Fixed Mast Antenna ...3-68...
... Finish Damage ...5-100 Sheet Metal Damage ...5-100 Underbody Maintenance ...5-101 Vehicle Care/Appearance Materials ...5-102 Weatherstrips ...5-97 Approaching a Hill ...4-20 Ashtrays ...3-17 Assist Handles ...2-43 Audio System(s) ...3-42 AM-FM Radio ...3-44 Care of Your CD Player ...3-68 Care of Your CDs ...3-68 Chime Level Adjustment ...3-68 Fixed Mast Antenna ...3-68...
Owner's Manual
Page 406
Audio System(s) (cont.) Setting the Time for Radios with Radio Data Systems (RDS) ...Setting the Time for Radios without Radio Data Systems (RDS) ...Theft-Deterrent Feature ......
Audio System(s) (cont.) Setting the Time for Radios with Radio Data Systems (RDS) ...Setting the Time for Radios without Radio Data Systems (RDS) ...Theft-Deterrent Feature ......