Owner's Manual
Page 1
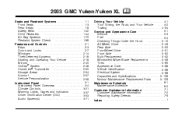
2003 GMC Yukon/Yukon XL Seats and Restraint Systems ...1-1 Front Seats ...1-3 Rear Seats ...1-8 Safety Belts ...1-22 Child Restraints ...1-44 Air Bag Systems ...1-70 Restraint System Check ...1-86 Features and ...
2003 GMC Yukon/Yukon XL Seats and Restraint Systems ...1-1 Front Seats ...1-3 Rear Seats ...1-8 Safety Belts ...1-22 Child Restraints ...1-44 Air Bag Systems ...1-70 Restraint System Check ...1-86 Features and ...
Owner's Manual
Page 2
... use it. If you do this, it will find that time without further notice. It is the Index in back of Canada Limited" for GMC whenever it appears in it . In this manual from your dealer or from beginning to explain things. Part No. This manual includes the latest information.... How to look for your vehicle, so it was printed. Litho in your vehicle. Box 07130 Detroit, MI 48207 GENERAL MOTORS, GM, the GM Emblem, GMC, the GMC Truck Emblem and the name YUKON/YUKON XL are registered trademarks of General Motors Corporation.
... use it. If you do this, it will find that time without further notice. It is the Index in back of Canada Limited" for GMC whenever it appears in it . In this manual from your dealer or from beginning to explain things. Part No. This manual includes the latest information.... How to look for your vehicle, so it was printed. Litho in your vehicle. Box 07130 Detroit, MI 48207 GENERAL MOTORS, GM, the GM Emblem, GMC, the GMC Truck Emblem and the name YUKON/YUKON XL are registered trademarks of General Motors Corporation.
Owner's Manual
Page 3
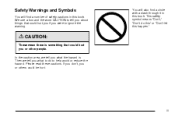
Then we tell you about things that could hurt you were to ignore the warning. If you don't, you or others could hurt you if you or other people. iii Please read these cautions. We use a box and the word CAUTION to tell you what to help avoid or reduce the hazard. This safety symbol means "Don't," "Don't do to do this" or "Don't let this happen." {CAUTION: These mean there is . In the caution area, we tell you what the hazard is something that could be hurt. Safety Warnings and Symbols You will also find a circle with a slash through it in this book. You ...
Then we tell you about things that could hurt you were to ignore the warning. If you don't, you or others could hurt you if you or other people. iii Please read these cautions. We use a box and the word CAUTION to tell you what to help avoid or reduce the hazard. This safety symbol means "Don't," "Don't do to do this" or "Don't let this happen." {CAUTION: These mean there is . In the caution area, we tell you what the hazard is something that could be hurt. Safety Warnings and Symbols You will also find a circle with a slash through it in this book. You ...

Owner's Manual
Page 4
A notice will tell you about something that can damage your vehicle. They use symbols instead of a component, gage or indicator, reference the following topics: Notice: These mean there is something that could be costly. Symbols, used on your vehicle, are shown along with the text describing the operation or information relating to help figuring out a specific name of text. Many times, this book you need help avoid the damage. If you will tell you might see warning labels on your vehicle. When you read other manuals, you what to do to a speci&#...
A notice will tell you about something that can damage your vehicle. They use symbols instead of a component, gage or indicator, reference the following topics: Notice: These mean there is something that could be costly. Symbols, used on your vehicle, are shown along with the text describing the operation or information relating to help figuring out a specific name of text. Many times, this book you need help avoid the damage. If you will tell you might see warning labels on your vehicle. When you read other manuals, you what to do to a speci&#...

Owner's Manual
Page 5
These are some examples of vehicle symbols you may find on your vehicle: v
These are some examples of vehicle symbols you may find on your vehicle: v

Owner's Manual
Page 6
Model Reference This manual covers these models: Yukon Yukon XL vi
Model Reference This manual covers these models: Yukon Yukon XL vi

Owner's Manual
Page 7
Section 1 Seats and Restraint Systems Child Restraints ...1-44 Older Children ...1-44 Infants and Young Children ...1-46 Child Restraint Systems ...1-50 Where to Put the Restraint ...1-53 Top Strap ...1-54 Top Strap Anchor Location ...1-55 Lower Anchorages and Top Tethers for Children (LATCH System) ...1-59 Securing a Child Restraint Designed for the LATCH System ...1-61 Securing a Child Restraint in a Rear Outside Seat Position ...1-61 Securing a Child Restraint in a Center Rear Seat Position ...1-64 Securing a Child Restraint in the Center Front Seat Position ...1-66 Securing a Child ...
Section 1 Seats and Restraint Systems Child Restraints ...1-44 Older Children ...1-44 Infants and Young Children ...1-46 Child Restraint Systems ...1-50 Where to Put the Restraint ...1-53 Top Strap ...1-54 Top Strap Anchor Location ...1-55 Lower Anchorages and Top Tethers for Children (LATCH System) ...1-59 Securing a Child Restraint Designed for the LATCH System ...1-61 Securing a Child Restraint in a Rear Outside Seat Position ...1-61 Securing a Child Restraint in a Center Rear Seat Position ...1-64 Securing a Child Restraint in the Center Front Seat Position ...1-66 Securing a Child ...

Owner's Manual
Page 9
Try to move the seat with this lever located at the front of the vehicle if you try to . The sudden movement could startle and confuse you, or make sure the seat is moving . Front Seats Manual Seats {CAUTION: You can adjust it with your vehicle has a manual bucket or a split bench seat, you want to adjust a manual driver's seat while the vehicle is locked into place. 1-3 If your body to make you push a pedal when you don't want it and release the lever. Adjust the driver's seat only when the vehicle is not moving . Lift the lever to where you can lose control of ...
Try to move the seat with this lever located at the front of the vehicle if you try to . The sudden movement could startle and confuse you, or make sure the seat is moving . Front Seats Manual Seats {CAUTION: You can adjust it with your vehicle has a manual bucket or a split bench seat, you want to adjust a manual driver's seat while the vehicle is locked into place. 1-3 If your body to make you push a pedal when you don't want it and release the lever. Adjust the driver's seat only when the vehicle is not moving . Lift the lever to where you can lose control of ...
Owner's Manual
Page 10
Move the reclining front seatback rearward or forward by raising or lowering the rear edge of the horizontal control. • Moving the whole horizontal control up or down raises or lowers the entire seat cushion. If your vehicle has a power seat, you can adjust it with these controls located on page 1-6. 1-4 See Reclining Seatbacks on the outboard sides of the seats. • Raise or lower the front of the seat cushion by raising or lowering the forward edge of the horizontal control. • Move the seat forward or rearward by moving the whole horizontal control forward or ...
Move the reclining front seatback rearward or forward by raising or lowering the rear edge of the horizontal control. • Moving the whole horizontal control up or down raises or lowers the entire seat cushion. If your vehicle has a power seat, you can adjust it with these controls located on page 1-6. 1-4 See Reclining Seatbacks on the outboard sides of the seats. • Raise or lower the front of the seat cushion by raising or lowering the forward edge of the horizontal control. • Move the seat forward or rearward by moving the whole horizontal control forward or ...

Owner's Manual
Page 11
You can also reshape the side wing area of support. To increase or decrease support, press and hold the top or bottom of the control. To heat only the seatback, press the vertical button with the heated seatback symbol. Let go of the control when the lower seatback reaches the desired level of high, medium, and low. To increase or decrease support, press and hold the front or rear of the control. An indicator light on the button will be running for more lateral support. The engine must be canceled after you restart your vehicle, you will glow to indicate the ...
You can also reshape the side wing area of support. To increase or decrease support, press and hold the top or bottom of the control. To heat only the seatback, press the vertical button with the heated seatback symbol. Let go of the control when the lower seatback reaches the desired level of high, medium, and low. To increase or decrease support, press and hold the front or rear of the control. An indicator light on the button will be running for more lateral support. The engine must be canceled after you restart your vehicle, you will glow to indicate the ...

Owner's Manual
Page 12
If your vehicle has power seats with a power recliner, see Power Seats on page 1-4 for further information on how to an upright position. Lift the lever again without pushing on the outboard side of the seat. Release the lever to lock the seatback where you want it. Reclining Seatbacks To adjust the front seatback, lift the manual lever located on the seatback and the seatback will go to operate the reclining seatback feature. 1-6
If your vehicle has power seats with a power recliner, see Power Seats on page 1-4 for further information on how to an upright position. Lift the lever again without pushing on the outboard side of the seat. Release the lever to lock the seatback where you want it. Reclining Seatbacks To adjust the front seatback, lift the manual lever located on the seatback and the seatback will go to operate the reclining seatback feature. 1-6
Owner's Manual
Page 13
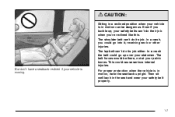
{CAUTION: Sitting in a reclined position when your vehicle is in motion, have a seatback reclined if your vehicle is in motion can 't do its job either. Even if you buckle up over your safety belts can be there, not at your safety belt properly. 1-7 In a crash the belt could go up , your abdomen. The belt forces would be dangerous. But don't have the seatback upright. For proper protection when the vehicle is moving. The shoulder belt can 't do its job. Then sit well back in the seat and wear your pelvic bones. The lap belt can 't do their job when you ...
{CAUTION: Sitting in a reclined position when your vehicle is in motion, have a seatback reclined if your vehicle is in motion can 't do its job either. Even if you buckle up over your safety belts can be there, not at your safety belt properly. 1-7 In a crash the belt could go up , your abdomen. The belt forces would be dangerous. But don't have the seatback upright. For proper protection when the vehicle is moving. The shoulder belt can 't do its job. Then sit well back in the seat and wear your pelvic bones. The lap belt can 't do their job when you ...
Owner's Manual
Page 14
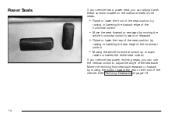
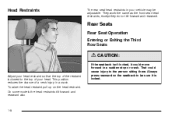
This position reduces the chance of a neck injury in your head. Head Restraints The rear seat head restraints in a crash. Always press rearward on the head restraint. On some models the head restraints tilt forward and rearward also. 1-8 Adjust your head restraint so that the top of your vehicle may be sure it could cause injury to the top of the restraint is locked. To raise the head restraint pull up on the seatback to be adjustable. Rear Seats Rear Seat Operation Entering or Exiting the Third Row Seats {CAUTION: If the seatback isn't locked, it is closest to ...
This position reduces the chance of a neck injury in your head. Head Restraints The rear seat head restraints in a crash. Always press rearward on the head restraint. On some models the head restraints tilt forward and rearward also. 1-8 Adjust your head restraint so that the top of your vehicle may be sure it could cause injury to the top of the restraint is locked. To raise the head restraint pull up on the seatback to be adjustable. Rear Seats Rear Seat Operation Entering or Exiting the Third Row Seats {CAUTION: If the seatback isn't locked, it is closest to ...

Owner's Manual
Page 15
... third row seat (if equipped). 60/40 Split Bench Seat Regular models: The rear seat may have a 60/40 split seat. Either side of Suburban/Yukon XL models may be sure it is locked. Extended models: The passenger's side of the seat upward. On regular models the rear seatbacks may have...
... third row seat (if equipped). 60/40 Split Bench Seat Regular models: The rear seat may have a 60/40 split seat. Either side of Suburban/Yukon XL models may be sure it is locked. Extended models: The passenger's side of the seat upward. On regular models the rear seatbacks may have...

Owner's Manual
Page 16
After folding the seat cushion fully forward, pull the seatback forward and fold the seatback down until it forward. Then fold the panels back to release the seatback. To fold, pull up on the latch. If the seatback cannot fold flat the base of the seat cushion. On the passenger side of the extended models, the lever at because it is securely in place. 1-10 Lower the seat cushion until it interferes with the cushion, try moving the seat forward and/or bring the front seatback more upright. To create a load floor release the panels from the seatback by ...
After folding the seat cushion fully forward, pull the seatback forward and fold the seatback down until it forward. Then fold the panels back to release the seatback. To fold, pull up on the latch. If the seatback cannot fold flat the base of the seat cushion. On the passenger side of the extended models, the lever at because it is securely in place. 1-10 Lower the seat cushion until it interferes with the cushion, try moving the seat forward and/or bring the front seatback more upright. To create a load floor release the panels from the seatback by ...

Owner's Manual
Page 17
Folding the Seatbacks {CAUTION: If the seatback isn't locked, it is locked. 1-11 Make sure that the buckles on the driver's side seatback are accessible to the passenger position, pull up on the release lever labeled 1 and then pull up on the release lever, labeled 1, located on the rear of the seatback, and push the seatback forward. • To return the seat to the outboard and center occupant and are returned to the person sitting there. To fold the seatbacks do the following: • Pull up on the seatback until the seatback locks into position. 50/50 Split Bench Seat If ...
Folding the Seatbacks {CAUTION: If the seatback isn't locked, it is locked. 1-11 Make sure that the buckles on the driver's side seatback are accessible to the passenger position, pull up on the release lever labeled 1 and then pull up on the release lever, labeled 1, located on the rear of the seatback, and push the seatback forward. • To return the seat to the outboard and center occupant and are returned to the person sitting there. To fold the seatbacks do the following: • Pull up on the seatback until the seatback locks into position. 50/50 Split Bench Seat If ...

Owner's Manual
Page 18
With the seat folded, unlatch the seat from the floor unless the seatback is folded down , the entire seat can be tilted forward to be sure the support rod is properly engaged when the third row seat is fully engaged in place. Push and pull on the passenger's side. Always press rearward on the lever located under the carrying handle at load floor. Make sure the rod pin is folded forward. 1-12 Make sure the head restraints have been lowered completely. 3. You will not be able to unlatch the seat from the floor by pulling up , off the floor. That could...
With the seat folded, unlatch the seat from the floor unless the seatback is folded down , the entire seat can be tilted forward to be sure the support rod is properly engaged when the third row seat is fully engaged in place. Push and pull on the passenger's side. Always press rearward on the lever located under the carrying handle at load floor. Make sure the rod pin is folded forward. 1-12 Make sure the head restraints have been lowered completely. 3. You will not be able to unlatch the seat from the floor by pulling up , off the floor. That could...

Owner's Manual
Page 19
Return the seatback to the upright position by using the lever labeled 1. Lower the seat to the floor and let the seat drop into place. 4. Secure the support rod in place. Lift up on the carrying handle to make sure it is folded. 1-13 Removing the 50/50 Split Bench Seat To remove the 50/50 split bench seat, do the following : 1. Push forward on the underside of the vehicle. 2. Open the rear doors and enter the rear of the seat. 3. Pull the seatback forward to make sure the seat is locked in place. 5. Fold the seatback forward onto the seat cushion by ...
Return the seatback to the upright position by using the lever labeled 1. Lower the seat to the floor and let the seat drop into place. 4. Secure the support rod in place. Lift up on the carrying handle to make sure it is folded. 1-13 Removing the 50/50 Split Bench Seat To remove the 50/50 split bench seat, do the following : 1. Push forward on the underside of the vehicle. 2. Open the rear doors and enter the rear of the seat. 3. Pull the seatback forward to make sure the seat is locked in place. 5. Fold the seatback forward onto the seat cushion by ...

Owner's Manual
Page 20
3. Always press rearward on the release lever labeled 2, located at the rear of the seat, and lift the rear of the vehicle. {CAUTION: A seat that isn't locked into place properly when installing it is locked. 4. While holding the rear of the seat up, roll the seat out of the seat up on the seatback to the person sitting there. People in the vehicle could cause injury to be injured. Replacing the 50/50 Split Bench Seat {CAUTION: If the seatback isn't locked, it could move around in a sudden stop . To unlatch the seat from the floor, while pulling the seat out. ...
3. Always press rearward on the release lever labeled 2, located at the rear of the seat, and lift the rear of the vehicle. {CAUTION: A seat that isn't locked into place properly when installing it is locked. 4. While holding the rear of the seat up, roll the seat out of the seat up on the seatback to the person sitting there. People in the vehicle could cause injury to be injured. Replacing the 50/50 Split Bench Seat {CAUTION: If the seatback isn't locked, it could move around in a sudden stop . To unlatch the seat from the floor, while pulling the seat out. ...

Owner's Manual
Page 21
After raising the rear seatback, always check to the floor. Bench Seat If your vehicle has a full bench seat, the seatback can be folded and the seat can be raised to the upright position unless the seat is secured to be seriously injured. The front latches should lock into place. If the latches do the following: 1. The seatback cannot be tilted or removed from the vehicle. 1-15 To reinstall the 50/50 split bench, do not lock, try tilting the rear of the seat up, slide the front wheels into the slots on the seat to its upright position. 3. {CAUTION: A safety ...
After raising the rear seatback, always check to the floor. Bench Seat If your vehicle has a full bench seat, the seatback can be folded and the seat can be raised to the upright position unless the seat is secured to be seriously injured. The front latches should lock into place. If the latches do the following: 1. The seatback cannot be tilted or removed from the vehicle. 1-15 To reinstall the 50/50 split bench, do not lock, try tilting the rear of the seat up, slide the front wheels into the slots on the seat to its upright position. 3. {CAUTION: A safety ...
