

Owner's Manual
Page 10
... a pedal when you can lose control of the seat. Front Seats Manual Seats You can adjust it and release the lever. If your body to . Lift the lever to adjust a manual driver's seat while the vehicle is locked into place. 1-3 Try to move the seat with your vehicle has a manual bucket...
... a pedal when you can lose control of the seat. Front Seats Manual Seats You can adjust it and release the lever. If your body to . Lift the lever to adjust a manual driver's seat while the vehicle is locked into place. 1-3 Try to move the seat with your vehicle has a manual bucket...

Owner's Manual
Page 12
... to indicate the level of heat selected. Release the lever to lock the seatback where you will need to press the heated seat button again. Lift the lever again without pushing on the passenger's door panel. 1 To heat the entire seat, press the horizontal button. The engine must be canceled ... further information on the outboard side of high, medium, and low. An indicator light on the driver's door panel. To adjust the front seatback, lift the manual lever located on how to cycle through the temperature settings of the seat. If you still want it. If your vehicle has power...
... to indicate the level of heat selected. Release the lever to lock the seatback where you will need to press the heated seat button again. Lift the lever again without pushing on the passenger's door panel. 1 To heat the entire seat, press the horizontal button. The engine must be canceled ... further information on the outboard side of high, medium, and low. An indicator light on the driver's door panel. To adjust the front seatback, lift the manual lever located on how to cycle through the temperature settings of the seat. If you still want it. If your vehicle has power...

Owner's Manual
Page 14
.... Seatback Latches If the seatback isn't locked, it latches. On some models the head restraints tilt forward and rearward also. To fold a front seatback forward, lift the lever at the base of the cab.
.... Seatback Latches If the seatback isn't locked, it latches. On some models the head restraints tilt forward and rearward also. To fold a front seatback forward, lift the lever at the base of the cab.
Owner's Manual
Page 16
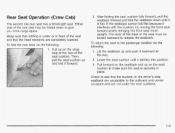
... the seat and that the head restraints are completely lowered. 2. Pull forward on the seatback and up and push it is under the seat cushions. 1-9 Lift the seatback up on the driver's side seatback are accessible to give you more upright. Rear Seat Operation (Crew Cab) The second row rear seat...
... the seat and that the head restraints are completely lowered. 2. Pull forward on the seatback and up and push it is under the seat cushions. 1-9 Lift the seatback up on the driver's side seatback are accessible to give you more upright. Rear Seat Operation (Crew Cab) The second row rear seat...
Owner's Manual
Page 100
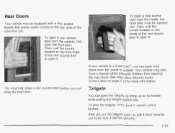
... access door from the inside of the extended cab. Rear Doors vehicle Your may be sure it latches securely. 2-13 To open the tailgate by lifting up , pull it latches. before you put the tailgate back up on the inside , the front door must be opened first.
... access door from the inside of the extended cab. Rear Doors vehicle Your may be sure it latches securely. 2-13 To open the tailgate by lifting up , pull it latches. before you put the tailgate back up on the inside , the front door must be opened first.
Owner's Manual
Page 101
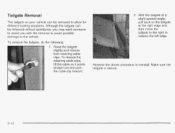
To release the retaining cable clips, lift the cable so it points straight out and push the cable clip forward. 2. With the tailgate at the right edge and then move the tailgate ...
To release the retaining cable clips, lift the cable so it points straight out and push the cable clip forward. 2. With the tailgate at the right edge and then move the tailgate ...
Owner's Manual
Page 173
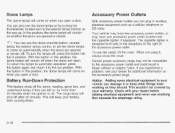
... have one accessory power outlet located near the cigarette lighter, if equipped. Check with your dealer before adding electrical equipment, and never use the outlet, lift the cover. With the button in this position, the dome lamps will come on when you open a door. This wouldn't be compatible to come on...
... have one accessory power outlet located near the cigarette lighter, if equipped. Check with your dealer before adding electrical equipment, and never use the outlet, lift the cover. With the button in this position, the dome lamps will come on when you open a door. This wouldn't be compatible to come on...
Owner's Manual
Page 219
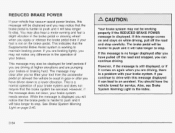
This message may also be displayed for service. The message may clear after you've lifted your foot from the accelerator pedal an allowed the vehicle to coast in gear or after you have pulled off the road and stop carefully. ...
This message may also be displayed for service. The message may clear after you've lifted your foot from the accelerator pedal an allowed the vehicle to coast in gear or after you have pulled off the road and stop carefully. ...

Owner's Manual
Page 386
Then go to the front of the grill. 3. Lift the hood. Pull down the hood andclose it firmly. 5-11 2. Before closing the hood, be sure fillercaps are on the secondary hood release located near the center of the vehicle and pull up on all properly.
Then go to the front of the grill. 3. Lift the hood. Pull down the hood andclose it firmly. 5-11 2. Before closing the hood, be sure fillercaps are on the secondary hood release located near the center of the vehicle and pull up on all properly.

Owner's Manual
Page 389
When you lift up the hood on the VORTEC 5300 V8 engine (VORTEC 4800 and 6000 V8 engines similar), you will see the following: 5-14
When you lift up the hood on the VORTEC 5300 V8 engine (VORTEC 4800 and 6000 V8 engines similar), you will see the following: 5-14

Owner's Manual
Page 391
When you lift up the hood on the VORTEC 8100 V8 engine you will see the following: 5-16
When you lift up the hood on the VORTEC 8100 V8 engine you will see the following: 5-16
Owner's Manual
Page 399
... engine air cleaner/filter. 5. Clean the filter sealing surface and the housing. 4. See Part B: Owner Checks and Services on the cover of the housing and lift up the cover. ' "I Operating the engine with the air cleanedfilter off can cause you or others to replace the engine air cleanedfilter. Notice: If the...
... engine air cleaner/filter. 5. Clean the filter sealing surface and the housing. 4. See Part B: Owner Checks and Services on the cover of the housing and lift up the cover. ' "I Operating the engine with the air cleanedfilter off can cause you or others to replace the engine air cleanedfilter. Notice: If the...

Owner's Manual
Page 413
If you get an engine overheat warning with no steam, the problem may decide not to lift the hood but see or hear no sign of steam, push down . Sometimes the engine can drive. If the warning doesn't come back on page 4-...
If you get an engine overheat warning with no steam, the problem may decide not to lift the hood but see or hear no sign of steam, push down . Sometimes the engine can drive. If the warning doesn't come back on page 4-...

Owner's Manual
Page 414
The vehicle should be parked on a level surface. 5-39 Coolant Surge Tank 6. Coolant Surge Tank Pressure Cap 8100 V8 Engines C.EngineFan If the coolant inside the coolant surge tank is boiling, don't do anything else until it 's safe to lift the hood, here's what you decide it cools down. Cooling System When you 'll see: All Other Engines A.
The vehicle should be parked on a level surface. 5-39 Coolant Surge Tank 6. Coolant Surge Tank Pressure Cap 8100 V8 Engines C.EngineFan If the coolant inside the coolant surge tank is boiling, don't do anything else until it 's safe to lift the hood, here's what you decide it cools down. Cooling System When you 'll see: All Other Engines A.

Owner's Manual
Page 441
Center High-Mounted Stoplamps 2. Remove a cargo bulb by pressing the release tabs. 3. Remove the screws and lift off the lamp assembly. Remove the CHMSL bulb holder back plate from the holder back plate. CargoLamps B. A. Remove the CHMSL bulb by pulling the bulb straight out from the housing by turning the socket counterclockwise and pulling the bulb straight out. 5-66 Center High-Mounted Stoplamp (CHMSL) and Cargo Lamp I .
Center High-Mounted Stoplamps 2. Remove a cargo bulb by pressing the release tabs. 3. Remove the screws and lift off the lamp assembly. Remove the CHMSL bulb holder back plate from the holder back plate. CargoLamps B. A. Remove the CHMSL bulb by pulling the bulb straight out from the housing by turning the socket counterclockwise and pulling the bulb straight out. 5-66 Center High-Mounted Stoplamp (CHMSL) and Cargo Lamp I .

Owner's Manual
Page 445
Lift the lens off the lamp assembly. 3. Put a new bulb into the socket and press it in until it is tight. 5. Taillamps (Chassis Cab Models) Replacement ...
Lift the lens off the lamp assembly. 3. Put a new bulb into the socket and press it in until it is tight. 5. Taillamps (Chassis Cab Models) Replacement ...

Owner's Manual
Page 446
Install a new blade by reversing Steps 1 and 2. 5-7 1 Replacement blades come in different types and are removed in different ways. Lift the wiper arm and turn the blade until it is facing away from the windshield. 2. Windshield Wiper Blade Replacement Windshield wiper blades should be inspected ...
Install a new blade by reversing Steps 1 and 2. 5-7 1 Replacement blades come in different types and are removed in different ways. Lift the wiper arm and turn the blade until it is facing away from the windshield. 2. Windshield Wiper Blade Replacement Windshield wiper blades should be inspected ...

Owner's Manual
Page 463
... spare tire. 5-88 Turn the wrench counterclockwise until you hear two clicks or feel it is visible. 2. You cannot overtighten the cable. 3. Position the center lift point of "Removing Your Spare Tire and Tools" earlier in this procedure at least two times. Stand the wheel blocks on the wheel blocks, separating...
... spare tire. 5-88 Turn the wrench counterclockwise until you hear two clicks or feel it is visible. 2. You cannot overtighten the cable. 3. Position the center lift point of "Removing Your Spare Tire and Tools" earlier in this procedure at least two times. Stand the wheel blocks on the wheel blocks, separating...

Owner's Manual
Page 464
... out from under the spare with the other hand. Turn the wrench clockwise to store a spare or flat tire using the hoist assembly until it lifts the end fitting. 10. Pull the tire out from under the vehicle. 14. You will not be able to raise the jack until it through...
... out from under the spare with the other hand. Turn the wrench clockwise to store a spare or flat tire using the hoist assembly until it lifts the end fitting. 10. Pull the tire out from under the vehicle. 14. You will not be able to raise the jack until it through...

Owner's Manual
Page 466
If you have a center cap with wheel nut caps, the wheel nut caps are designed to raise the jack lift head a little. If the wheel has a smooth center piece, place the chisel end of the wheel wrench in the slot on the wheel and gently pry out. 5-91 Remove the center cap. Turn the wheel wrench clockwise to remain with the center cap. If your vehicle has wheel nut caps, loosen them by turning the wheel wrench counterclockwise.
If you have a center cap with wheel nut caps, the wheel nut caps are designed to raise the jack lift head a little. If the wheel has a smooth center piece, place the chisel end of the wheel wrench in the slot on the wheel and gently pry out. 5-91 Remove the center cap. Turn the wheel wrench clockwise to remain with the center cap. If your vehicle has wheel nut caps, loosen them by turning the wheel wrench counterclockwise.

