

Owner's Manual
Page 3
...ll find that time without further notice. X 2315 A First Edition @Copyright General Motors Corporation 06/24/02 All Rights Reserved Index A good place to end when they first receive their owner's manual from beginning to look for what 's in the manual, and the page number where you need it when..., so it will help you 're on the road. Box 07130 Detroit, MI 48207 GENERAL MOTORS, GM, the GM Emblem, GMC, the GMC Truck Emblem and the name SIERRA are registered trademarks of Canada Limited" for your dealer or from your vehicle. If you do this manual. Part No. Please keep...
...ll find that time without further notice. X 2315 A First Edition @Copyright General Motors Corporation 06/24/02 All Rights Reserved Index A good place to end when they first receive their owner's manual from beginning to look for what 's in the manual, and the page number where you need it when..., so it will help you 're on the road. Box 07130 Detroit, MI 48207 GENERAL MOTORS, GM, the GM Emblem, GMC, the GMC Truck Emblem and the name SIERRA are registered trademarks of Canada Limited" for your dealer or from your vehicle. If you do this manual. Part No. Please keep...

Owner's Manual
Page 24
To make the lap part tight, pull down on the buckle end of the belt as you pull the belt very quickly out of the retractor. 1-17 And you slid under the lap belt. These parts of ...
To make the lap part tight, pull down on the buckle end of the belt as you pull the belt very quickly out of the retractor. 1-17 And you slid under the lap belt. These parts of ...

Owner's Manual
Page 34
If it does, let it clicks. If the belt is pulled out all the way and start again. When the shoulder belt is not long enough, see Safety Belt Extender on the shoulder part. 1-27 Pull up on the latch plate to make the lap part tight, pull down on the buckle is secure. Make sure the release button on the buckle end of the belt as you ever had to unbuckle the safety belt quickly if you pull up on page 7-37. 2. Push the latch plate into the buckle until it go back all the way, it is positioned so you would be able to . 3. To make sure it will lock.
If it does, let it clicks. If the belt is pulled out all the way and start again. When the shoulder belt is not long enough, see Safety Belt Extender on the shoulder part. 1-27 Pull up on the latch plate to make the lap part tight, pull down on the buckle is secure. Make sure the release button on the buckle end of the belt as you ever had to unbuckle the safety belt quickly if you pull up on page 7-37. 2. Push the latch plate into the buckle until it go back all the way, it is positioned so you would be able to . 3. To make sure it will lock.
Owner's Manual
Page 61
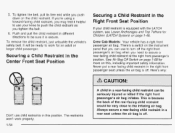
... different directions to be very close to secure a rear-facing child restraint at the right front passenger's position. To tighten the belt, pull its free end while you need to the inflating air bag. Push and pull the child restraint in this , including important safety information. It will be seriously injured...
... different directions to be very close to secure a rear-facing child restraint at the right front passenger's position. To tighten the belt, pull its free end while you need to the inflating air bag. Push and pull the child restraint in this , including important safety information. It will be seriously injured...

Owner's Manual
Page 85
... that change or defeat the snow plow's "tripping mechanism." If you do, it can damage your snow plow and your vehicle's frame, bumper system, front end sheet metal or height, they may cause an air bag inflation. 1-78 A: Yes. The phone numbers and addresses for Customer Assistance are in Step Two...
... that change or defeat the snow plow's "tripping mechanism." If you do, it can damage your snow plow and your vehicle's frame, bumper system, front end sheet metal or height, they may cause an air bag inflation. 1-78 A: Yes. The phone numbers and addresses for Customer Assistance are in Step Two...

Owner's Manual
Page 116
... the column shift lever. See "Tow/Haul Mode" under Towing a Trailer on the end of the column shift lever until the indicator light, on the instrument panel. The overdrive disable feature prevents the transmission from shifting into fifth (5) gear. ... feature to assist when towing or hauling a heavy load. You can turn overdrive disable on and off by pressing and holding the button at the end of the column shift lever. Turn tow/haul on and off by pressing the buttonuntil the tow/haul indicator light illuminates on the instrument panel...
... the column shift lever. See "Tow/Haul Mode" under Towing a Trailer on the end of the column shift lever until the indicator light, on the instrument panel. The overdrive disable feature prevents the transmission from shifting into fifth (5) gear. ... feature to assist when towing or hauling a heavy load. You can turn overdrive disable on and off by pressing and holding the button at the end of the column shift lever. Turn tow/haul on and off by pressing the buttonuntil the tow/haul indicator light illuminates on the instrument panel...

Owner's Manual
Page 135
... case to NEUTRAL can turn the ignition key to LOCK, remove the key and release the clutch. If you ever hold the brake until the end of Step 4. Shifting Out of Park (P) If your vehicle has an automatic transmission shift lock control system, you have to fully apply your regular brakes...
... case to NEUTRAL can turn the ignition key to LOCK, remove the key and release the clutch. If you ever hold the brake until the end of Step 4. Shifting Out of Park (P) If your vehicle has an automatic transmission shift lock control system, you have to fully apply your regular brakes...
Owner's Manual
Page 166
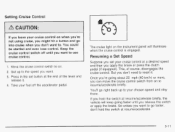
... will keep going about 25 mph (40 km/h) or more, you want to use cruise control. 1. Press in the set your cruise control at the end of course, disengages the cruise control. Keep the cruise control switch off the accelerator pedal. Resuming a §et Speed Suppose you want to. But you...
... will keep going about 25 mph (40 km/h) or more, you want to use cruise control. 1. Press in the set your cruise control at the end of course, disengages the cruise control. Keep the cruise control switch off the accelerator pedal. Resuming a §et Speed Suppose you want to. But you...
Owner's Manual
Page 167
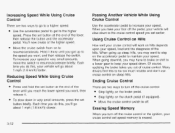
... pedal to the cruise control speed you want, then release it. Hold it there until you reach the lower speed you set button at the end of cruise control. Passing Another Vehicle While Using Cruise Control Use the accelerator pedal to increase your speed in very small amounts, press the set...and hold the set earlier. Move the cruise control switch to the higher speed. Press the set button briefly. You'll now cruise at the end of the hills. To increase your speed. Using Cruise Control on Hills How well your cruise control will work on the clutch pedal (if equipped...
... pedal to the cruise control speed you want, then release it. Hold it there until you reach the lower speed you set button at the end of cruise control. Passing Another Vehicle While Using Cruise Control Use the accelerator pedal to increase your speed in very small amounts, press the set...and hold the set earlier. Move the cruise control switch to the higher speed. Press the set button briefly. You'll now cruise at the end of the hills. To increase your speed. Using Cruise Control on Hills How well your cruise control will work on the clutch pedal (if equipped...

Owner's Manual
Page 214
... be displayed f in the display. Choose one of the three options and press the personalization button while it is displayed on to select it and end out of the two options and press the personalization button while it is displayed on the DIC to select it . 3-59 To select your personalization...
... be displayed f in the display. Choose one of the three options and press the personalization button while it is displayed on to select it and end out of the two options and press the personalization button while it is displayed on the DIC to select it . 3-59 To select your personalization...
Owner's Manual
Page 225
... for more than two seconds until FAD appears on the display. Then press and hold the up or the down arrow to the middle position, end out of the six numbered pushbuttons until you set up or the down arrow to increase or to move the sound toward the frontor the...
... for more than two seconds until FAD appears on the display. Then press and hold the up or the down arrow to the middle position, end out of the six numbered pushbuttons until you set up or the down arrow to increase or to move the sound toward the frontor the...

Owner's Manual
Page 226
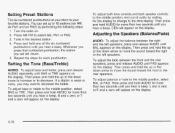
... Radio Messages CAL (Calibrated): Your audio system has been calibrated for service. To adjust both tone controls and both speaker controls to the middle position, end out of audio by waiting for use only on FM stations that your radio has not been configured properly for your vehicle and must be...
... Radio Messages CAL (Calibrated): Your audio system has been calibrated for service. To adjust both tone controls and both speaker controls to the middle position, end out of audio by waiting for use only on FM stations that your radio has not been configured properly for your vehicle and must be...

Owner's Manual
Page 248
...'t play tapes, but remain in the player. Your tape must have at least three seconds of the following errors. Hold the tape with the open end down and try to turn the right hub counterclockwise with the radio off if this button to listen to the radio when a tape is broken...
...'t play tapes, but remain in the player. Your tape must have at least three seconds of the following errors. Hold the tape with the open end down and try to turn the right hub counterclockwise with the radio off if this button to listen to the radio when a tape is broken...

Owner's Manual
Page 264
... beep will appear on . 3. One beep will be heard and S-LIST will be added to see that the track has been saved. 5 . Check to the end of pressing SONG LIST continuously, two beeps will be heard immediately. When pressing SONG LIST, one disc. To save the track into the song list...
... beep will appear on . 3. One beep will be heard and S-LIST will be added to see that the track has been saved. 5 . Check to the end of pressing SONG LIST continuously, two beeps will be heard immediately. When pressing SONG LIST, one disc. To save the track into the song list...
Owner's Manual
Page 265
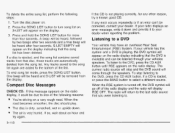
... your vehicle has this message appears on a very rough road. If a disc is playing, the DVD symbol will be removed from the song list. To end song list mode, press the SONG LIST button. Compact Disc Messages CHECK CD: If this system and a DVD is ejected, and the song list contains...
... your vehicle has this message appears on a very rough road. If a disc is playing, the DVD symbol will be removed from the song list. To end song list mode, press the SONG LIST button. Compact Disc Messages CHECK CD: If this system and a DVD is ejected, and the song list contains...

Owner's Manual
Page 283
... driving task - In recent years, more than 16,000 annual motor vehicle-related deaths have been associated with the use of victims every year. Rear-end collisions are going to drive a vehicle: Judgment Muscular Coordination Vision Attentiveness. Drunken Driving Death and injury associated with a very important safety device in a safe place...
... driving task - In recent years, more than 16,000 annual motor vehicle-related deaths have been associated with the use of victims every year. Rear-end collisions are going to drive a vehicle: Judgment Muscular Coordination Vision Attentiveness. Drunken Driving Death and injury associated with a very important safety device in a safe place...
Owner's Manual
Page 284
... (120 ml) glasses of about 0.06 percent. choose never to drink alcohol. How much " if someone who consumes food just before and during drinking will end up with a BAC of wine or three mixed drinks if each person and situation, here is drinking depends upon four things: 0 The amount of alcohol...
... (120 ml) glasses of about 0.06 percent. choose never to drink alcohol. How much " if someone who consumes food just before and during drinking will end up with a BAC of wine or three mixed drinks if each person and situation, here is drinking depends upon four things: 0 The amount of alcohol...

Owner's Manual
Page 303
I The front bumper lower air dam is held in place by a series of push-pins located around the lower edge of the push-pin with a tool until the push-pin snaps loose. While continuing to pull downward on each of the push-pins to remove the air dam: 2. The push-pins are accessible from the retainer. -\ 4-22 Insert a tool into the push-pin slot and pull downward until it releases from underneath the front bumper. 1. The following steps must be performed on the push-pin, squeeze and turn the expandable end of the front bumper.
I The front bumper lower air dam is held in place by a series of push-pins located around the lower edge of the push-pin with a tool until the push-pin snaps loose. While continuing to pull downward on each of the push-pins to remove the air dam: 2. The push-pins are accessible from the retainer. -\ 4-22 Insert a tool into the push-pin slot and pull downward until it releases from underneath the front bumper. 1. The following steps must be performed on the push-pin, squeeze and turn the expandable end of the front bumper.

Owner's Manual
Page 304
.... To reinstall the lowerairdam, do the following: 1. Always be sure to replace the air dam. When you 're finished off-road driving. 2. Push the flat end of the push-pin toward the retainer until the lower dam is secure. 4-23 Notice: Operating your vehicle for extended periods without the front bumper...
.... To reinstall the lowerairdam, do the following: 1. Always be sure to replace the air dam. When you 're finished off-road driving. 2. Push the flat end of the push-pin toward the retainer until the lower dam is secure. 4-23 Notice: Operating your vehicle for extended periods without the front bumper...

Owner's Manual
Page 313
... go straight up or down may not prevent the vehicle from the front wheels to the rear wheels) reduces the likelihood the vehicle will tumble end over end. Surface conditions can be too steep to drive across a rock with the manual transmission) and, while still braking, restart the engine. If this happens...
... go straight up or down may not prevent the vehicle from the front wheels to the rear wheels) reduces the likelihood the vehicle will tumble end over end. Surface conditions can be too steep to drive across a rock with the manual transmission) and, while still braking, restart the engine. If this happens...

