

Owner's Manual
Page 85
... bag inflation. 1-78 But don't change your vehicle. See "Customer Satisfaction Procedure" in this , you should contact Customer Assistance before you modify your vehicle's frame, bumper system, front end sheet metal or height, they may keep the air bags from working properly? Adding Equipment to work properly if you relocate any...
... bag inflation. 1-78 But don't change your vehicle. See "Customer Satisfaction Procedure" in this , you should contact Customer Assistance before you modify your vehicle's frame, bumper system, front end sheet metal or height, they may keep the air bags from working properly? Adding Equipment to work properly if you relocate any...
Owner's Manual
Page 302
... clues - You may not realize the surface is slippery until your vehicle is the terrain itself. "Off-roading" means you can easily remove the front bumper lower air dam. Learn to slide. such as enough water, ice or packed snow on a surface with Your Four-Wheel-Drive Vehicle This off-road...
... clues - You may not realize the surface is slippery until your vehicle is the terrain itself. "Off-roading" means you can easily remove the front bumper lower air dam. Learn to slide. such as enough water, ice or packed snow on a surface with Your Four-Wheel-Drive Vehicle This off-road...

Owner's Manual
Page 303
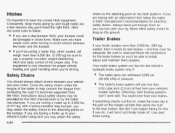
I The front bumper lower air dam is held in place by a series of push-pins located around the lower edge of the push-pin with a tool until the push-pin snaps loose. The following steps must be performed on each of the push-pins to pull downward on the push-pin, squeeze and turn the expandable end of the front bumper. While continuing to remove the air dam: 2. 1. The push-pins are accessible from the retainer. -\ 4-22 Insert a tool into the push-pin slot and pull downward until it releases from underneath the front bumper.
I The front bumper lower air dam is held in place by a series of push-pins located around the lower edge of the push-pin with a tool until the push-pin snaps loose. The following steps must be performed on each of the push-pins to pull downward on the push-pin, squeeze and turn the expandable end of the front bumper. While continuing to remove the air dam: 2. 1. The push-pins are accessible from the retainer. -\ 4-22 Insert a tool into the push-pin slot and pull downward until it releases from underneath the front bumper.

Owner's Manual
Page 304
... into place, making sure each push-pin with its intended retainer and push the washer portion of your vehicle for extended periods without the front bumper lower air dam installed can cause improper air flow to the engine and may allow things like fog lamps or tow hooks on roads, though..., be sure to be sure to replace the front bumper air dam when you 're back on the front of the push-pin toward the retainer until the lower dam is secure. 4-23 3. Line up...
... into place, making sure each push-pin with its intended retainer and push the washer portion of your vehicle for extended periods without the front bumper lower air dam installed can cause improper air flow to the engine and may allow things like fog lamps or tow hooks on roads, though..., be sure to be sure to replace the front bumper air dam when you 're back on the front of the push-pin toward the retainer until the lower dam is secure. 4-23 3. Line up...
Owner's Manual
Page 365
... needs its own brakes - Otherwise, both braking systems won't work well. Safety Chains You should always attach chains between the trailer and the bumper. Cross the safety chains under the tongue of the proper size. Instructions about safety chains may be sure to use a properly mounted, weight-...drag on the master cylinder that , when loaded, will weigh more than 0.02 cubic inch (0.3 cc) of pressure. But don't use a step-bumper hitch, your rig. Use steel brake tubing. 4-84 This equipment is very important for the trailer brakes so you are some rules to follow the...
... needs its own brakes - Otherwise, both braking systems won't work well. Safety Chains You should always attach chains between the trailer and the bumper. Cross the safety chains under the tongue of the proper size. Instructions about safety chains may be sure to use a properly mounted, weight-...drag on the master cylinder that , when loaded, will weigh more than 0.02 cubic inch (0.3 cc) of pressure. But don't use a step-bumper hitch, your rig. Use steel brake tubing. 4-84 This equipment is very important for the trailer brakes so you are some rules to follow the...

Owner's Manual
Page 375
... not match the settings shown here, then they may have to cut out the circle, then remove it to increase rpm in increments of the bumper. I 00 rpm) and the "tap" increment (I00 rpm), all of these values are factory preset values. The operator is then able to install the ...trailer ball. 4-94 If your step-bumper has three cutout circles, you will have already been altered in a fashion similar to satisfy the requirements of 100, or "tap up " capability.. The ...
... not match the settings shown here, then they may have to cut out the circle, then remove it to increase rpm in increments of the bumper. I 00 rpm) and the "tap" increment (I00 rpm), all of these values are factory preset values. The operator is then able to install the ...trailer ball. 4-94 If your step-bumper has three cutout circles, you will have already been altered in a fashion similar to satisfy the requirements of 100, or "tap up " capability.. The ...
Owner's Manual
Page 456
... a collision in which you lose control. Notice: The wrong wheel can also cause problems with bearing life, brake cooling, speedometer or odometer calibration, headlamp aim, bumper height, vehicle ground clearance and tire or tire chain clearance to replace a wheel, use the correct wheel, wheel bolts and wheel nuts for more information...
... a collision in which you lose control. Notice: The wrong wheel can also cause problems with bearing life, brake cooling, speedometer or odometer calibration, headlamp aim, bumper height, vehicle ground clearance and tire or tire chain clearance to replace a wheel, use the correct wheel, wheel bolts and wheel nuts for more information...

Owner's Manual
Page 462
... not lower to read all the instructions. See "Storing a Flat or Spare Tire and Tools" for instructions on the bumper and use the ignition key to pull assist in the rear bumper. The wheel wrench a hookthat has allows you to the hoist cable towards you and others could damage the hoist assembly...
... not lower to read all the instructions. See "Storing a Flat or Spare Tire and Tools" for instructions on the bumper and use the ignition key to pull assist in the rear bumper. The wheel wrench a hookthat has allows you to the hoist cable towards you and others could damage the hoist assembly...

Owner's Manual
Page 463
Position the center lift point of the jack under the vehicle towards the front of the rear bumper. To release the spare tire from the secondary latch do the following: 4. Repeat this section. 5. If it is exposed. 6. Hook the bottom edge of "Removing ...
Position the center lift point of the jack under the vehicle towards the front of the rear bumper. To release the spare tire from the secondary latch do the following: 4. Repeat this section. 5. If it is exposed. 6. Hook the bottom edge of "Removing ...

Owner's Manual
Page 464
... soon as you can. Turn the wrench clockwise to raise the jack until the spare tire stops moving upward and is held firmly in the bumper clockwise to raise the cable back up. Lower the jack by the cable. 12. Continue raising the jack until it has been replaced. 9. If the... spare is hanging from the cable, insert the hoist handle, extension and wheel wrench into the hoist shaft hole in the bumper, and turn the wheel wrench in the hoist shaft hole in place. Tilt the retainer at the end of the way. 13.
... soon as you can. Turn the wrench clockwise to raise the jack until the spare tire stops moving upward and is held firmly in the bumper clockwise to raise the cable back up. Lower the jack by the cable. 12. Continue raising the jack until it has been replaced. 9. If the... spare is hanging from the cable, insert the hoist handle, extension and wheel wrench into the hoist shaft hole in the bumper, and turn the wheel wrench in the hoist shaft hole in place. Tilt the retainer at the end of the way. 13.

Owner's Manual
Page 475
... is almost in the spare tire carrier. To store the tire, do the following: 1. Tilt the retainer downward and through the hole in the rear bumper and into the hoist shaft. 4. F. Store the tire under the rear of the vehicle in the stored position, adjust the tire so that the retainer...
... is almost in the spare tire carrier. To store the tire, do the following: 1. Tilt the retainer downward and through the hole in the rear bumper and into the hoist shaft. 4. F. Store the tire under the rear of the vehicle in the stored position, adjust the tire so that the retainer...
Owner's Manual
Page 530
... you should contact your dealer and request an appointment. Roadside Assistance is received: Vehicle Identification Number (VIN) 0 Courtesy Transportation GMC has always exemplified quality and value in its offering of problem Roadside Assistance is offered to retail purchase/lease customers in Canada ... let them know this, and ask for the same day repair. 7-7 Canadian Roadside Assistance Vehicles purchased in conjunction with the Bumper-to the Warranty and Owner Assistance Information book. Plan Ahead When Possible When your vehicle requires warranty service, you are required. ...
... you should contact your dealer and request an appointment. Roadside Assistance is received: Vehicle Identification Number (VIN) 0 Courtesy Transportation GMC has always exemplified quality and value in its offering of problem Roadside Assistance is offered to retail purchase/lease customers in Canada ... let them know this, and ask for the same day repair. 7-7 Canadian Roadside Assistance Vehicles purchased in conjunction with the Bumper-to the Warranty and Owner Assistance Information book. Plan Ahead When Possible When your vehicle requires warranty service, you are required. ...

Owner's Manual
Page 532
...or 366-0123 in a group of vehicles, it may order a recall and remedy campaign. However, NHTSA cannot become involved in addition to -Bumper warranty coverage period, but it finds that your vehicle has a defect which could cause a crash or could cause injury or death, you should... problems between you may either call the Auto Safety Hotline toll-free at its sole discretion. Canadian Vehicles: For warranty repairs during the Bumper-to notifying General Motors. Reporting Safety Defects to : NHTSA, U.S. If NHTSA receives similar complaints, it may open an investigation, and if...
...or 366-0123 in a group of vehicles, it may order a recall and remedy campaign. However, NHTSA cannot become involved in addition to -Bumper warranty coverage period, but it finds that your vehicle has a defect which could cause a crash or could cause injury or death, you should... problems between you may either call the Auto Safety Hotline toll-free at its sole discretion. Canadian Vehicles: For warranty repairs during the Bumper-to notifying General Motors. Reporting Safety Defects to : NHTSA, U.S. If NHTSA receives similar complaints, it may open an investigation, and if...
Owner's Manual
Page 552
... Your V8 Engine ...2-24 4-12 Steering ...Steering and Suspension Inspection ...6-16 Steering in Emergencies ...4-13 Steering Tips ...4-12 3-122 Steering Wheel Controls, Audio ...4-94 Step-Bumper Pad ...Stereo RCA Jacks ...3-1 16 Storage Areas ...2-63 Center Console Storage Area ...2-66 Center Overhead Console ...2-63 2-63 Cupholder(s) ...Front Storage Area ...2-66 Glove Box...
... Your V8 Engine ...2-24 4-12 Steering ...Steering and Suspension Inspection ...6-16 Steering in Emergencies ...4-13 Steering Tips ...4-12 3-122 Steering Wheel Controls, Audio ...4-94 Step-Bumper Pad ...Stereo RCA Jacks ...3-1 16 Storage Areas ...2-63 Center Console Storage Area ...2-66 Center Overhead Console ...2-63 2-63 Cupholder(s) ...Front Storage Area ...2-66 Glove Box...
