

Owner's Manual
Page 13
... feature to turn the heater off. Reclining Seatbacks If your vehicle has this section for information on reclining the seatback. To adjust a manual front seatback, lift the lever on high. Press the upper part of the control to work on the passenger's seat. The passenger's safety belt must be engaged for...
... feature to turn the heater off. Reclining Seatbacks If your vehicle has this section for information on reclining the seatback. To adjust a manual front seatback, lift the lever on high. Press the upper part of the control to work on the passenger's seat. The passenger's safety belt must be engaged for...
Owner's Manual
Page 17
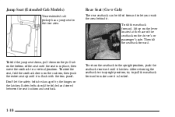
... jump seat down, pull down on the cushion, then push the entire seat up on the driver's or passenger's side. To tilt the seatback forward, lift up until it is flush with the trim panel. After returning the seatback to its upright position, try to pull the seatback forward to make...
... jump seat down, pull down on the cushion, then push the entire seat up on the driver's or passenger's side. To tilt the seatback forward, lift up until it is flush with the trim panel. After returning the seatback to its upright position, try to pull the seatback forward to make...
Owner's Manual
Page 120
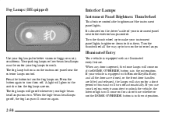
... button again to unlock the vehicle, the interior lights will come on . The fog lamp button is in the switch when the fog lamps are lifted and released, the lamps will stay on . Illuminated Entry Use your fog lamps to dim them off whenever your vehicle is in foggy or misty...
... button again to unlock the vehicle, the interior lights will come on . The fog lamp button is in the switch when the fog lamps are lifted and released, the lamps will stay on . Illuminated Entry Use your fog lamps to dim them off whenever your vehicle is in foggy or misty...
Owner's Manual
Page 125
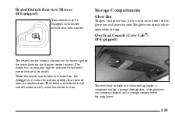
... outside rearview mirrors. Storage Compartments Glove Box To open while driving. Heated Outside Rearview Mirrors (If Equipped) Your vehicle may be open your glove box, lift the lever on the front of the glove box and lower the door.
... outside rearview mirrors. Storage Compartments Glove Box To open while driving. Heated Outside Rearview Mirrors (If Equipped) Your vehicle may be open your glove box, lift the lever on the front of the glove box and lower the door.

Owner's Manual
Page 130
Crew Cab models have storage pockets and cupholders on each door. If your vehicle has this console compartment, squeeze the front lever while lifting the top to open it. Door Storage You will find a storage compartment on rear doors. You can store cassettes and compact discs in the slots in the console. 2-60 There is also a lift-out storage tray in front of the compartment. Sunglasses Storage Compartment Front Storage Area The console has a sunglasses storage compartment.
Crew Cab models have storage pockets and cupholders on each door. If your vehicle has this console compartment, squeeze the front lever while lifting the top to open it. Door Storage You will find a storage compartment on rear doors. You can store cassettes and compact discs in the slots in the console. 2-60 There is also a lift-out storage tray in front of the compartment. Sunglasses Storage Compartment Front Storage Area The console has a sunglasses storage compartment.

Owner's Manual
Page 131
If you do, cigarettes or other things that burn into your vehicle has the center armrest compartment, lift the cover to open it. To remove the front ashtray, pull the bin upward. If your ashtray. Some vehicles may have a storage pocket on fire, causing damage. Ashtray and Cigarette Lighter Pull the front ashtray door down to expose the storage area which includes slots for cassettes or compact discs and a coinholder. NOTICE: Don't put papers and other smoking materials could set them on the back of the bucket or 60/40 bench seats. 2-61
If you do, cigarettes or other things that burn into your vehicle has the center armrest compartment, lift the cover to open it. To remove the front ashtray, pull the bin upward. If your ashtray. Some vehicles may have a storage pocket on fire, causing damage. Ashtray and Cigarette Lighter Pull the front ashtray door down to expose the storage area which includes slots for cassettes or compact discs and a coinholder. NOTICE: Don't put papers and other smoking materials could set them on the back of the bucket or 60/40 bench seats. 2-61

Owner's Manual
Page 287
... window as normal idle speed for a minute or so: 1. If the warning doesn't come back on your vehicle right away. Tow a trailer. otherwise, shift to lift the hood but see or hear no longer have the overheat warning, you can drive. DRIVE (D) or THIRD (3) for about twice as fast as necessary...
... window as normal idle speed for a minute or so: 1. If the warning doesn't come back on your vehicle right away. Tow a trailer. otherwise, shift to lift the hood but see or hear no longer have the overheat warning, you can drive. DRIVE (D) or THIRD (3) for about twice as fast as necessary...
Owner's Manual
Page 288
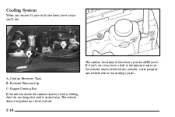
Engine Cooling Fan If the coolant inside the coolant recovery tank is boiling, don't do anything else until it 's safe to lift the hood, here's what you'll see: The coolant level should be parked on a level surface. 5-10 Coolant Recovery Tank B. Cooling System When you decide it cools down. The vehicle should beat least up to the ADD mark. Radiator Pressure Cap C. A. If it isn't, you may have a leak at the pressure cap or in the radiator hoses, heater hoses, radiator, water pump or somewhere else in the cooling system.
Engine Cooling Fan If the coolant inside the coolant recovery tank is boiling, don't do anything else until it 's safe to lift the hood, here's what you'll see: The coolant level should be parked on a level surface. 5-10 Coolant Recovery Tank B. Cooling System When you decide it cools down. The vehicle should beat least up to the ADD mark. Radiator Pressure Cap C. A. If it isn't, you may have a leak at the pressure cap or in the radiator hoses, heater hoses, radiator, water pump or somewhere else in the cooling system.

Owner's Manual
Page 300
Rear Frame Hole (ZR2) 1. Don't remove them yet. 2. Spring Hanger Hole (Standard Pickups) 5-22 Fit the jack into the appropriate hole nearest the flat tire. Turn the jack handle clockwise slightly to raise the jack lift head. 3. C. Removing the Flat Tire and Installing the Spare Tire A. Front Frame Hole B. Using the wheel wrench, loosen all the wheel nuts.
Rear Frame Hole (ZR2) 1. Don't remove them yet. 2. Spring Hanger Hole (Standard Pickups) 5-22 Fit the jack into the appropriate hole nearest the flat tire. Turn the jack handle clockwise slightly to raise the jack lift head. 3. C. Removing the Flat Tire and Installing the Spare Tire A. Front Frame Hole B. Using the wheel wrench, loosen all the wheel nuts.
Owner's Manual
Page 301
... vehicle fall. Remove all the wheel nuts and take off the ground so there is enough room for the spare tire to fit the jack lift head into the proper location before raising the vehicle. 4. CAUTION: Getting under a vehicle when it is jacked up is dangerous. Raise the vehicle far enough...
... vehicle fall. Remove all the wheel nuts and take off the ground so there is enough room for the spare tire to fit the jack lift head into the proper location before raising the vehicle. 4. CAUTION: Getting under a vehicle when it is jacked up is dangerous. Raise the vehicle far enough...

Owner's Manual
Page 320
Pull the handle located inside the vehicle on the lower left side of the instrument panel. 2. Lift the hood. 3. Hood Release To open the hood, do the following: 1. Release the hood prop from its retainer and put the hood prop into the slot in the hood 6-10
Pull the handle located inside the vehicle on the lower left side of the instrument panel. 2. Lift the hood. 3. Hood Release To open the hood, do the following: 1. Release the hood prop from its retainer and put the hood prop into the slot in the hood 6-10

Owner's Manual
Page 328
and remove the cover 2. Remove the fasteners that hold the cover in the Index for more information on . Tighten the fasteners to hold the cover on location. Lift out the engine air cleaner/filter, if needed. 3. Engine Air Cleaner/Filter "VORTEC" 4300 V6 Engine "VORTEC" 2200 L4 Engine See "Engine Compartment Overview" in place. 6-18 Reinstall the engine air cleaner/filter cover. Insert a new air filter. 4. To remove either engine air cleaner/filter, do the following: 1.
and remove the cover 2. Remove the fasteners that hold the cover in the Index for more information on . Tighten the fasteners to hold the cover on location. Lift out the engine air cleaner/filter, if needed. 3. Engine Air Cleaner/Filter "VORTEC" 4300 V6 Engine "VORTEC" 2200 L4 Engine See "Engine Compartment Overview" in place. 6-18 Reinstall the engine air cleaner/filter cover. Insert a new air filter. 4. To remove either engine air cleaner/filter, do the following: 1.

Owner's Manual
Page 349
... Bulbs" in this section, contact your GM dealer's service department. Open the hood. You or others could be injured. Remove the black retainer clips by lifting up. 3. Pull the headlamp assembly out. 4. Halogen Bulbs CAUTION: Halogen bulbs have pressurized gas inside and can burst if you drop or scratch the bulb...
... Bulbs" in this section, contact your GM dealer's service department. Open the hood. You or others could be injured. Remove the black retainer clips by lifting up. 3. Pull the headlamp assembly out. 4. Halogen Bulbs CAUTION: Halogen bulbs have pressurized gas inside and can burst if you drop or scratch the bulb...

Owner's Manual
Page 350
Plug in the headlamp assembly by lifting up. 3. Install the two retaining clips. 10. Close the hood. 2. Put the headlamp assembly back into the bulb assembly and reinstall it in the electrical connector. 8. Unplug the electrical connector. 4. Pull the headlamp lens assembly out. 6-40 Put the new bulb into the vehicle. 9. Turn the bulb assembly counterclockwise to remove it is tight. 7. Remove the black retainer clips by turning it clockwise until it from the headlamp assembly. 6. Open the hood. 5. Two-Piece Composite Headlamp System 1.
Plug in the headlamp assembly by lifting up. 3. Install the two retaining clips. 10. Close the hood. 2. Put the headlamp assembly back into the bulb assembly and reinstall it in the electrical connector. 8. Unplug the electrical connector. 4. Pull the headlamp lens assembly out. 6-40 Put the new bulb into the vehicle. 9. Turn the bulb assembly counterclockwise to remove it is tight. 7. Remove the black retainer clips by turning it clockwise until it from the headlamp assembly. 6. Open the hood. 5. Two-Piece Composite Headlamp System 1.

Owner's Manual
Page 355
... and cracking. A. Locking Tab D. Press down on the blade assembly pivot locking tab. Replacement blades come in the Index. To remove the old wiper blades, lift the wiper arm until it from the wiper arm hook. 3. Accidental bumping can cause the arm to release it locks into a vertical position. NOTICE: Use...
... and cracking. A. Locking Tab D. Press down on the blade assembly pivot locking tab. Replacement blades come in the Index. To remove the old wiper blades, lift the wiper arm until it from the wiper arm hook. 3. Accidental bumping can cause the arm to release it locks into a vertical position. NOTICE: Use...
Owner's Manual
Page 451
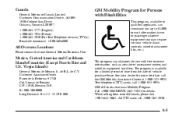
... Islands/Countries (Except Puerto Rico and U.S. Virgin Islands) General Motors de Mexico, S. The program is available for details. See your vehicle (hand controls, wheelchair/scooter lifts, etc.). When calling from the date of Canada also has a Mobility Program.
... Islands/Countries (Except Puerto Rico and U.S. Virgin Islands) General Motors de Mexico, S. The program is available for details. See your vehicle (hand controls, wheelchair/scooter lifts, etc.). When calling from the date of Canada also has a Mobility Program.