
Owner's Manual
Page 15
... the vehicle is locked into place. 1-2 If your vehicle has a manual bucket or split bench seat, you , or make sure the seat is not moving . Lift the lever at the front of the seat. The sudden movement could startle and confuse you can lose control of the seat to . It also...
... the vehicle is locked into place. 1-2 If your vehicle has a manual bucket or split bench seat, you , or make sure the seat is not moving . Lift the lever at the front of the seat. The sudden movement could startle and confuse you can lose control of the seat to . It also...
Owner's Manual
Page 19
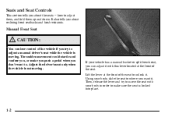
If your vehicle is located on how to operate the reclining seatback feature. Release the lever to an upright position. But don't have a seatback reclined if your vehicle has power seats with a power recliner, see "Power Seats" in the Index for further information on the outboard side of the seat cushion. Lift the lever again upward and the seatback will go to lock the seatback where you want it. Reclining Seatbacks To adjust the front seatback, lift the lever upward. The lever is moving. 1-6
If your vehicle is located on how to operate the reclining seatback feature. Release the lever to an upright position. But don't have a seatback reclined if your vehicle has power seats with a power recliner, see "Power Seats" in the Index for further information on the outboard side of the seat cushion. Lift the lever again upward and the seatback will go to lock the seatback where you want it. Reclining Seatbacks To adjust the front seatback, lift the lever upward. The lever is moving. 1-6

Owner's Manual
Page 25
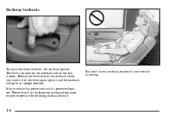
... or be seriously injured or killed. You can 't wear a safety belt properly. To return the seat to the passenger position, lift the floor load panels and latch them into position. Lift the seatback up . Then lower the seat cushion until it explains the air bag system. 1-12 If you 're not wearing...
... or be seriously injured or killed. You can 't wear a safety belt properly. To return the seat to the passenger position, lift the floor load panels and latch them into position. Lift the seatback up . Then lower the seat cushion until it explains the air bag system. 1-12 If you 're not wearing...

Owner's Manual
Page 97
... it latches securely. Tailgate Removal The tailgate on your vehicle can be removed to allow for different loading situations. To release the retaining cable clips, lift the cable so it latches. Reverse the above procedure to release the left edge. Make sure the tailgate is secure. 2-14 To shut the tailgate...
... it latches securely. Tailgate Removal The tailgate on your vehicle can be removed to allow for different loading situations. To release the retaining cable clips, lift the cable so it latches. Reverse the above procedure to release the left edge. Make sure the tailgate is secure. 2-14 To shut the tailgate...
Owner's Manual
Page 316
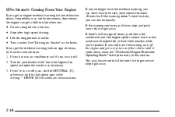
... necessary. 3. Tow a trailer. D D D D Climb a long hill on , you can get a little too hot when you: If you no steam, the problem may decide not to lift the hood but see "Overheated Engine Protection Operating Mode" listed previously in this for automatic transmissions. 5-10 Turn on Grades" in traffic. otherwise, shift to...
... necessary. 3. Tow a trailer. D D D D Climb a long hill on , you can get a little too hot when you: If you no steam, the problem may decide not to lift the hood but see "Overheated Engine Protection Operating Mode" listed previously in this for automatic transmissions. 5-10 Turn on Grades" in traffic. otherwise, shift to...
Owner's Manual
Page 317
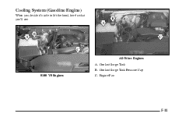
Cooling System (Gasoline Engine) When you decide it's safe to lift the hood, here's what you'll see: All Other Engines A. Engine Fan 5-11 Coolant Surge Tank B. Coolant Surge Tank Pressure Cap 8100 V8 Engines C.
Cooling System (Gasoline Engine) When you decide it's safe to lift the hood, here's what you'll see: All Other Engines A. Engine Fan 5-11 Coolant Surge Tank B. Coolant Surge Tank Pressure Cap 8100 V8 Engines C.

Owner's Manual
Page 329
Turn the wheel wrench clockwise to the jack. Attach the jack handle to raise the jack lift head a little. 5-23 Attach the wheel wrench to the jack handle extensions (as needed).
Turn the wheel wrench clockwise to the jack. Attach the jack handle to raise the jack lift head a little. 5-23 Attach the wheel wrench to the jack handle extensions (as needed).

Owner's Manual
Page 331
... models), position the jack on the frame behind the flat tire. If you could be sure to the front of the vehicle (2-Wheel Drive 1500 Series vehicles), position the jack under the vehicle. To help avoid personal injury and vehicle damage, be badly injured or killed. Never get under...damage the vehicle and even make the vehicle fall. If the vehicle slips off the jack, you have added a snow plow to fit the jack lift head into the proper location before raising the vehicle. CAUTION: Getting under a vehicle when it is dangerous. CAUTION: Raising your vehicle, lower the snow...
... models), position the jack on the frame behind the flat tire. If you could be sure to the front of the vehicle (2-Wheel Drive 1500 Series vehicles), position the jack under the vehicle. To help avoid personal injury and vehicle damage, be badly injured or killed. Never get under...damage the vehicle and even make the vehicle fall. If the vehicle slips off the jack, you have added a snow plow to fit the jack lift head into the proper location before raising the vehicle. CAUTION: Getting under a vehicle when it is dangerous. CAUTION: Raising your vehicle, lower the snow...

Owner's Manual
Page 351
Lift the hood. 4. Pull down the hood and close it firmly. 6-9 Then go to the lower left of the grille. 3. Hood Release 1. To open the hood, first pull the handle located inside the vehicle to the front of the vehicle and pull up on the secondary hood release, located on properly. Before closing the hood, be sure all filler caps are on the passenger's side near the center of the steering wheel. 2.
Lift the hood. 4. Pull down the hood and close it firmly. 6-9 Then go to the lower left of the grille. 3. Hood Release 1. To open the hood, first pull the handle located inside the vehicle to the front of the vehicle and pull up on the secondary hood release, located on properly. Before closing the hood, be sure all filler caps are on the passenger's side near the center of the steering wheel. 2.
Owner's Manual
Page 352
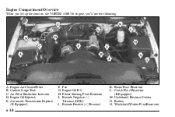
C. D. Clutch Fluid Reservoir (If Equipped) M. Windshield Washer Fluid Reservoir 6-10 H. Underhood Electrical Center N. Battery O. Remote Positive (+) Terminal F. G. E. Engine Air Cleaner/Filter Coolant Surge Tank Air Filter Restriction Indicator Engine Oil Dipstick Automatic Transmission Dipstick (If Equipped) Fan Engine Oil Fill Power Steering Fluid Reservoir Remote Negative (-) Terminal (GND) J. I. B. K. Brake Fluid Reservoir L. Engine Compartment Overview When you lift up the hood on the VORTEC 4300 V6 engine, you'll see the following: A.
C. D. Clutch Fluid Reservoir (If Equipped) M. Windshield Washer Fluid Reservoir 6-10 H. Underhood Electrical Center N. Battery O. Remote Positive (+) Terminal F. G. E. Engine Air Cleaner/Filter Coolant Surge Tank Air Filter Restriction Indicator Engine Oil Dipstick Automatic Transmission Dipstick (If Equipped) Fan Engine Oil Fill Power Steering Fluid Reservoir Remote Negative (-) Terminal (GND) J. I. B. K. Brake Fluid Reservoir L. Engine Compartment Overview When you lift up the hood on the VORTEC 4300 V6 engine, you'll see the following: A.

Owner's Manual
Page 353
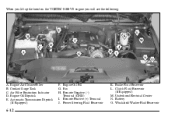
C. Remote Positive (+) Terminal K. Brake Fluid Reservoir L. Power Steering Fluid Reservoir J. Underhood Electrical Center N. E. Engine Oil Fill G. Clutch Fluid Reservoir (If Equipped) M. Engine Air Cleaner/Filter Coolant Surge Tank Air Filter Restriction Indicator Engine Oil Dipstick Automatic Transmission Dipstick (If Equipped) F. Remote Negative (-) Terminal (GND) I. Windshield Washer Fluid Reservoir 6-11 D. Battery O. Fan H. B. When you lift up the hood on the VORTEC 5300 V8 engine (VORTEC 4800 and 6000 V8 engines similar), you will see the following: A.
C. Remote Positive (+) Terminal K. Brake Fluid Reservoir L. Power Steering Fluid Reservoir J. Underhood Electrical Center N. E. Engine Oil Fill G. Clutch Fluid Reservoir (If Equipped) M. Engine Air Cleaner/Filter Coolant Surge Tank Air Filter Restriction Indicator Engine Oil Dipstick Automatic Transmission Dipstick (If Equipped) F. Remote Negative (-) Terminal (GND) I. Windshield Washer Fluid Reservoir 6-11 D. Battery O. Fan H. B. When you lift up the hood on the VORTEC 5300 V8 engine (VORTEC 4800 and 6000 V8 engines similar), you will see the following: A.
Owner's Manual
Page 354
C. Engine Oil Fill G. Remote Positive (+) Terminal J. Clutch Fluid Reservoir (If Equipped) M. E. Fan H. Underhood Electrical Center N. When you lift up the hood on the VORTEC 8100 V8 engine you will see the following: A. Brake Fluid Reservoir L. Windshield Washer Fluid Reservoir 6-12 Remote Negative (-) Terminal (GND) I. Engine Air Cleaner/Filter Coolant Surge Tank Air Filter Restriction Indicator Engine Oil Dipstick Automatic Transmission Dipstick (If Equipped) F. B. D. Battery O. Power Steering Fluid Reservoir K.
C. Engine Oil Fill G. Remote Positive (+) Terminal J. Clutch Fluid Reservoir (If Equipped) M. E. Fan H. Underhood Electrical Center N. When you lift up the hood on the VORTEC 8100 V8 engine you will see the following: A. Brake Fluid Reservoir L. Windshield Washer Fluid Reservoir 6-12 Remote Negative (-) Terminal (GND) I. Engine Air Cleaner/Filter Coolant Surge Tank Air Filter Restriction Indicator Engine Oil Dipstick Automatic Transmission Dipstick (If Equipped) F. B. D. Battery O. Power Steering Fluid Reservoir K.

Owner's Manual
Page 361
... the Index for more information on the air cleaner cover. See "Owner Checks and Services" in the passenger's side front corner of the engine compartment. Lift the filter from the air cleaner housing. Your air cleaner is located in the Index. 6-19 Refer to the Maintenance Schedule to determine when to...
... the Index for more information on the air cleaner cover. See "Owner Checks and Services" in the passenger's side front corner of the engine compartment. Lift the filter from the air cleaner housing. Your air cleaner is located in the Index. 6-19 Refer to the Maintenance Schedule to determine when to...

Owner's Manual
Page 388
A CHMSL bulb is removed by turning the socket counterclockwise and pulling the bulb straight out. 6-46 Center High-Mounted Stoplamps 2. A. Cargo Lamps B. Remove the CHMSL bulb holder back plate from the housing by pulling the bulb straight out from the holder back plate. Remove the screws and lift off the lamp assembly. A cargo bulb is removed by pressing the release tabs. 3. Center High-Mounted Stoplamp (CHMSL) and Cargo Lamp 1.
A CHMSL bulb is removed by turning the socket counterclockwise and pulling the bulb straight out. 6-46 Center High-Mounted Stoplamps 2. A. Cargo Lamps B. Remove the CHMSL bulb holder back plate from the housing by pulling the bulb straight out from the holder back plate. Remove the screws and lift off the lamp assembly. A cargo bulb is removed by pressing the release tabs. 3. Center High-Mounted Stoplamp (CHMSL) and Cargo Lamp 1.

Owner's Manual
Page 389
Remove the two screws and lift off the lens. If a cargo lamp is replaced, put the new bulb into the lamp housing. 7. If a CHMSL bulb is replaced, put a new cargo lamp bulb into the socket and press it in until it is tight before turning the socket counterclockwise. 6. The center roof marker lamps has six screws to remove. 4. Reinstall the lamp assembly and tighten the screws. 6-47 Put the bulb holder back plate into the socket and press it in until it is tight. 5. Roof Marker Lamps 1.
Remove the two screws and lift off the lens. If a cargo lamp is replaced, put the new bulb into the lamp housing. 7. If a CHMSL bulb is replaced, put a new cargo lamp bulb into the socket and press it in until it is tight before turning the socket counterclockwise. 6. The center roof marker lamps has six screws to remove. 4. Reinstall the lamp assembly and tighten the screws. 6-47 Put the bulb holder back plate into the socket and press it in until it is tight. 5. Roof Marker Lamps 1.

Owner's Manual
Page 392
... Signal Lamp B. Reinstall the rear lamp assembly and tighten the screws. 7. Using your hands, peel the rubber seal away from the socket. 5. Back-up Lamp 3. Lift the lens off the lamp assembly. 3. Put a new bulb into the taillamp housing until it clicks. 6. Press a new bulb into the socket and turn the...
... Signal Lamp B. Reinstall the rear lamp assembly and tighten the screws. 7. Using your hands, peel the rubber seal away from the socket. 5. Back-up Lamp 3. Lift the lens off the lamp assembly. 3. Put a new bulb into the taillamp housing until it clicks. 6. Press a new bulb into the socket and turn the...

Owner's Manual
Page 393
... and cracking. Push the release lever and slide the wiper assembly toward the driver's side of the vehicle. 3. See "Wiper Blade Check" in different ways. Lift the wiper arm and turn the blade until it is facing away from the windshield. 2. Install a new blade by reversing Steps 1 and 2. Windshield wiper blades...
... and cracking. Push the release lever and slide the wiper assembly toward the driver's side of the vehicle. 3. See "Wiper Blade Check" in different ways. Lift the wiper arm and turn the blade until it is facing away from the windshield. 2. Install a new blade by reversing Steps 1 and 2. Windshield wiper blades...
Owner's Manual
Page 417
Lift the cover for more information on the driver's side of the engine compartment near the battery. You can be used accordingly. See "Engine Compartment Overview" ...
Lift the cover for more information on the driver's side of the engine compartment near the battery. You can be used accordingly. See "Engine Compartment Overview" ...

Owner's Manual
Page 460
... Number) GM Mobility Program for more details or call the GM Mobility Assistance Center at 1-800-323-9935. See your vehicle (hand controls, wheelchair/scooter lifts, etc.). All TTY users call 1-800-833-9935. de C.V. Customer Assistance Center Paseo de la Reforma # 2740 Col. The program is available for details. Canada...
... Number) GM Mobility Program for more details or call the GM Mobility Assistance Center at 1-800-323-9935. See your vehicle (hand controls, wheelchair/scooter lifts, etc.). All TTY users call 1-800-833-9935. de C.V. Customer Assistance Center Paseo de la Reforma # 2740 Col. The program is available for details. Canada...
