

Owner's Manual
Page 11
Also see : ENGINE COOLANT TEMP WINDSHIELD WASHER BATTERY CHARGING SYSTEM FUSE TURN SIGNALS LIGHTER DOOR LOCK UNLOCK PARKING LAMPS WINDSHIELD DEFROSTER HORN BRAKE FASTEN SEAT BELTS HAZARD WARNING FLASHER POWER WINDOW DAYTIME RUNNING LAMPS REAR WINDOW DEFOGGER COOLANT FUEL ENGINE OIL PRESSURE VENTILATING FAN AIR BAG FOG LAMPS ANTI-LOCK BRAKES ix For...
Also see : ENGINE COOLANT TEMP WINDSHIELD WASHER BATTERY CHARGING SYSTEM FUSE TURN SIGNALS LIGHTER DOOR LOCK UNLOCK PARKING LAMPS WINDSHIELD DEFROSTER HORN BRAKE FASTEN SEAT BELTS HAZARD WARNING FLASHER POWER WINDOW DAYTIME RUNNING LAMPS REAR WINDOW DEFOGGER COOLANT FUEL ENGINE OIL PRESSURE VENTILATING FAN AIR BAG FOG LAMPS ANTI-LOCK BRAKES ix For...

Owner's Manual
Page 44
...not even realize the air bag inflated. Some components of the right front passenger. The sensing system triggers a release of collisions, including rollovers, rear impacts and side impacts, primarily because an occupant's motion is dust in the vehicle should never be hot for a short time. Air bags ...supplement the protection provided by opening a window or door. 1-31 There will be some people may be warm, but can contact the steering wheel or the instrument panel. How does an air bag...
...not even realize the air bag inflated. Some components of the right front passenger. The sensing system triggers a release of collisions, including rollovers, rear impacts and side impacts, primarily because an occupant's motion is dust in the vehicle should never be hot for a short time. Air bags ...supplement the protection provided by opening a window or door. 1-31 There will be some people may be warm, but can contact the steering wheel or the instrument panel. How does an air bag...

Owner's Manual
Page 80
...2-8 2-11 2-14 2-17 2-18 2-19 2-19 2-20 2-21 2-23 2-24 2-27 2-28 2-31 2-31 Windows Keys Front Doors Rear Doors Door Locks Keyless Entry System (Option) Sliding Door Hatch Theft PasslockR New Vehicle "Break-In" Ignition Positions Starting Your Engine Engine Coolant Heater (If Equipped) Automatic Transmission Operation Parking Brake...2-41 2-44 2-45 2-47 2-55 2-56 2-57 2-57 2-62 2-65 Engine Exhaust Running Your Engine While You're Parked Locking Rear Axle (If Equipped) All-Wheel Drive (Option) Horn Tilt Wheel (If Equipped) Turn Signal/Multifunction Lever Exterior Lamps Interior Lamps Mirrors Storage...
...2-8 2-11 2-14 2-17 2-18 2-19 2-19 2-20 2-21 2-23 2-24 2-27 2-28 2-31 2-31 Windows Keys Front Doors Rear Doors Door Locks Keyless Entry System (Option) Sliding Door Hatch Theft PasslockR New Vehicle "Break-In" Ignition Positions Starting Your Engine Engine Coolant Heater (If Equipped) Automatic Transmission Operation Parking Brake...2-41 2-44 2-45 2-47 2-55 2-56 2-57 2-57 2-62 2-65 Engine Exhaust Running Your Engine While You're Parked Locking Rear Axle (If Equipped) All-Wheel Drive (Option) Horn Tilt Wheel (If Equipped) Turn Signal/Multifunction Lever Exterior Lamps Interior Lamps Mirrors Storage...

Owner's Manual
Page 85
To open a front door from the outside . See "Hatch Release" in the Index. Open the passenger's side rear door first. Grasp the handle and pull the door open the hatch first. Rear Doors If you have the "Dutch doors," you and push the door open. Cargo Door Shown 2-6 Front Doors To open a front door from the inside, pull the lever toward you must open . Rear doors can only be opened from the outside , grasp the handle and pull the door open.
To open a front door from the outside . See "Hatch Release" in the Index. Open the passenger's side rear door first. Grasp the handle and pull the door open the hatch first. Rear Doors If you have the "Dutch doors," you and push the door open. Cargo Door Shown 2-6 Front Doors To open a front door from the inside, pull the lever toward you must open . Rear doors can only be opened from the outside , grasp the handle and pull the door open.

Owner's Manual
Page 86
The rear doors have a check assembly to make sure both doors are completely closed. To close the rear doors, close the driver's side door first. Check to keep the doors from opening beyond 90 degrees. Replace the check assemblies on each door. Do this on the mounting brackets before closing the doors. 2-7 To open the rear doors, push in on the inside of the door. To fully open the driver's side rear door, pull on the latch release handle located on the clip and lift the check assembly up off the mounting bracket.
The rear doors have a check assembly to make sure both doors are completely closed. To close the rear doors, close the driver's side door first. Check to keep the doors from opening beyond 90 degrees. Replace the check assemblies on each door. Do this on the mounting brackets before closing the doors. 2-7 To open the rear doors, push in on the inside of the door. To fully open the driver's side rear door, pull on the latch release handle located on the clip and lift the check assembly up off the mounting bracket.
Owner's Manual
Page 88
...hold it while you will hear the lock switch lock and unlock. After you press the power door lock switch, the sliding door will lock or unlock the rear hatch and Dutch doors. Turn your door locks. You can set the automatic lock feature to program your key to have no... doors lock and none of the doors unlock. The power door lock switch will not lock immediately. Programmable Automatic Door Locks Your ...
...hold it while you will hear the lock switch lock and unlock. After you press the power door lock switch, the sliding door will lock or unlock the rear hatch and Dutch doors. Turn your door locks. You can set the automatic lock feature to program your key to have no... doors lock and none of the doors unlock. The power door lock switch will not lock immediately. Programmable Automatic Door Locks Your ...

Owner's Manual
Page 91
If the engine is running, the automatic transmission must also be in PARK (P) or NEUTRAL (N) for the REAR 2X button to lock all doors will unlock, the parking lamps will flash and the interior lights will go on the key transmitter is pressed, the horn will sound and the ... within five seconds to Your Vehicle If you press UNLOCK again within five seconds and the horn will chirp. Matching Transmitter(s) to unlock the rear hatch or cargo doors, the parking lamps will flash and the interior lights will go on . Each remote keyless entry transmitter is lost transmitter will not unlock...
If the engine is running, the automatic transmission must also be in PARK (P) or NEUTRAL (N) for the REAR 2X button to lock all doors will unlock, the parking lamps will flash and the interior lights will go on the key transmitter is pressed, the horn will sound and the ... within five seconds to Your Vehicle If you press UNLOCK again within five seconds and the horn will chirp. Matching Transmitter(s) to unlock the rear hatch or cargo doors, the parking lamps will flash and the interior lights will go on . Each remote keyless entry transmitter is lost transmitter will not unlock...

Owner's Manual
Page 93
.... If the locks do not cycle, see your dealer for eight seconds. This will not respond to a signal it rests in the open position. The door locks should cycle to the security method used by this system. The transmitter does not send the same signal twice to the... rear until it has been sent previously. To close to your transmitter, stand close the sliding side door, pull the handle toward the back and slide the door to the receiver. To resynchronize your vehicle and simultaneously press and hold...
.... If the locks do not cycle, see your dealer for eight seconds. This will not respond to a signal it rests in the open position. The door locks should cycle to the security method used by this system. The transmitter does not send the same signal twice to the... rear until it has been sent previously. To close to your transmitter, stand close the sliding side door, pull the handle toward the back and slide the door to the receiver. To resynchronize your vehicle and simultaneously press and hold...
Owner's Manual
Page 94
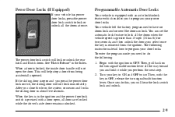
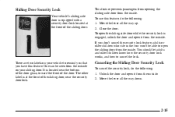
...Door Security Lock Your vehicle's sliding side door is equipped with a security door lock located at the front of the sliding door, near the bottom of the door glass, toward the front of the sliding door. This feature prevents passengers from opening the sliding side door...door. Unlock the door and open the sliding door from the outside on your sliding door. To use this feature. The other label is engaged, unlock the door and open it from the inside . Close the door. Canceling the Sliding Door... older children know how the security door lock works, and how to open...
...Door Security Lock Your vehicle's sliding side door is equipped with a security door lock located at the front of the sliding door, near the bottom of the door glass, toward the front of the sliding door. This feature prevents passengers from opening the sliding side door...door. Unlock the door and open the sliding door from the outside on your sliding door. To use this feature. The other label is engaged, unlock the door and open it from the inside . Close the door. Canceling the Sliding Door... older children know how the security door lock works, and how to open...

Owner's Manual
Page 96
D Turn the fan on your heating or cooling system to drive with the rear hatch or rear doors open them all other doors from the outside air into the hatch release button and turn it , then press the button and lift the handle located in the Index. See "... electrical wiring or other cable connections must pass through the seal between the body and the rear hatch or rear doors: D Make sure all the way. Hatch CAUTION: It can be opened or closed without a key if the door lock system is unlocked. The hatch can use the keyless entry system described earlier. Hatch...
D Turn the fan on your heating or cooling system to drive with the rear hatch or rear doors open them all other doors from the outside air into the hatch release button and turn it , then press the button and lift the handle located in the Index. See "... electrical wiring or other cable connections must pass through the seal between the body and the rear hatch or rear doors: D Make sure all the way. Hatch CAUTION: It can be opened or closed without a key if the door lock system is unlocked. The hatch can use the keyless entry system described earlier. Hatch...

Owner's Manual
Page 206
... Weight Rating (GAWR). The label shows the size of your vehicle, or GAWR for the front and rear axles, called the Gross Vehicle Weight Rating (GVWR). To find out the actual loads on the rear edge of the vehicle, all occupants, fuel, cargo and tongue weight, if pulling a trailer. Never... to obtain the gross weight capacity of the center line. The Certification/Tire label in your front and rear axles, you the maximum weights for either the front or rear axle. The GVWR includes the weight of the driver's door. And, if you do have a heavy load, you with this example.
... Weight Rating (GAWR). The label shows the size of your vehicle, or GAWR for the front and rear axles, called the Gross Vehicle Weight Rating (GVWR). To find out the actual loads on the rear edge of the vehicle, all occupants, fuel, cargo and tongue weight, if pulling a trailer. Never... to obtain the gross weight capacity of the center line. The Certification/Tire label in your front and rear axles, you the maximum weights for either the front or rear axle. The GVWR includes the weight of the driver's door. And, if you do have a heavy load, you with this example.

Owner's Manual
Page 213
... are some rules to help prevent the tongue from contacting the road if it becomes separated from your vehicle, including the weight of the driver's door or see "Tire Loading" in the Index. You'll find these numbers on the ground. Crosswinds, large trucks going by the trailer manufacturer. If you... 'll be pulling a trailer that, when loaded, will weigh more than 2,000 lbs. (900 kg), be sure to drag on the Certification label at the rear edge of the trailer tongue. Cross the safety chains under the tongue of the proper size. This equipment is very important for cold tires.
... are some rules to help prevent the tongue from contacting the road if it becomes separated from your vehicle, including the weight of the driver's door or see "Tire Loading" in the Index. You'll find these numbers on the ground. Crosswinds, large trucks going by the trailer manufacturer. If you... 'll be pulling a trailer that, when loaded, will weigh more than 2,000 lbs. (900 kg), be sure to drag on the Certification label at the rear edge of the trailer tongue. Cross the safety chains under the tongue of the proper size. This equipment is very important for cold tires.
Owner's Manual
Page 218
... Gage): Center High-Mounted Stoplamp. It consists of six wires that the trailer or the body won 't be routed out of your vehicle between the rear door and the floor, with enough of the harness left on the passenger's side of the vehicle near the passenger's side... technician. The harness is stored on both sides so that may be wired by after-market trailer hitch installers. The harness is located near the rear wheel well. If you have the optional trailering package, your trailer. The technician can use the following color code chart when connecting the wiring harness...
... Gage): Center High-Mounted Stoplamp. It consists of six wires that the trailer or the body won 't be routed out of your vehicle between the rear door and the floor, with enough of the harness left on the passenger's side of the vehicle near the passenger's side... technician. The harness is stored on both sides so that may be wired by after-market trailer hitch installers. The harness is located near the rear wheel well. If you have the optional trailering package, your trailer. The technician can use the following color code chart when connecting the wiring harness...

Owner's Manual
Page 238
... the front of the cover. Remove the nut and washer, then pull the wheel blocks off the bolt. Remove the wheel blocks by your vehicle's rear doors, along the passenger's side wall. Removing the Spare Tire and Tools The jacking equipment you'll need is stored by turning the top nut counterclockwise...
... the front of the cover. Remove the nut and washer, then pull the wheel blocks off the bolt. Remove the wheel blocks by your vehicle's rear doors, along the passenger's side wall. Removing the Spare Tire and Tools The jacking equipment you'll need is stored by turning the top nut counterclockwise...

Owner's Manual
Page 240
... wheel opening. Pull the tire out from under the vehicle. Put the flat end of the cable and pull it through the hole in the rear door frame, above the bumper. Be sure the flat end connects into the hoist shaft.
... wheel opening. Pull the tire out from under the vehicle. Put the flat end of the cable and pull it through the hole in the rear door frame, above the bumper. Be sure the flat end connects into the hoist shaft.

Owner's Manual
Page 249
... with the valve stem pointed down. 2. The compact spare is up all these in the Index. CAUTION: Storing a jack, a tire or other equipment in the rear door frame, above the bumper. Put the flat tire on an angle through the wheel opening. Put the flat end of the vehicle. The spare tire... the ground at least two "clicks" when the tire is for temporary use only. Continue turning the ratchet/wheel wrench until you feel at the rear of the vehicle could strike someone. Make sure it is tight.
... with the valve stem pointed down. 2. The compact spare is up all these in the Index. CAUTION: Storing a jack, a tire or other equipment in the rear door frame, above the bumper. Put the flat tire on an angle through the wheel opening. Put the flat end of the vehicle. The spare tire... the ground at least two "clicks" when the tire is for temporary use only. Continue turning the ratchet/wheel wrench until you feel at the rear of the vehicle could strike someone. Make sure it is tight.

Owner's Manual
Page 293
Taillamps 1. Pull out the taillamp assembly so you can see the socket. 6-41 Remove the two screws from behind the door. 3. Open the rear door. 2.
Taillamps 1. Pull out the taillamp assembly so you can see the socket. 6-41 Remove the two screws from behind the door. 3. Open the rear door. 2.

Owner's Manual
Page 295
...be cut, punctured or broken by a leading tire manufacturer. Overinflated tires are more than 1 mile (1.6 km). 6-43 If your tread is on the rear edge of too much friction. CAUTION: (Continued) D D Inflation -- Keep tires at least three hours or driven no more likely to be checked ... tire warranty and where to maintain the recommended pressure. See "Loading Your Vehicle" in the Index. such as a result of the driver's door, shows the correct inflation pressures for your tires when they're cold. "Cold" means your Vehicle Warranty booklet for at the recommended pressure. ...
...be cut, punctured or broken by a leading tire manufacturer. Overinflated tires are more than 1 mile (1.6 km). 6-43 If your tread is on the rear edge of too much friction. CAUTION: (Continued) D D Inflation -- Keep tires at least three hours or driven no more likely to be checked ... tire warranty and where to maintain the recommended pressure. See "Loading Your Vehicle" in the Index. such as a result of the driver's door, shows the correct inflation pressures for your tires when they're cold. "Cold" means your Vehicle Warranty booklet for at the recommended pressure. ...

Owner's Manual
Page 311
...'s side. You can see it if you look through the windshield from the vehicle. 6-59 On this label on the inside of the rear edge of the passenger's door. Be sure that this label is not removed from outside your vehicle. This code will help you ever need to order parts. It...
...'s side. You can see it if you look through the windshield from the vehicle. 6-59 On this label on the inside of the rear edge of the passenger's door. Be sure that this label is not removed from outside your vehicle. This code will help you ever need to order parts. It...
Owner's Manual
Page 315
... Amplifier Crank Circuit Fuse, Park/Neutral Switch, Starter Enable Relay License Plate Lamp, Taillamps, Parking Lamps, Ashtray Lamp, Panel Lights, Trailer Taillamps, Front and Rear Sidemarker Lamps, Door Switch Illumination, Headlamp Switch Illumination, Rear Seat Audio Illumination, TBC Module Air Bag System Not Used Fuse/Circuit Breaker 12 Usage L, M1, M2 Blower Motor...
... Amplifier Crank Circuit Fuse, Park/Neutral Switch, Starter Enable Relay License Plate Lamp, Taillamps, Parking Lamps, Ashtray Lamp, Panel Lights, Trailer Taillamps, Front and Rear Sidemarker Lamps, Door Switch Illumination, Headlamp Switch Illumination, Rear Seat Audio Illumination, TBC Module Air Bag System Not Used Fuse/Circuit Breaker 12 Usage L, M1, M2 Blower Motor...


