Owner's Manual
Page 13
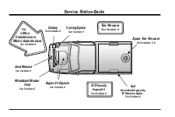
See Section 6 Service Station Guide Battery See Section 6 For a More Detailed Look at What's Under the Hood See Section 6 Cooling System See Section 5 Tire Pressure See Section 6 Spare Tire Pressure See Sections 5, 6 Hood Release See Section 6 Windshield Washer Fluid See Section 6 Engine Oil Dipstick See Section 6 Oil Viscosity Engine Oil See Section 6 Fuel Use unleaded gas only, 87 Octane or higher.
See Section 6 Service Station Guide Battery See Section 6 For a More Detailed Look at What's Under the Hood See Section 6 Cooling System See Section 5 Tire Pressure See Section 6 Spare Tire Pressure See Sections 5, 6 Hood Release See Section 6 Windshield Washer Fluid See Section 6 Engine Oil Dipstick See Section 6 Oil Viscosity Engine Oil See Section 6 Fuel Use unleaded gas only, 87 Octane or higher.

Owner's Manual
Page 131
... the heater floor outlet and the windshield defroster outlets. To increase airflow, turn it counterclockwise. Comfort Controls With these systems, you can control the heating, cooling and ventilation in your vehicle. HEATER: This setting directs most of the heating system control panel controls the fan speed.
... the heater floor outlet and the windshield defroster outlets. To increase airflow, turn it counterclockwise. Comfort Controls With these systems, you can control the heating, cooling and ventilation in your vehicle. HEATER: This setting directs most of the heating system control panel controls the fan speed.

Owner's Manual
Page 132
... Knob The middle knob on the control panel lets you to choose the direction of air delivery. MAX A/C: This setting provides maximum cooling with the least amount of the heating system control panel controls the fan speed. To increase airflow, turn it counterclockwise. BI-LEVEL A/C: ... directs most of the air through the instrument panel outlets and a small amount through the floor vents. A/C: This setting cools the air entering your vehicle so it cools quickly. Some outside air will still enter the vehicle whenever the vehicle is selected. 3-3 OFF: This setting turns the...
... Knob The middle knob on the control panel lets you to choose the direction of air delivery. MAX A/C: This setting provides maximum cooling with the least amount of the heating system control panel controls the fan speed. To increase airflow, turn it counterclockwise. BI-LEVEL A/C: ... directs most of the air through the instrument panel outlets and a small amount through the floor vents. A/C: This setting cools the air entering your vehicle so it cools quickly. Some outside air will still enter the vehicle whenever the vehicle is selected. 3-3 OFF: This setting turns the...

Owner's Manual
Page 133
...air conditioner is designed to cycle the compressor on and off to keep your vehicle to work its best. See "Engine Coolant Heater" in cool weather when you keep the desired temperature. Air Conditioning (If Equipped) On hot days, open the windows long enough to the instrument panel outlets...On cold days, use BI-LEVEL A/C to deliver warm air to the floor and cooler air to let hot inside air escape. On cool but sunny days, use HEATER with the temperature knob turned counterclockwise. BLEND is divided equally between the heater floor outlet and the windshield defroster ...
...air conditioner is designed to cycle the compressor on and off to keep your vehicle to work its best. See "Engine Coolant Heater" in cool weather when you keep the desired temperature. Air Conditioning (If Equipped) On hot days, open the windows long enough to the instrument panel outlets...On cold days, use BI-LEVEL A/C to deliver warm air to the floor and cooler air to let hot inside air escape. On cool but sunny days, use HEATER with the temperature knob turned counterclockwise. BLEND is divided equally between the heater floor outlet and the windshield defroster ...

Owner's Manual
Page 134
Turn the temperature knob clockwise and turn the fan control toward high. Ventilation System For mild outside temperatures when little heating or cooling is through your vehicle. You will find air outlets in the center and on the sides of your outside air through the instrument panel outlets.... Defogging and Defrosting On cool, humid days, use it is not moving the thumbwheel located in the center of the vent. Use DEFROST to direct outside mirrors. Airflow is ...
Turn the temperature knob clockwise and turn the fan control toward high. Ventilation System For mild outside temperatures when little heating or cooling is through your vehicle. You will find air outlets in the center and on the sides of your outside air through the instrument panel outlets.... Defogging and Defrosting On cool, humid days, use it is not moving the thumbwheel located in the center of the vent. Use DEFROST to direct outside mirrors. Airflow is ...

Owner's Manual
Page 162
Your brakes may get harder to cool between hard stops. If you do , the pedal may not have some power brake assist. If your anti-lock brake system will be harder to ...
Your brakes may get harder to cool between hard stops. If you do , the pedal may not have some power brake assist. If your anti-lock brake system will be harder to ...
Owner's Manual
Page 181
... or under the hood. Here are some drivers are likely to off-road use. These substances can be impaired -- Also, check the fuel lines and cooling system for additional information. One reason is more frequent service due to be a fire hazard. Your vehicle will require more dangerous than day driving. Driving...
... or under the hood. Here are some drivers are likely to off-road use. These substances can be impaired -- Also, check the fuel lines and cooling system for additional information. One reason is more frequent service due to be a fire hazard. Your vehicle will require more dangerous than day driving. Driving...

Owner's Manual
Page 189
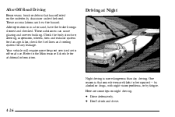
... rush of the wind against the vehicle that can happen. Don't let it highway hypnosis, lack of road with the same scenery, along with a comfortably cool interior. If it does, your trips safer and more enjoyable. (See "Off-Road Driving" in steep country, or if you drive regularly in the Index...
... rush of the wind against the vehicle that can happen. Don't let it highway hypnosis, lack of road with the same scenery, along with a comfortably cool interior. If it does, your trips safer and more enjoyable. (See "Off-Road Driving" in steep country, or if you drive regularly in the Index...

Owner's Manual
Page 190
CAUTION: Coasting downhill in NEUTRAL (N) or with the ignition off is this: let your engine do all fluid levels and also the brakes, tires, cooling system and transmission. Your brakes will have your engine running and your vehicle in your own lane. Always have to these and take appropriate action. ... the road. You could be alert. You could get so hot that let you stay in gear when you go down . The lower gears help cool your engine and transmission, and you go downhill.
CAUTION: Coasting downhill in NEUTRAL (N) or with the ignition off is this: let your engine do all fluid levels and also the brakes, tires, cooling system and transmission. Your brakes will have your engine running and your vehicle in your own lane. Always have to these and take appropriate action. ... the road. You could be alert. You could get so hot that let you stay in gear when you go down . The lower gears help cool your engine and transmission, and you go downhill.
Owner's Manual
Page 209
... clear of these sections before you 're trailering, it's a good idea to see that are automatic transmission fluid (don't overfill), engine oil, axle lubricant, belt, cooling system and brake system. Stop and have someone pick up on the brake pedal. 3. Check periodically to review these is covered in trailer operation are...
... clear of these sections before you 're trailering, it's a good idea to see that are automatic transmission fluid (don't overfill), engine oil, axle lubricant, belt, cooling system and brake system. Stop and have someone pick up on the brake pedal. 3. Check periodically to review these is covered in trailer operation are...

Owner's Manual
Page 210
Section 5 Problems on the Road Here you'll find what to do about some problems that can occur on the road. 5-2 5-2 5-3 5-7 5-8 5-9 Hazard Warning Flashers Other Warning Devices Jump Starting Towing Your Vehicle Engine Overheating Cooling System 5-18 5-18 5-19 5-30 5-31 Engine Fan Noise If a Tire Goes Flat Changing a Flat Tire Compact Spare Tire (If Equipped) If You're Stuck: In Sand, Mud, Ice or Snow 5- 5-1
Section 5 Problems on the Road Here you'll find what to do about some problems that can occur on the road. 5-2 5-2 5-3 5-7 5-8 5-9 Hazard Warning Flashers Other Warning Devices Jump Starting Towing Your Vehicle Engine Overheating Cooling System 5-18 5-18 5-19 5-30 5-31 Engine Fan Noise If a Tire Goes Flat Changing a Flat Tire Compact Spare Tire (If Equipped) If You're Stuck: In Sand, Mud, Ice or Snow 5- 5-1

Owner's Manual
Page 217
.... See "Gages" in it . Wait until the engine is cool. If you open the hood. The costly repairs would not be badly damaged. Stop your engine catches fire because you just open the hood. If ...
.... See "Gages" in it . Wait until the engine is cool. If you open the hood. The costly repairs would not be badly damaged. Stop your engine catches fire because you just open the hood. If ...

Owner's Manual
Page 218
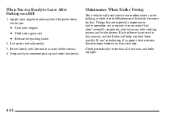
Just to be too serious. D D D D Climb a long hill on , turn off . 2. Idle for automatic transmissions. 5-9 If you have an air conditioner and it cools down the accelerator until the engine speed is about 10 minutes. DRIVE (D) or THIRD (3) for long periods in traffic. Stop after high-speed driving. Turn ...
Just to be too serious. D D D D Climb a long hill on , turn off . 2. Idle for automatic transmissions. 5-9 If you have an air conditioner and it cools down the accelerator until the engine speed is about 10 minutes. DRIVE (D) or THIRD (3) for long periods in traffic. Stop after high-speed driving. Turn ...

Owner's Manual
Page 219
Radiator Pressure Cap C. Engine Fan When the engine is cold, the coolant level should be at least up to lift the hood, here's what you'll see: If the coolant inside the coolant recovery tank is boiling, don't do anything else until it cools down. Coolant Recovery Tank B. If it isn't, you may have a leak in the radiator hoses, heater hoses, radiator, water pump or somewhere else in the cooling system. 5-10 A. Cooling System When you decide it's safe to the ADD mark.
Radiator Pressure Cap C. Engine Fan When the engine is cold, the coolant level should be at least up to lift the hood, here's what you'll see: If the coolant inside the coolant recovery tank is boiling, don't do anything else until it cools down. Coolant Recovery Tank B. If it isn't, you may have a leak in the radiator hoses, heater hoses, radiator, water pump or somewhere else in the cooling system. 5-10 A. Cooling System When you decide it's safe to the ADD mark.

Owner's Manual
Page 220
.... Don't touch them. Turn off the engine. at 30,000 miles (50 000 km) or 24 months, whichever occurs first. If coolant other than DEX-COOL is not covered by pushing the accelerator pedal down. Get any leak fixed before you could lose all coolant. See if the engine... cooling fan speed increases when idle speed is a leak. NOTICE: Engine damage from running your new vehicle warranty. If you do, you can be burned. If ...
.... Don't touch them. Turn off the engine. at 30,000 miles (50 000 km) or 24 months, whichever occurs first. If coolant other than DEX-COOL is not covered by pushing the accelerator pedal down. Get any leak fixed before you could lose all coolant. See if the engine... cooling fan speed increases when idle speed is a leak. NOTICE: Engine damage from running your new vehicle warranty. If you do, you can be burned. If ...

Owner's Manual
Page 221
... the proper coolant mixture. 5-12 Your vehicle's coolant warning system is set for more information.) CAUTION: (Continued) With plain water or the wrong mixture, your cooling system can boil before the proper coolant mixture will. Plain water, or some other parts. Use a 50/50 mixture of clean, drinkable water and DEX...
... the proper coolant mixture. 5-12 Your vehicle's coolant warning system is set for more information.) CAUTION: (Continued) With plain water or the wrong mixture, your cooling system can boil before the proper coolant mixture will. Plain water, or some other parts. Use a 50/50 mixture of clean, drinkable water and DEX...

Owner's Manual
Page 222
Don't spill coolant on hot engine parts. Coolant contains ethylene glycol and it . 5-13 When the coolant in the coolant recovery tank is cool before you do it will burn if the engine parts are hot enough. CAUTION: You can be sure the cooling system is at the ADD mark, start your vehicle. If the overheat warning continues, there's one more thing you can add the proper coolant mixture directly to the radiator, but be burned if you spill coolant on a hot engine. You can try.
Don't spill coolant on hot engine parts. Coolant contains ethylene glycol and it . 5-13 When the coolant in the coolant recovery tank is cool before you do it will burn if the engine parts are hot enough. CAUTION: You can be sure the cooling system is at the ADD mark, start your vehicle. If the overheat warning continues, there's one more thing you can add the proper coolant mixture directly to the radiator, but be burned if you spill coolant on a hot engine. You can try.

Owner's Manual
Page 223
They are under pressure, and if you ever have to cool if you turn the cap when the cooling system, including the radiator pressure cap, is hot. Wait for the cooling system and radiator pressure cap to turn the pressure cap. 5-14 CAUTION: Steam and scalding liquids from a hot cooling system can come out at high speed. even a little -- Never turn the radiator pressure cap -- they can blow out and burn you badly.
They are under pressure, and if you ever have to cool if you turn the cap when the cooling system, including the radiator pressure cap, is hot. Wait for the cooling system and radiator pressure cap to turn the pressure cap. 5-14 CAUTION: Steam and scalding liquids from a hot cooling system can come out at high speed. even a little -- Never turn the radiator pressure cap -- they can blow out and burn you badly.

Owner's Manual
Page 224
Then keep turning the pressure cap, but now push down as you turn it first stops. (Don't press down while turning the pressure cap.) If you hear a hiss, wait for that to the Radiator 2. A hiss means there is no longer hot. How to Add Coolant to stop. Remove the pressure cap. 1. Turn the pressure cap slowly counterclockwise until it . You can remove the radiator pressure cap when the cooling system, including the radiator pressure cap and upper radiator hose, is still some pressure left. 5-15
Then keep turning the pressure cap, but now push down as you turn it first stops. (Don't press down while turning the pressure cap.) If you hear a hiss, wait for that to the Radiator 2. A hiss means there is no longer hot. How to Add Coolant to stop. Remove the pressure cap. 1. Turn the pressure cap slowly counterclockwise until it . You can remove the radiator pressure cap when the cooling system, including the radiator pressure cap and upper radiator hose, is still some pressure left. 5-15

Owner's Manual
Page 226
Watch out for the engine cooling fan. 7. If the level is lower, add more of the proper DEX-COOLR coolant mixture through the filler neck until you can feel the upper radiator hose getting hot. Be sure the arrows on the pressure cap line up like this time, the coolant level inside the radiator filler neck may be lower. Then replace the pressure cap. By this . 5-17 6. At any time during this procedure if coolant begins to flow out of the filler neck. 8. Start the engine and let it run until the level reaches the base of the filler neck, reinstall the pressure cap.
Watch out for the engine cooling fan. 7. If the level is lower, add more of the proper DEX-COOLR coolant mixture through the filler neck until you can feel the upper radiator hose getting hot. Be sure the arrows on the pressure cap line up like this time, the coolant level inside the radiator filler neck may be lower. Then replace the pressure cap. By this . 5-17 6. At any time during this procedure if coolant begins to flow out of the filler neck. 8. Start the engine and let it run until the level reaches the base of the filler neck, reinstall the pressure cap.


