

Owner's Manual
Page 14
...: You can adjust it with your body, slide the seat to where you want to adjust a manual driver's seat while the vehicle is not moving . Lift the lever at the front of the seat. If your vehicle has a manual bucket or split bench seat, you try to move the seat with...
...: You can adjust it with your body, slide the seat to where you want to adjust a manual driver's seat while the vehicle is not moving . Lift the lever at the front of the seat. If your vehicle has a manual bucket or split bench seat, you try to move the seat with...
Owner's Manual
Page 18
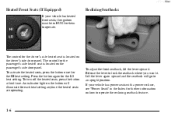
... located on the driver's side door panel. The control for the LO heat setting. Release the lever to operate the reclining seatback feature. 1-6 Lift the lever again upward and the seatback will illuminate for them to an upright position. Reclining Seatbacks The control for the HI heat setting. To... turn off the heated seats, press the button a third time. To adjust the front seatback, lift the lever upward. To activate the heated seats, press the button once for the driver's side heated seat is located on the passenger's side door...
... located on the driver's side door panel. The control for the LO heat setting. Release the lever to operate the reclining seatback feature. 1-6 Lift the lever again upward and the seatback will illuminate for them to an upright position. Reclining Seatbacks The control for the HI heat setting. To... turn off the heated seats, press the button a third time. To adjust the front seatback, lift the lever upward. To activate the heated seats, press the button once for the driver's side heated seat is located on the passenger's side door...

Owner's Manual
Page 88
... on the inside , the front door must be sure it latches securely. 2-10 To remove the tailgate: 1. To release the retaining cable clips, lift the cable so it latches. To shut the tailgate, firmly push it upward until it points straight out and push the cable clip forward. Tailgate...allow for different loading situations. yellowblue To open a rear access door from the inside of the rear access door to open the tailgate by lifting up , pull it back towards you to be opened first. Raise the tailgate slightly and release both retaining cable clips. Although the tailgate can...
... on the inside , the front door must be sure it latches securely. 2-10 To remove the tailgate: 1. To release the retaining cable clips, lift the cable so it latches. To shut the tailgate, firmly push it upward until it points straight out and push the cable clip forward. Tailgate...allow for different loading situations. yellowblue To open a rear access door from the inside of the rear access door to open the tailgate by lifting up , pull it back towards you to be opened first. Raise the tailgate slightly and release both retaining cable clips. Although the tailgate can...

Owner's Manual
Page 275
... or posted speeds. The distance is unlimited. 5-8 D Always secure the vehicle on each side with separate safety chains when towing it has been lifted by the tow truck. With current trends in a vehicle that the correct towing equipment is used to tow a vehicle. NOTICE: Use the proper... can be towed with damaged parts not fully secured. D Use only the correct hooks. D Never tow with wheel lift equipment or car carrier equipment. Two-Wheel-Drive vehicle towing limits for wheel lift equipment are as follows: D Front Towing -- 35 mph (55 km/h) for 50 miles (80 km) D Rear...
... or posted speeds. The distance is unlimited. 5-8 D Always secure the vehicle on each side with separate safety chains when towing it has been lifted by the tow truck. With current trends in a vehicle that the correct towing equipment is used to tow a vehicle. NOTICE: Use the proper... can be towed with damaged parts not fully secured. D Use only the correct hooks. D Never tow with wheel lift equipment or car carrier equipment. Two-Wheel-Drive vehicle towing limits for wheel lift equipment are as follows: D Front Towing -- 35 mph (55 km/h) for 50 miles (80 km) D Rear...
Owner's Manual
Page 276
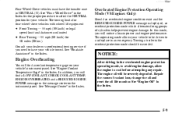
... in power and engine performance. yellowblue Four-Wheel-Drive vehicles must have your vehicle towed. The towing limits for four-wheel-drive vehicles with wheel lift equipment: Overheated Engine Protection Operating Mode (V8 Engines Only) Should an overheated engine condition exist and the REDUCED ENGINE POWER message is unlimited D Rear Towing...
... in power and engine performance. yellowblue Four-Wheel-Drive vehicles must have your vehicle towed. The towing limits for four-wheel-drive vehicles with wheel lift equipment: Overheated Engine Protection Operating Mode (V8 Engines Only) Should an overheated engine condition exist and the REDUCED ENGINE POWER message is unlimited D Rear Towing...
Owner's Manual
Page 278
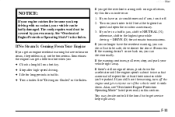
... can drive normally. yellowblue If you get the overheat warning with no coolant, your warranty. If you no steam, the problem may decide not to lift the hood but see "Overheated Engine Protection Operating Mode" listed previously in the Index. 5-11 Tow a trailer. Also, see or hear no longer have the...
... can drive normally. yellowblue If you get the overheat warning with no coolant, your warranty. If you no steam, the problem may decide not to lift the hood but see "Overheated Engine Protection Operating Mode" listed previously in the Index. 5-11 Tow a trailer. Also, see or hear no longer have the...
Owner's Manual
Page 279
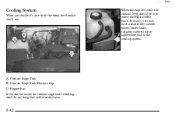
A. Engine Fan If the coolant inside the coolant surge tank is cold, the coolant level should be at or above the FILL COLD mark. Coolant Surge Tank Pressure Cap C. If it cools down. 5-12 Coolant Surge Tank B. yellowblue Cooling System When you decide it's safe to lift the hood, here's what you'll see: When the engine is boiling, don't do anything else until it isn't, you may have a leak in the radiator hoses, heater hoses, radiator, water pump or somewhere else in the cooling system.
A. Engine Fan If the coolant inside the coolant surge tank is cold, the coolant level should be at or above the FILL COLD mark. Coolant Surge Tank Pressure Cap C. If it cools down. 5-12 Coolant Surge Tank B. yellowblue Cooling System When you decide it's safe to lift the hood, here's what you'll see: When the engine is boiling, don't do anything else until it isn't, you may have a leak in the radiator hoses, heater hoses, radiator, water pump or somewhere else in the cooling system.

Owner's Manual
Page 290
yellowblue Attach the wheel wrench to raise the jack lift head a little. 5-23 Turn the wheel wrench clockwise to the jack handle extensions (as needed). Attach the jack handle to the jack.
yellowblue Attach the wheel wrench to raise the jack lift head a little. 5-23 Turn the wheel wrench clockwise to the jack handle extensions (as needed). Attach the jack handle to the jack.
Owner's Manual
Page 292
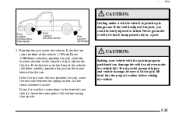
... the rear axle between the spring anchor and the shock absorber bracket. If you could be sure to the front of the vehicle (2-Wheel Drive 1500 Series vehicles), position the jack under the bracket attached to the vehicle's frame, behind the flat tire. yellowblue CAUTION: Getting under a vehicle when it is... the snow plow fully before raising the vehicle. 5-25 If the vehicle slips off the jack, you have added a snow plow to fit the jack lift head into the proper location before raising the vehicle.
... the rear axle between the spring anchor and the shock absorber bracket. If you could be sure to the front of the vehicle (2-Wheel Drive 1500 Series vehicles), position the jack under the bracket attached to the vehicle's frame, behind the flat tire. yellowblue CAUTION: Getting under a vehicle when it is... the snow plow fully before raising the vehicle. 5-25 If the vehicle slips off the jack, you have added a snow plow to fit the jack lift head into the proper location before raising the vehicle.

Owner's Manual
Page 312
Lift the hood. Pull down the hood and close it firmly. 6-9 Before closing the hood, be sure all filler caps are on the secondary hood release, located just to the front of the grill. Then go to the passenger's side of the center of the vehicle and pull up on properly. yellowblue Hood Release To open the hood, first pull the handle inside the vehicle.
Lift the hood. Pull down the hood and close it firmly. 6-9 Before closing the hood, be sure all filler caps are on the secondary hood release, located just to the front of the grill. Then go to the passenger's side of the center of the vehicle and pull up on properly. yellowblue Hood Release To open the hood, first pull the handle inside the vehicle.
Owner's Manual
Page 313
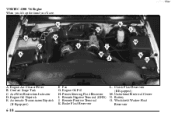
G. K. Underhood Electrical Center N. C. J. B. Clutch Fluid Reservoir (If Equipped) M. I. Fan Engine Oil Fill Power Steering Fluid Reservoir Remote Negative Terminal (GND) Remote Positive Terminal Brake Fluid Reservoir L. Windshield Washer Fluid Reservoir 6-10 H. D. Engine Air Cleaner/Filter Coolant Surge Tank Air Filter Restriction Indicator Engine Oil Dipstick Automatic Transmission Dipstick (If Equipped) F. yellowblue VORTEC 4300 V6 Engine When you lift up the hood you'll see: A. Battery O. E.
G. K. Underhood Electrical Center N. C. J. B. Clutch Fluid Reservoir (If Equipped) M. I. Fan Engine Oil Fill Power Steering Fluid Reservoir Remote Negative Terminal (GND) Remote Positive Terminal Brake Fluid Reservoir L. Windshield Washer Fluid Reservoir 6-10 H. D. Engine Air Cleaner/Filter Coolant Surge Tank Air Filter Restriction Indicator Engine Oil Dipstick Automatic Transmission Dipstick (If Equipped) F. yellowblue VORTEC 4300 V6 Engine When you lift up the hood you'll see: A. Battery O. E.

Owner's Manual
Page 320
... cover. See "Owner Checks and Services" in the passenger's side front corner of the air cleaner housing. Lift the filter out of the engine compartment. 1. Care should be taken to replace the air filter. Lift the cover upward. Refer to the Maintenance Schedule to determine when to dislodge as little dirt as...
... cover. See "Owner Checks and Services" in the passenger's side front corner of the air cleaner housing. Lift the filter out of the engine compartment. 1. Care should be taken to replace the air filter. Lift the cover upward. Refer to the Maintenance Schedule to determine when to dislodge as little dirt as...

Owner's Manual
Page 344
The cargo lamp is removed by turning the socket counterclockwise and pulling the bulb straight out. 6-41 Cargo Lamps B. The CHMSL bulb is removed by pulling the bulb straight out from the housing by pressing the release tabs. 3. yellowblue Center High-Mounted Stoplamp (CHMSL) and Cargo Lamp 1. Remove the CHMSL bulb holder back plate from the holder back plate. Center High-Mounted Stoplamps 2. A. Remove the screws and lift off the lamp assembly.
The cargo lamp is removed by turning the socket counterclockwise and pulling the bulb straight out. 6-41 Cargo Lamps B. The CHMSL bulb is removed by pulling the bulb straight out from the housing by pressing the release tabs. 3. yellowblue Center High-Mounted Stoplamp (CHMSL) and Cargo Lamp 1. Remove the CHMSL bulb holder back plate from the holder back plate. Center High-Mounted Stoplamps 2. A. Remove the screws and lift off the lamp assembly.
Owner's Manual
Page 347
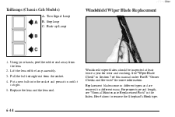
... it is tight. 5. Turn Signal Lamp B. Replace the lens and the lens seal. Replacement blades come in different types and are removed in the Index. Lift the lens off the lamp assembly. 3. For proper type and length, see "Normal Maintenance Replacement Parts" in different ways. Stoplamp C. Windshield wiper blades should be...
... it is tight. 5. Turn Signal Lamp B. Replace the lens and the lens seal. Replacement blades come in different types and are removed in the Index. Lift the lens off the lamp assembly. 3. For proper type and length, see "Normal Maintenance Replacement Parts" in different ways. Stoplamp C. Windshield wiper blades should be...
Owner's Manual
Page 348
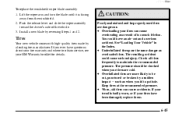
.... Tires Your new vehicle comes with high-quality tires made by reversing Steps 1 and 2. Tire pressure should be cut, punctured or broken by a sudden impact -- Lift the wiper arm and turn the blade until it is badly worn, or if your GM Warranty booklet for details. 6-45 D Overloading your tires are...
.... Tires Your new vehicle comes with high-quality tires made by reversing Steps 1 and 2. Tire pressure should be cut, punctured or broken by a sudden impact -- Lift the wiper arm and turn the blade until it is badly worn, or if your GM Warranty booklet for details. 6-45 D Overloading your tires are...

Owner's Manual
Page 370
Lift the cover for access to the fuse/relay block. The fuse extractor is located on the driver's side of the fuse between your thumb and index finger and pull straight out. 6-67 To remove fuses if you don't have a fuse extractor, hold the end of the engine compartment near the battery. yellowblue Underhood Electrical Center The underhood electrical center is located in the underhood electrical center. You can remove fuses with a fuse extractor.
Lift the cover for access to the fuse/relay block. The fuse extractor is located on the driver's side of the fuse between your thumb and index finger and pull straight out. 6-67 To remove fuses if you don't have a fuse extractor, hold the end of the engine compartment near the battery. yellowblue Underhood Electrical Center The underhood electrical center is located in the underhood electrical center. You can remove fuses with a fuse extractor.

Owner's Manual
Page 413
...) users, call 1-800-263-3830. When calling from the date of vehicle purchase/lease. All Overseas Locations GMODC - See your vehicle (hand controls, wheelchair/scooter lifts, etc.). yellowblue Canada General Motors of Canada Limited Customer Communication Centre, 163-005 1908 Colonel Sam Drive Oshawa, Ontario L1H 8P7 1-800-263-3777 (English...
...) users, call 1-800-263-3830. When calling from the date of vehicle purchase/lease. All Overseas Locations GMODC - See your vehicle (hand controls, wheelchair/scooter lifts, etc.). yellowblue Canada General Motors of Canada Limited Customer Communication Centre, 163-005 1908 Colonel Sam Drive Oshawa, Ontario L1H 8P7 1-800-263-3777 (English...

