
Owner's Manual
Page 9
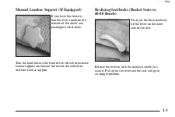
Release the lever to increase lumbar support and toward the front of the vehicle to lock the seatback where you have this feature, there will go to decrease lumbar support. Pull up on the lever and the seat will be a knob on the outer side of the vehicle to an upright position. 1-3 yellowblue Manual Lumbar Support (If Equipped) If you want it. Turn the knob toward the rear of the seat. Reclining Seatbacks (Bucket Seats or 60/40 Bench) To adjust the front seatback, lift the lever on the outside of the driver and passenger bucket seats.
Release the lever to increase lumbar support and toward the front of the vehicle to lock the seatback where you have this feature, there will go to decrease lumbar support. Pull up on the lever and the seat will be a knob on the outer side of the vehicle to an upright position. 1-3 yellowblue Manual Lumbar Support (If Equipped) If you want it. Turn the knob toward the rear of the seat. Reclining Seatbacks (Bucket Seats or 60/40 Bench) To adjust the front seatback, lift the lever on the outside of the driver and passenger bucket seats.

Owner's Manual
Page 101
... entry transmitter to unlock the vehicle, the interior lights will stay on . Illuminated Entry Your vehicle is in the switch when the fog lamps are lifted and released, the lamps will come on if the DOME OVERRIDE button is on the instrument panel under the lamps switch. yellowblue Fog Lamps (If...
... entry transmitter to unlock the vehicle, the interior lights will stay on . Illuminated Entry Your vehicle is in the switch when the fog lamps are lifted and released, the lamps will come on if the DOME OVERRIDE button is on the instrument panel under the lamps switch. yellowblue Fog Lamps (If...

Owner's Manual
Page 104
... and lower the door. When you operate the heated mirror button on each door. 2-46 Check your inside mirror or glance over your glove box, lift the lever on the front of ice, snow or condensation. The glove box should not be equipped with heated outside rearview mirrors. yellowblue Convex Outside...
... and lower the door. When you operate the heated mirror button on each door. 2-46 Check your inside mirror or glance over your glove box, lift the lever on the front of ice, snow or condensation. The glove box should not be equipped with heated outside rearview mirrors. yellowblue Convex Outside...
Owner's Manual
Page 105
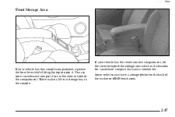
You can store cassettes and compact discs in the slots in the console. yellowblue Front Storage Area If your vehicle has the center armrest compartment, lift the cover to open it. There is also a lift-out storage tray in front of the bucket or 60/40 bench seats. 2-47 Some vehicles may have a storage pocket on the back of the compartment. If your vehicle has this console compartment, squeeze the front lever while lifting the top to expose the storage area which includes slots for cassettes or compact discs and a coinholder.
You can store cassettes and compact discs in the slots in the console. yellowblue Front Storage Area If your vehicle has the center armrest compartment, lift the cover to open it. There is also a lift-out storage tray in front of the bucket or 60/40 bench seats. 2-47 Some vehicles may have a storage pocket on the back of the compartment. If your vehicle has this console compartment, squeeze the front lever while lifting the top to expose the storage area which includes slots for cassettes or compact discs and a coinholder.
Owner's Manual
Page 106
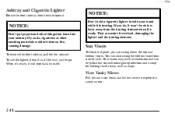
.... Visor Vanity Mirror Pull the sun visor down to open it is heating. yellowblue Ashtray and Cigarette Lighter Rotate the front ashtray door down and lift the cover to expose the vanity mirror. 2-48 NOTICE: Don't put papers and other smoking materials could set them on fire, causing damage. When it...
.... Visor Vanity Mirror Pull the sun visor down to open it is heating. yellowblue Ashtray and Cigarette Lighter Rotate the front ashtray door down and lift the cover to expose the vanity mirror. 2-48 NOTICE: Don't put papers and other smoking materials could set them on fire, causing damage. When it...
Owner's Manual
Page 107
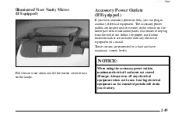
... center of the vehicle on the lower part of the instrument panel. Leaving electrical equipment on the lamps. NOTICE: Pull the sun visor down and lift the mirror cover to turn off any electrical equipment you install. The accessory power outlets are protected by a fuse and have accessory power outlets, you...
... center of the vehicle on the lower part of the instrument panel. Leaving electrical equipment on the lamps. NOTICE: Pull the sun visor down and lift the mirror cover to turn off any electrical equipment you install. The accessory power outlets are protected by a fuse and have accessory power outlets, you...

Owner's Manual
Page 112
... be . For example, when the needle points to 2, it must be set the trip odometer to a higher gear, or lift your foot off the accelerator pedal. If you have an automatic transmission, lift your foot off the accelerator pedal. 2-54 If you have a manual transmission, shift to the mileage total of the...
... be . For example, when the needle points to 2, it must be set the trip odometer to a higher gear, or lift your foot off the accelerator pedal. If you have an automatic transmission, lift your foot off the accelerator pedal. 2-54 If you have a manual transmission, shift to the mileage total of the...

Owner's Manual
Page 211
yellowblue Towing Your Vehicle CAUTION: To help avoid serious personal injury to you or others: D Never let passengers ride in a vehicle that is being towed. D Never tow with separate safety chains when towing it has been lifted by the tow truck. Heavy Metal Engine Part B. D Never get under your vehicle after it . Dead Battery 5-7 Good Battery C. D Never tow faster than safe or posted speeds. D Use only the correct hooks. A. D Always secure the vehicle on each side with damaged parts not fully secured.
yellowblue Towing Your Vehicle CAUTION: To help avoid serious personal injury to you or others: D Never let passengers ride in a vehicle that is being towed. D Never tow with separate safety chains when towing it has been lifted by the tow truck. Heavy Metal Engine Part B. D Never get under your vehicle after it . Dead Battery 5-7 Good Battery C. D Never tow faster than safe or posted speeds. D Use only the correct hooks. A. D Always secure the vehicle on each side with damaged parts not fully secured.

Owner's Manual
Page 212
... miles (80 km) When towing four-wheel-drive vehicles with the electronic shift transfer case with wheel lift equipment, a towing dolly must abide by the following tow limits when being towed by wheel lift equipment: NOTICE: Use the proper towing equipment to avoid damage to the bumper, fascia or fog lamp... areas of the vehicle. Vehicles equipped with wheel lift or car carrier equipment. Two-wheel-drive vehicles must be placed on a towing dolly D Towing from the front -- 35 mph (55 km/h), 50 miles ...
... miles (80 km) When towing four-wheel-drive vehicles with the electronic shift transfer case with wheel lift equipment, a towing dolly must abide by the following tow limits when being towed by wheel lift equipment: NOTICE: Use the proper towing equipment to avoid damage to the bumper, fascia or fog lamp... areas of the vehicle. Vehicles equipped with wheel lift or car carrier equipment. Two-wheel-drive vehicles must be placed on a towing dolly D Towing from the front -- 35 mph (55 km/h), 50 miles ...
Owner's Manual
Page 214
... warranty. 2. If you keep driving with no steam, the problem may not be safe, drive slower for about twice as fast as necessary. 3. Just to lift the hood but see or hear no sign of steam, push down the accelerator until it off the engine and get everyone out of the...
... warranty. 2. If you keep driving with no steam, the problem may not be safe, drive slower for about twice as fast as necessary. 3. Just to lift the hood but see or hear no sign of steam, push down the accelerator until it off the engine and get everyone out of the...
Owner's Manual
Page 215
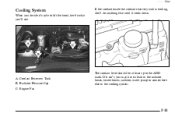
yellowblue Cooling System When you may have a leak in the radiator hoses, heater hoses, radiator, water pump or somewhere else in the cooling system. 5-11 Radiator Pressure Cap C. If it cools down. Coolant Recovery Tank B. Engine Fan The coolant level should be at least up to lift the hood, here's what you'll see: If the coolant inside the coolant recovery tank is boiling, don't do anything else until it isn't, you decide it's safe to the ADD mark. A.
yellowblue Cooling System When you may have a leak in the radiator hoses, heater hoses, radiator, water pump or somewhere else in the cooling system. 5-11 Radiator Pressure Cap C. If it cools down. Coolant Recovery Tank B. Engine Fan The coolant level should be at least up to lift the hood, here's what you'll see: If the coolant inside the coolant recovery tank is boiling, don't do anything else until it isn't, you decide it's safe to the ADD mark. A.

Owner's Manual
Page 228
Using the wheel wrench, loosen all the wheel nuts. Don't remove them yet. 2. Turn the jack handle clockwise slightly to raise the jack lift head. 3. Fit the jack into the appropriate hole nearest the flat tire. Spring Hanger Hole (Standard Pickups) 5-24 Front Frame Hole B. Rear Frame Hole (ZR2) 1. C. yellowblue Removing the Flat Tire and Installing the Spare Tire A.
Using the wheel wrench, loosen all the wheel nuts. Don't remove them yet. 2. Turn the jack handle clockwise slightly to raise the jack lift head. 3. Fit the jack into the appropriate hole nearest the flat tire. Spring Hanger Hole (Standard Pickups) 5-24 Front Frame Hole B. Rear Frame Hole (ZR2) 1. C. yellowblue Removing the Flat Tire and Installing the Spare Tire A.

Owner's Manual
Page 229
... the jack, you could be sure to fit. 5. Never get under a vehicle when it is enough room for the spare tire to fit the jack lift head into the proper location before raising the vehicle. 4. Raise the vehicle far enough off the flat tire. 5-25
... the jack, you could be sure to fit. 5. Never get under a vehicle when it is enough room for the spare tire to fit the jack lift head into the proper location before raising the vehicle. 4. Raise the vehicle far enough off the flat tire. 5-25
Owner's Manual
Page 246
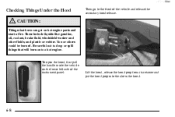
... panel. These include liquids like gasoline, oil, coolant, brake fluid, windshield washer and other fluids, and plastic or rubber. You or others could be burned. Lift the hood, release the hood prop from its retainer and put the hood prop into the slot in the hood. 6-8 yellowblue Checking Things Under the...
... panel. These include liquids like gasoline, oil, coolant, brake fluid, windshield washer and other fluids, and plastic or rubber. You or others could be burned. Lift the hood, release the hood prop from its retainer and put the hood prop into the slot in the hood. 6-8 yellowblue Checking Things Under the...
Owner's Manual
Page 247
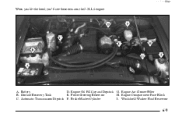
Coolant Recovery Tank E. Engine Oil Fill Cap and Dipstick G. Engine Compartment Fuse Block C. Automatic Transmission Dipstick F. yellowblue When you lift the hood, you'll see these items on the 2.2L L4 engine: A. Engine Air Cleaner/Filter B. Battery D. Power Steering Reservoir H. Brake Master Cylinder I. Windshield Washer Fluid Reservoir 6-9
Coolant Recovery Tank E. Engine Oil Fill Cap and Dipstick G. Engine Compartment Fuse Block C. Automatic Transmission Dipstick F. yellowblue When you lift the hood, you'll see these items on the 2.2L L4 engine: A. Engine Air Cleaner/Filter B. Battery D. Power Steering Reservoir H. Brake Master Cylinder I. Windshield Washer Fluid Reservoir 6-9
Owner's Manual
Page 248
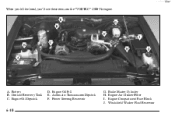
Brake Master Cylinder Engine Air Cleaner/Filter Engine Compartment Fuse Block Windshield Washer Fluid Reservoir 6-10 Battery B. J. Automatic Transmission Dipstick F. I. yellowblue When you lift the hood, you'll see these items on the "VORTEC" 4300 V6 engine: A. Engine Oil Dipstick D. Power Steering Reservoir G. Coolant Recovery Tank C. Engine Oil Fill E. H.
Brake Master Cylinder Engine Air Cleaner/Filter Engine Compartment Fuse Block Windshield Washer Fluid Reservoir 6-10 Battery B. J. Automatic Transmission Dipstick F. I. yellowblue When you lift the hood, you'll see these items on the "VORTEC" 4300 V6 engine: A. Engine Oil Dipstick D. Power Steering Reservoir G. Coolant Recovery Tank C. Engine Oil Fill E. H.

Owner's Manual
Page 249
... are on the hood. The oil dipstick on the 2.2L L4 engine is a yellow ring. yellowblue Before closing the hood, be on level ground. Then lift the hood to 30 cm) without pressing on properly. Remove the hood prop from 10 to 12 inches (25 to relieve pressure on the hood...
... are on the hood. The oil dipstick on the 2.2L L4 engine is a yellow ring. yellowblue Before closing the hood, be on level ground. Then lift the hood to 30 cm) without pressing on properly. Remove the hood prop from 10 to 12 inches (25 to relieve pressure on the hood...

Owner's Manual
Page 254
To remove either air cleaner, remove the wing nuts that hold the cover in place. 6-16 Insert a new air filter, then replace the air cleaner cover. 4. Tighten the wing nuts to hold the cover on. 2. yellowblue Engine Air Cleaner/Filter 2.2L L4 Engine "VORTEC" 4300 V6 Engine 1. Remove the cover and lift out the air filter. 3.
To remove either air cleaner, remove the wing nuts that hold the cover in place. 6-16 Insert a new air filter, then replace the air cleaner cover. 4. Tighten the wing nuts to hold the cover on. 2. yellowblue Engine Air Cleaner/Filter 2.2L L4 Engine "VORTEC" 4300 V6 Engine 1. Remove the cover and lift out the air filter. 3.

Owner's Manual
Page 274
Remove the black retainer clips by lifting up. 3. Put the headlamp assembly back into the headlamp assembly and turn it clockwise until it . 6. Turn the bulb assembly counterclockwise to remove it is tight. 2. Pull the headlamp assembly out. 4. Plug in the electrical connector. 8. Open the hood. 5. Unplug the electrical connector. 7. Put the new bulb assembly into the vehicle. yellowblue Headlamps One-Piece Composite Headlamp System 1. Install the two retaining clips. 6-36
Remove the black retainer clips by lifting up. 3. Put the headlamp assembly back into the headlamp assembly and turn it clockwise until it . 6. Turn the bulb assembly counterclockwise to remove it is tight. 2. Pull the headlamp assembly out. 4. Plug in the electrical connector. 8. Open the hood. 5. Unplug the electrical connector. 7. Put the new bulb assembly into the vehicle. yellowblue Headlamps One-Piece Composite Headlamp System 1. Install the two retaining clips. 6-36

Owner's Manual
Page 275
yellowblue Two-Piece Composite Headlamp System 1. Remove the black retainer clips by lifting up. 3. Unplug the electrical connector. 6. Pull the headlamp lens assembly out. 4. Put the new bulb assembly into the vehicle. Put the headlamp lens assembly back into the headlamp assembly and turn it clockwise until it . 2. Install the two retaining clips. 6-37 Turn the bulb assembly counterclockwise to remove it is tight. 7. Plug in the electrical connector. 8. Open the hood. 5.
yellowblue Two-Piece Composite Headlamp System 1. Remove the black retainer clips by lifting up. 3. Unplug the electrical connector. 6. Pull the headlamp lens assembly out. 4. Put the new bulb assembly into the vehicle. Put the headlamp lens assembly back into the headlamp assembly and turn it clockwise until it . 2. Install the two retaining clips. 6-37 Turn the bulb assembly counterclockwise to remove it is tight. 7. Plug in the electrical connector. 8. Open the hood. 5.